... Continued from Part I
Redemption in the Tetons
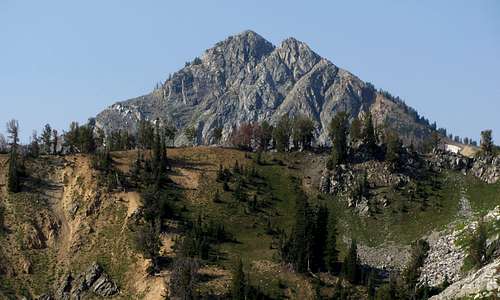
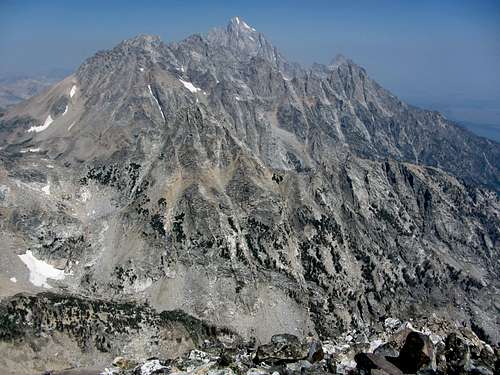
As if coming up short of the summit on Capitol Peak wasn’t bad enough, my hiking opportunities throughout the next two months were few and far between. We had only been on a few family hikes, and I still had not summited a big peak this summer. My uncle offered to let us stay at their cabin in Star Valley for a couple days though, and this meant I could try salvaging the hiking season with an attempt on a ridge similar to the one on Capitol, this time on Buck Mountain instead. Buck Mountain is one of the “Seven Summits of the Tetons”, but since the other nearby peaks get so much more attention it is relatively unknown (if it was in any other sub-range of the Rockies, it would garner a lot more attention), despite the fact that it sports two awesome non-technical routes: the class 3 East Face and class 4 East Ridge.
*NOTE* - For pictures in which I’ve drawn route lines, light blue = class 2, dark blue = class 3, purple = class 4, and red = class 5. I figured it might help, since there aren’t many other detailed trip reports for Buck Mountain.
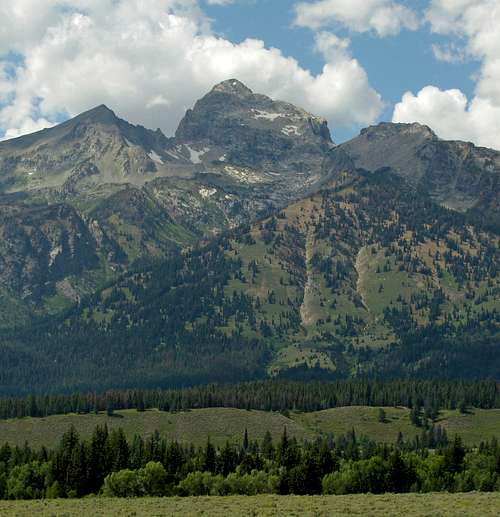
![Buck Mountain East Aspect]() Buck Mountain seen from the east ...
Buck Mountain seen from the east ...![Buck Mountain Northeast Aspect]() ... and the northeast.
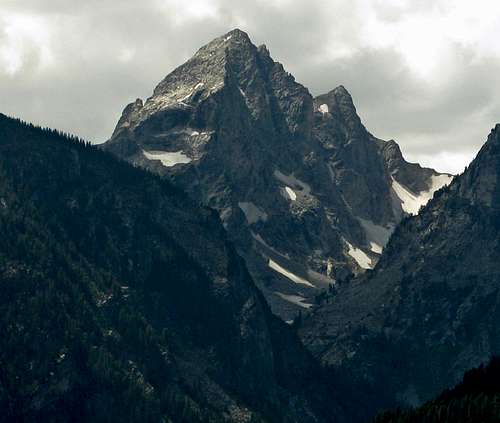
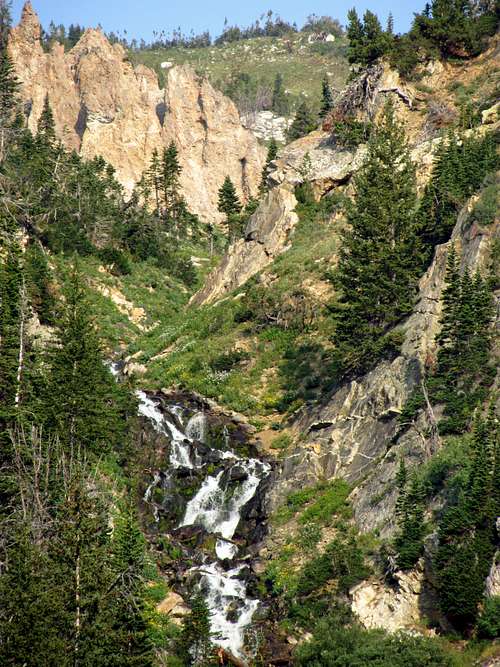
... and the northeast.![Death Canyon cliffs]() Death Canyon cliffs
Death Canyon cliffs![Boulder near stream crossing]() Boulder near stream crossing
Boulder near stream crossing
I went back and forth on whether we wanted to do the sure thing, and just go up and down the easier East Face, but the East Ridge looked more fun. A couple pictures I had seen in my Teton Rock Climbs digital guidebook made the route seem more technically difficult than the Knife Edge on Capitol Peak, so I had contacted some people who had already done the route to see how difficult it was (thanks for the feedback,
Tom Fralich and
Andinistaloco!). They said that the most difficult “knifey” parts of the ridge could be bypassed by traversing a few yards below on the south side, and there were also a couple bail points where we could go back over to the East Face if it proved too difficult. The scant information available online for this climb was in stark contrast to the information one can find for Capitol Peak, so Buck Mountain would offer a bit more adventure since we weren’t exactly sure what to expect. We would hike up to the gully and then choose which route to follow to the top depending on how we felt, and then descend back down the East Face.
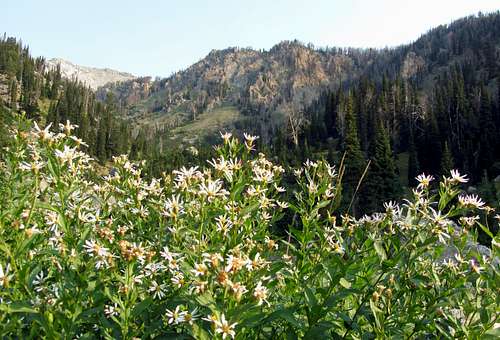
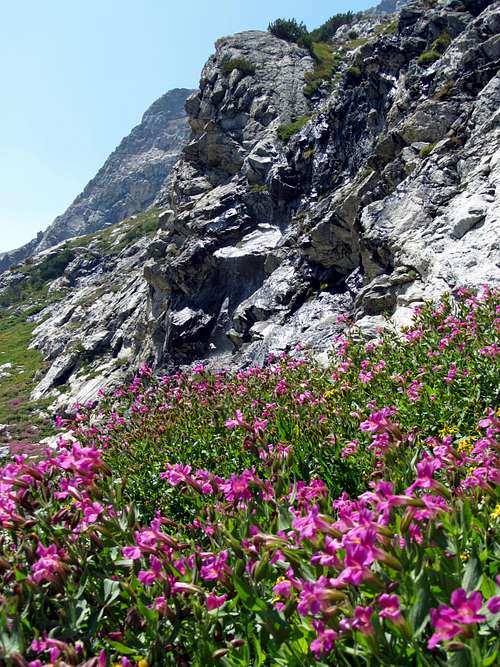
![Stewart Draw wildflowers]() Some wildflowers off-trail below Stewart Draw
Some wildflowers off-trail below Stewart Draw![Stewart Draw wildflowers & stream]() Yellow wildflowers
Yellow wildflowers![Stream crossing]() Stream crossing
Stream crossing
Since the cabin was farther from the Tetons, we didn’t make it to the Death Canyon trailhead until 7 am, but since this route was shorter than the one on Capitol Peak (especially, mileage-wise), an early start wasn’t as important. It would still end up being a long exhausting day, though. We expended a bit more energy than we would have liked at the beginning, since we missed the turnoff for the trail just before the third little footbridge, and ended up going all the way to the Phelps Lake overlook. This added almost an extra mile to our hike, as well as a couple hundred feet of elevation gain. On the way back down the trail, we kept our eyes glued to the northern side of the trail, and hidden between a couple trees this time we spotted the turnoff.
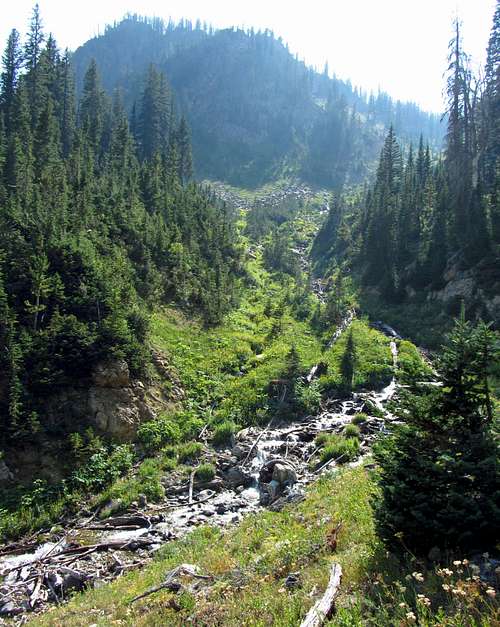
![Stewart Draw scenery]() Some views of the stream …
Some views of the stream …![Stewart Draw drainage]() … as we made our way up the trail.
… as we made our way up the trail.![Buck Mountain from Stewart Draw]() Buck Mountain over Stewart Draw
Buck Mountain over Stewart Draw
Before making it to the big meadow, we heard some loud crashing noises off in the trees about a couple hundred feet away, which prompted us to make sure we were talking loudly enough and each had our bear spray canisters within easy access just in case. The bushes off to the side of the trail through the meadow and forested section afterwards were a little overgrown, so I was glad to be wearing pants. We crossed several downed logs until we saw the stream coming down from Stewart Draw. There were some tree branches thrown over the stream in what looked like a makeshift crossing, but since the trail appeared to continue up the mountain on the left (south) side of the stream, we decided not to cross here. This is where we should have crossed (we ended up having to bushwhack along some game trails and finally back over across the stream in a different location, which took some extra time), which we discovered on our way back down later. Just to the right of the crossing on the way up (to the northeast) is a large house-sized boulder, which we missed since the trail description I had made it seem like that boulder would be found higher up in the lower draw.
![Stewart Draw]() Stewart Draw marks the end of the well-maintained trail …
Stewart Draw marks the end of the well-maintained trail …![Stewart Draw boulder field]() … and this is the path we took.
… and this is the path we took.
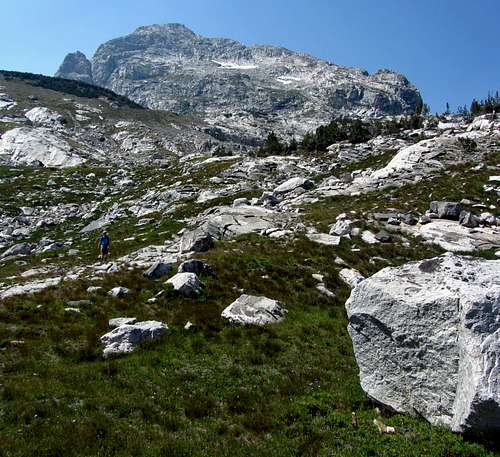
Despite the wrong turn, we did see some nice wildflower displays on the way up that we wouldn’t have seen from the main trail. We continued up, until we spotted a couple tents, whose three occupants would constitute the only other hikers we saw on the mountain the entire day. A little over two thousand feet up, the trail became less discernable as we entered a boulder field at Stewart Draw. This seemed like a good spot to stash one of my handheld water bottles, so I hid it near a car-sized boulder just after the end of the dirt trail.
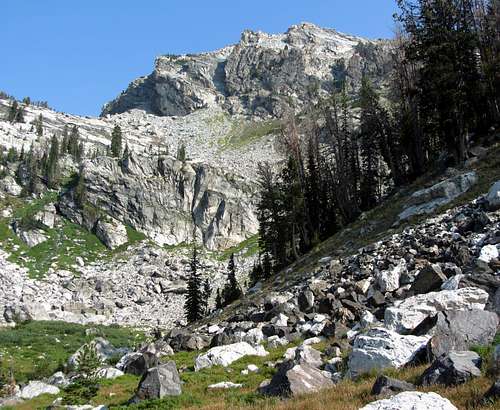
![Albright Peak]() Albright Peak to the south
Albright Peak to the south![Stewart Draw route]() Static Peak above the route that we should have taken to avoid some large boulder fields higher up
Static Peak above the route that we should have taken to avoid some large boulder fields higher up
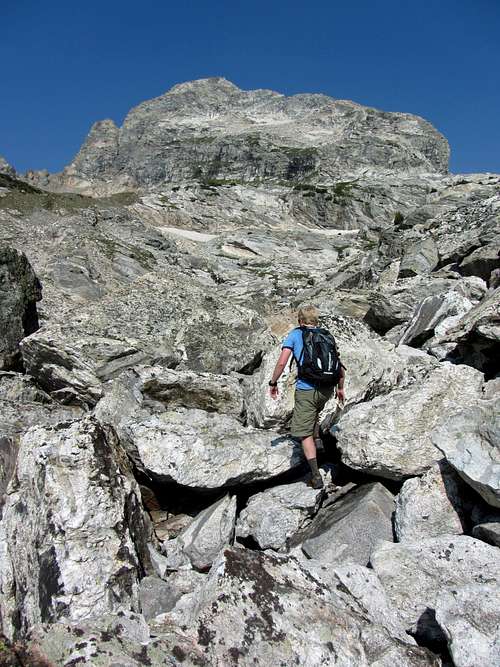
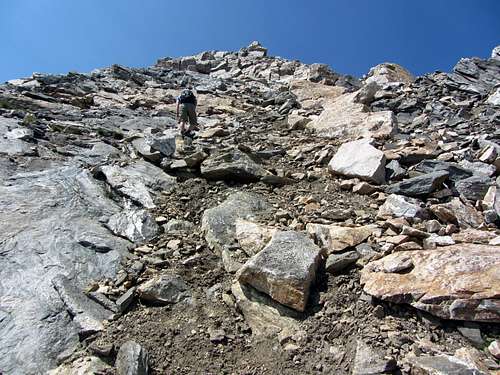
From here we still had three thousand vertical feet of boulder hopping and scrambling, which would require a great amount of energy, especially since the lack of cloud cover meant the sun would be beating down on us all day. There weren’t many cairns, so we went up the draw looping from a northwest direction back to the southwest. Since there were several undulating hills within the boulder field on the way up, we tried to stay high on the north side, which actually ended up requiring more effort. This is because we got caught up in some very large car-sized boulders that we had to go around. Since it was impossible to see the terrain behind each massive boulder, we ended up having to change directions a few times.
![Boulder fields below Buck Mountain]() Boulder-hopping on our way up Buck Mountain …
Boulder-hopping on our way up Buck Mountain …![Timberline Lake]() … towards Timberline Lake.
… towards Timberline Lake.
As we got closer to Timberline Lake, Static Peak and Buck Mountain became more impressive. We also started seeing some of the jagged Teton peaks off to the north (Nez Perce was the first). Despite requiring less miles of travel than hiking Middle Teton through the boulder fields in the south fork of Garnet Canyon had, this route was overall steeper and due to the lack of cairns a little harder for route-finding, which sapped a lot of our energy.
![East Face / East Ridge route split]() Looking towards where the East Face and East Ridge routes split …
Looking towards where the East Face and East Ridge routes split …![Gully route split]() … in this steep gully.
… in this steep gully.
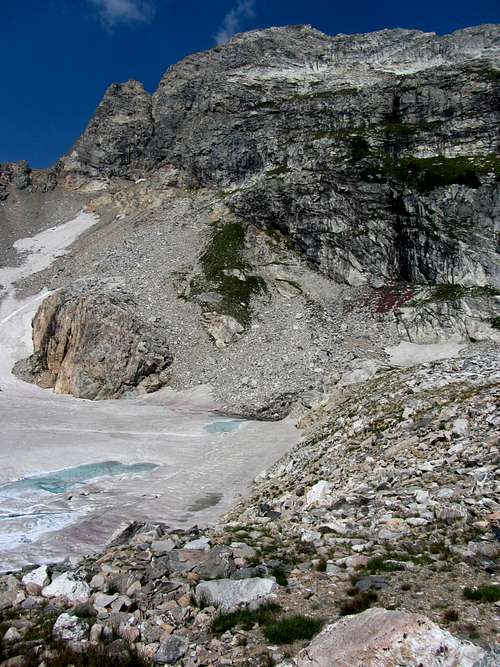
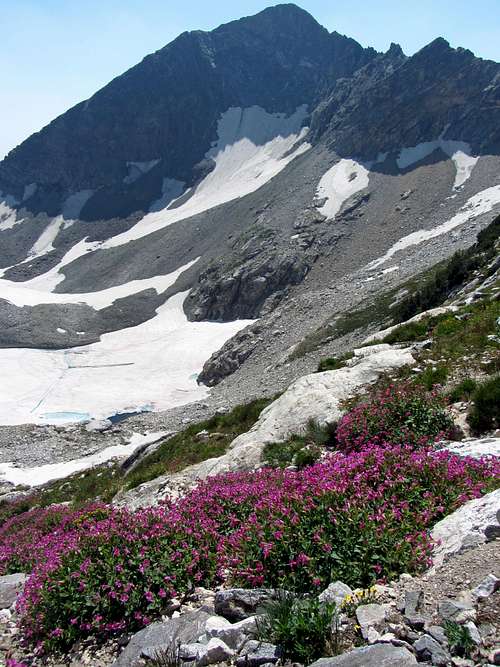
At this point we were leaning towards doing the easier East Face, but decided to take a nice long break at Timberline Lake before deciding for sure. Despite the unseasonably warm and dry summer, the lake was still completely frozen over. The snow and aqua water offered a nice contrast to the gray granite cliffs, and the views of the north face of Static Peak and Buck Mountain made this one of my new favorite lakes I’ve seen. Unfortunately, none of my photos did justice to this area, and I couldn’t get a good panorama since Buck Mountain’s East Face was too close to squeeze into a horizontal frame. Buck Mountain towered above the lake, and even the easier East Face looked quite imposing from our vantage point. Learning from my mistakes on Capitol, I forced down a granola bar, fruit snacks, and mini Snickers candy bars. As a result of eating more, we almost immediately got a second wind, so upon reaching the gully indicating the route split, we chose to go for the East Ridge instead. Now I would finally get a crack at a class 4 knife edge scramble!
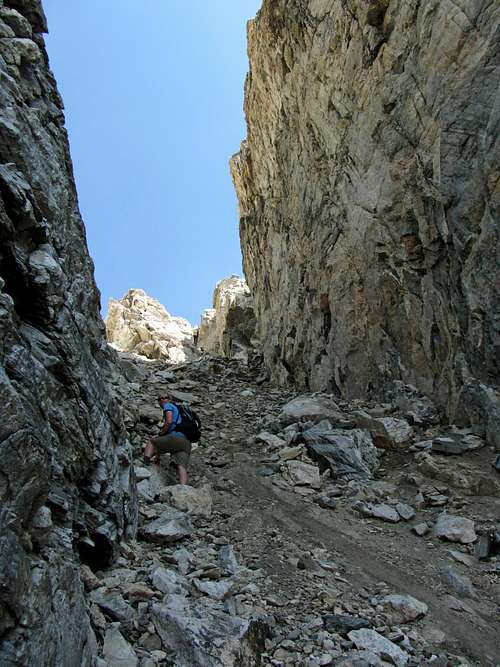
![Up the gully]() We went up the steep gully …
We went up the steep gully …![East Ridge ramps]() ... and then made our way along some easy ramps.
... and then made our way along some easy ramps.![Static Peak from gully]() Static Peak
Static Peak![East Ridge easy scrambling]() Easy part of ridge
Easy part of ridge
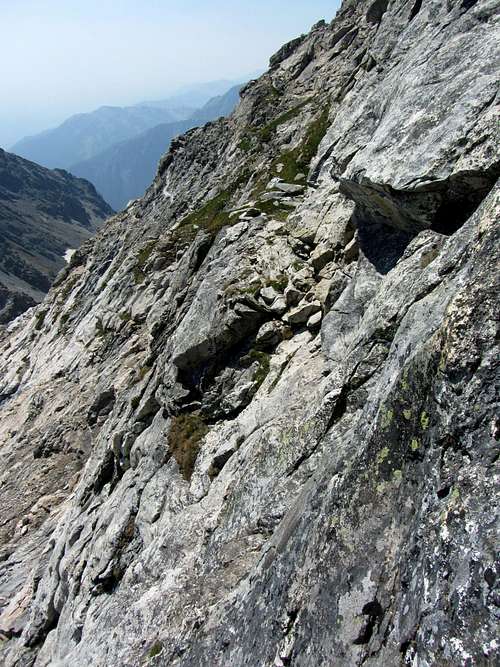
The initial part of the ridge was easy class 3, but as we continued upward the scrambling progressively got harder. In the distance to the west we could make out what looked like the crux of the route, with a sheer drop of several hundred feet down onto the face. The hardest part from here appeared to be a box-looking castle fortification rising up on the west side of a saddle along the ridge. We continued upward, until finally we got our first open view to the north.
![East Ridge Bail Points]() From here, I could make out two possible bail-points we could use to get back to the East Face on the left if necessary (the first one being easy class 3 and the second being harder class 4) …
From here, I could make out two possible bail-points we could use to get back to the East Face on the left if necessary (the first one being easy class 3 and the second being harder class 4) …![East Ridge scramble]() ... and see the more difficult scramble along the East Ridge.
... and see the more difficult scramble along the East Ridge.
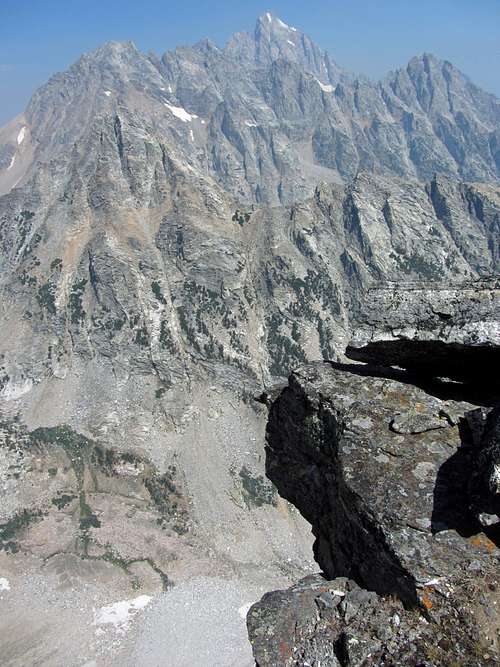
The north face of Buck Mountain is probably its most impressive aspect when seen from the park road to the northeast, dropping 2,000 feet straight down. The gusts of wind that hit us when looking over the edge definitely got our attention, and the views to the north were amazing. The view of the Grand Teton itself was better when I climbed the Middle Teton, but I felt these views of a whole assortment of peaks such as the Grand, Middle, and South Tetons, as well as Teewinot, Nez Perce, and Mount Wister were equally impressive if not more impressive. The sky was still hazy from all of the recent fires in Washington and Idaho, but we could still make out all of the major peaks in the distance.
![View north from East Ridge]() Looking north towards the other major Teton peaks, with a 2,000-foot drop straight below
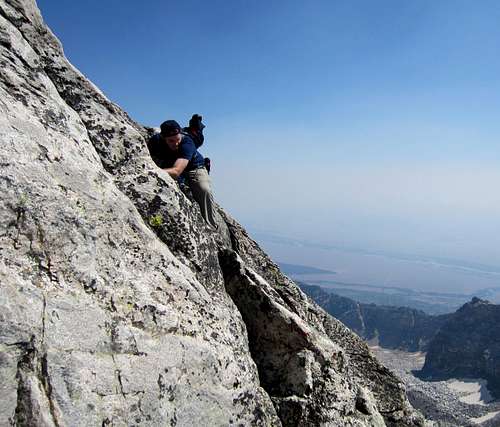
Looking north towards the other major Teton peaks, with a 2,000-foot drop straight below![David on the knife edge]() David up on knife edge
David up on knife edge
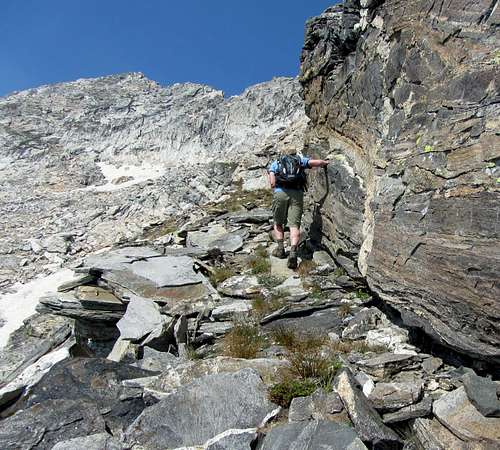
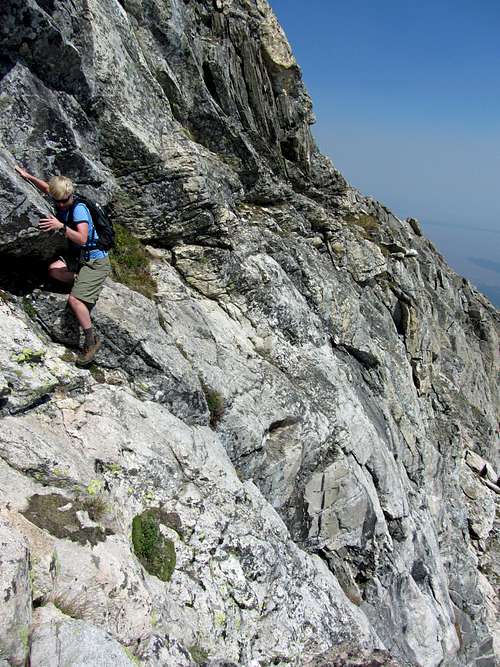
We came upon the main crossover point to the East Face, marked by a wide ledge system with patches of grass, but since we were feeling confident, we stayed on the ridge. About halfway up the ridge is where the class 4 climbing begins. To avoid the gusts of wind coming over the crest of the ridge itself, we stayed a few yards down on the south side for the most part, which still required careful hand and foot placement. As the number of obvious holds decreased, our pace slowed. It was nice climbing with David, since between the two of us we could usually find the best route around each obstacle. This was definitely the hardest climbing I had ever done, but at the same time it was also the most fun. I was surprisingly calm and never had any moments where I froze.
![David below knife edge]() David and I took turns leading the way …
David and I took turns leading the way …![Class 4 scrambling]() ... as we continued up the East Ridge.
... as we continued up the East Ridge.
Eventually we got to the little saddle along the ridge we had spotted from down below. There was a lot of air on both sides of the knife edge at this point, but there were enough holds that it still wasn’t too bad.
![Cliffs north of Buck Mountain fortress]() Looking up past the fortress towards the summit …
Looking up past the fortress towards the summit …![Buck Mountain North Face]() ... with big drops off the north side.
... with big drops off the north side.
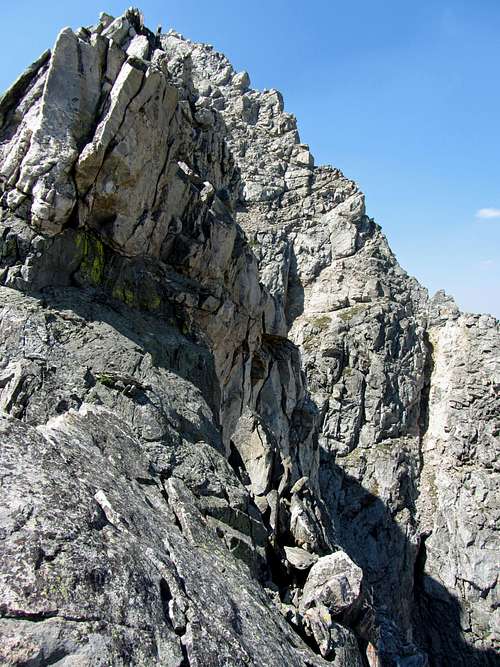
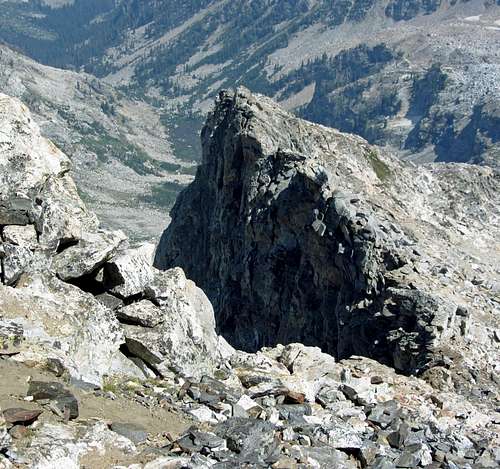
Shortly after traversing around the south side of the little watchtower-looking formation is where things became more difficult.
![East Ridge Fortress]() On the knife edge just below the “fortress” formation, with the summit just a few hundred yards away
On the knife edge just below the “fortress” formation, with the summit just a few hundred yards away![Looking back at East Ridge]() Looking back down from above the fortress formation (the 2,000 foot sheer drop on the left shows how much exposure you'll encounter if you stay right on top of the ridge)
Looking back down from above the fortress formation (the 2,000 foot sheer drop on the left shows how much exposure you'll encounter if you stay right on top of the ridge)
Looking back up at the last remaining few hundred feet on the ridge, there were no easy ways to get back up to the ridge crest. Above us were simply large smooth slab after large smooth slab, and even though we possibly could have climbed them, I knew there was no way I’d be able to come back down without a rope, should we need to retreat before connecting back up with the route from the East Face. Up until this point I felt that I could have climbed back down anything we ascended, but this is where I felt the terrain was low 5th class instead of 4th class. Maybe since it was just one short pitch is why the overall route is described as 4th class, but some guiding outfits still consider this route to be technical.
![Up we go]() Straightforward scrambling … Straightforward scrambling … | ![East Ridge tricky overhangs]() … became much steeper … … became much steeper … | ![East Ridge Class 5]() ... and smoother … ... and smoother … | ![Under the overhang]() ... prompting us to bail under this overhang. ... prompting us to bail under this overhang. |
|---|
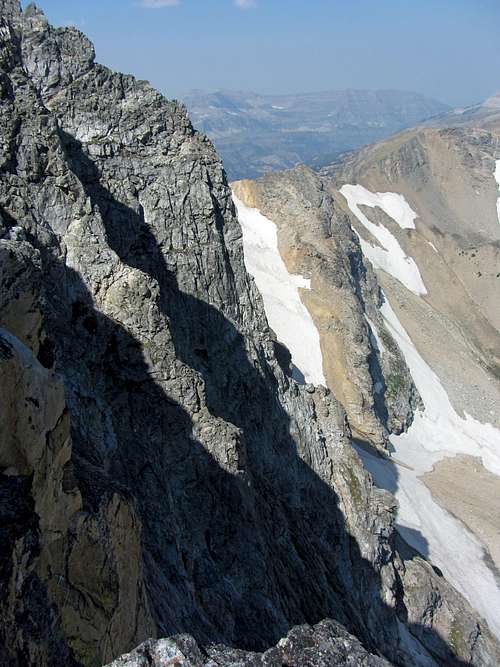
We stopped for a while and assessed our options. Despite the difficulty and exposure, we knew we could have retreated all the way back to the first crossover point to the East Face, but we were getting tired enough that it was unlikely after losing that much elevation we would have had energy to continue to the summit. Instead, I was able to spot a path that would take us straight along the cliffs below the ridge. This must have been the second, less obvious crossover point I had heard about.
![East Ridge Bail-Out Crux]() We spotted a way off the ridge …
We spotted a way off the ridge …![Across East Ridge Bail-Out Ledge]() ... and carefully went across.
... and carefully went across.
Just before we were about to start across, I heard my phone start ringing from within my pack, and I recognized the ringtone as the one I had set for my wife. I didn’t answer, since from our precarious position it would have been difficult to get my pack off, but instead took it as a sign to be extra careful. We had to duck underneath an overhang on our way across, and there were limited handholds. We made slow deliberate moves as we made our way along the cliffs under the ridge, getting closer to the narrow patches of grass and to safety. This part reminded me a bit of pictures I’d seen of the Broadway portion of the Kiener’s Route on Longs Peak. It was a bit scary, since one slip-up would have resulted in a two hundred foot drop onto the boulders and snow below us. Finally I made it across, with David following the exact same way, at which point I let out a sigh of relief.
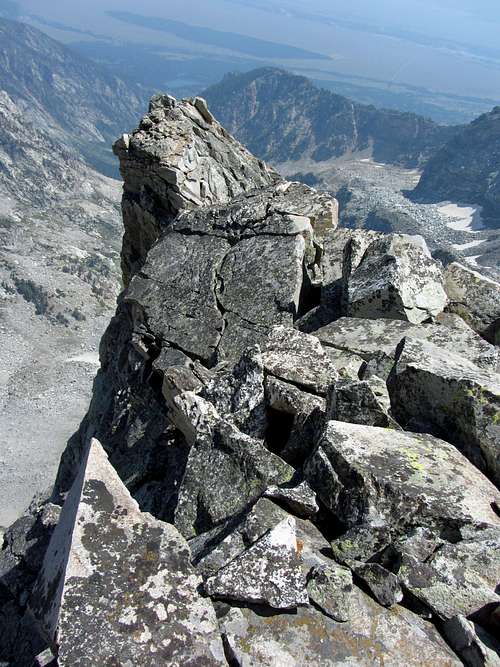
![Just Below Buck Mountain Summit]() We scrambled up the last easy portion to the summit …
We scrambled up the last easy portion to the summit …![East Ridge from Buck Summit]() ... from where we could look back down on the East Ridge.
... from where we could look back down on the East Ridge.![Buck Summit South View]() South summit view
South summit view![Buck Summit West View]() West summit view
West summit view
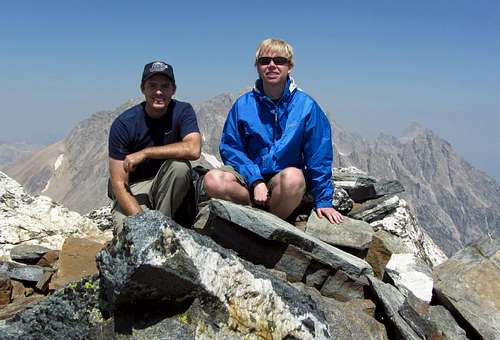
As the adrenaline wore off, I began to feel tired, so my pace on the remainder of the easier scramble to the top was quite slow. Eventually we made it, and it was an awesome feeling knowing what we had accomplished. Looking back down on the ridge from the top, we saw that we were very close to the end of the ridge when we bailed across those ledges to get to the East Face (we stayed on the east ridge for over 9/10 of the way), and going straight up the smooth slabs may have ended up being easier than the way that we went, but we were happy nonetheless to have made it over such an exciting ridge. Despite the haze, the views were awesome in every direction from the top. Before heading back down, we called our families to tell them we’d made it to the summit, and that we would be going back down an easier way.
![Buck Summit North View]() Awesome views …
Awesome views …![Buck Summit Shot]() … on the summit of Buck Mountain.
… on the summit of Buck Mountain.
Going back down the East Face was pretty easy, even though it required scrambling down terrain we had not ascended. I got a little off-route by following my Teton Rock Climbs photos too closely (it shows you should cut to the right [south] going down from the summit before going back to the northeast, which isn’t correct), but the three campers we originally passed at the bottom of Stewart Draw were now coming up the East Face and were able to wave me over to the right direction. Looking back across at the East Ridge, I was glad that we were going back down the East Face instead.
![East Face route]() This is the route we followed back down the East Face (as seen earlier from the beginning of the East Ridge)
This is the route we followed back down the East Face (as seen earlier from the beginning of the East Ridge)![East Ridge crux]() Looking back at the East Ridge crux from the East Face.
Looking back at the East Ridge crux from the East Face.
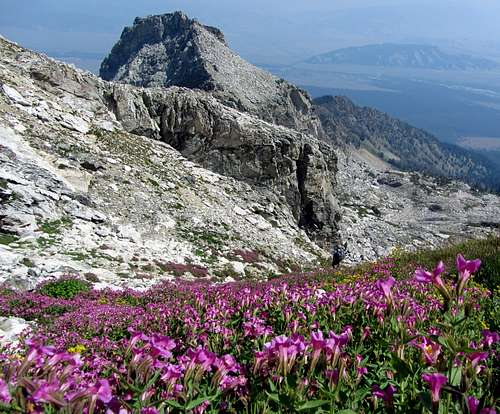
Closer to the point where the ridge and face routes met back up, we encountered some awesome purple wildflowers which from below had appeared to be some kind of red moss (since runoff coming out of the rocks made it seem like somewhere moss could grow).
![Buck East Face wildflowers]() A wildflower explosion on the East Face
A wildflower explosion on the East Face
It was awesome seeing such bright colors in a high alpine environment.
![Static Peak & wildflowers]() Looking south towards Static Peak …
Looking south towards Static Peak …![Wet Rock & Wildflowers]() … and the cliffs below Buck Mountain’s East Face.
… and the cliffs below Buck Mountain’s East Face.
We were both running low on water on the way down due to the heat and unrelenting sun which was making us thirsty, so we had to conserve what little we had left for the duration of our trip down. With tired legs from hiking up Static Peak and now Buck Mountain just three days later, David slipped on some scree in one of the boulder fields and ended up on his bottom. Rushing down to see if he was okay, I also biffed it and almost crashed right on top of him. I’m sure if anyone else had been watching they would have had a good laugh.
![Buck Mountain from grass meadows]() Going back down, we stayed closer to the grassy meadows south of our original ascent route …
Going back down, we stayed closer to the grassy meadows south of our original ascent route …![Un-named Peak East of Buck]() … avoiding the large boulder fields directly below this un-named peak.
… avoiding the large boulder fields directly below this un-named peak.
The bottle I left on the way up offered some nice liquid relief, and upon reaching the stream in Stewart Draw, I dunked my hat in the water before placing it back on my head, which felt great. Ten hours after leaving the car, we were back. On the way back to the cabin, we bought several bottles of Gatorade at a gas station. After that we ate dinner, and I loaded up on soda before driving all the way back to Salt Lake City with my family.
Buck Mountain Stats
DISTANCE:
10 miles roundtrip
DEATH CANYON TRAILHEAD:
6,807 feet
SUMMIT ELEVATION:
11,938 feet
ELEVATION GAIN:
5,200 feet
DIFFICULTY (EAST RIDGE):
Class 4
TIME:
10 hours
![Buck Mountain Route Overview]() Picture of our path up the East Ridge and down the East Face
Picture of our path up the East Ridge and down the East Face![East Ridge route to top]() Zoomed-in shot of East Ridge route to summit
Zoomed-in shot of East Ridge route to summitConclusion
All the descriptions and pictures I’ve analyzed seem to indicate that Capitol Peak’s Knife Edge is easier than what we encountered on Buck Mountain’s East Ridge, and the fact that I made it to the top of K2 without any problems (which some people consider the hardest part of the climb) makes me think that with better preparation and conditioning I could summit Capitol Peak, but for now I’m content to do mostly easier hikes and climbs (although I missed out on the Knife Edge experience I did get to see most everything else that the mountain has to offer, and with limited time off of work, convincing Liz to let me travel down to try it again isn't my highest priority). I might change my mind and decide to try Capitol Peak again someday, but for now I think I’ve satisfied that itch somewhat.
I still get a rush out of exposed scrambles, but to me the risk of pushing beyond what I'm comfortable with is just not worth it. This last summer I learned what my limitations are, and I’m comfortable knowing that I’ll never be a great mountaineer. I just love being in the mountains. There's another big class 4 peak I'd love to try eventually (don't want to mention its name for fear of jinxing myself), but right now I don't think I'm up to the task of tackling that one, at least not yet.
My family has been supportive of me going off on long hikes, but I owe it to them to stay safe, and for me, the less difficult class 4 scrambling I do the safer I feel. It’s all about risk management, and I’ve realized that at some point the risk outweighs the reward. Hiking with the family gets more fun each year as my kids get older, and I know eventually my son will be the one dragging me up the mountain. Here are some pictures from a recent family hike of the Brighton Lakes Trail (Wasatch Range, Utah), which serve as good motivation for me to not fall off of any cliffs:
![Lake Mary family photo]() Family photo Family photo | ![Wildflowers above Lake Martha]() Wildflowers near Lake Martha Wildflowers near Lake Martha | ![Lake Catherine Lunch Break]() Lunch break above Lake Catherine Lunch break above Lake Catherine | ![Little Hiker]() Matthew above Lake Mary Matthew above Lake Mary |
|---|
Have fun whatever your technical level of comfort is in the mountains, and stay safe out there!
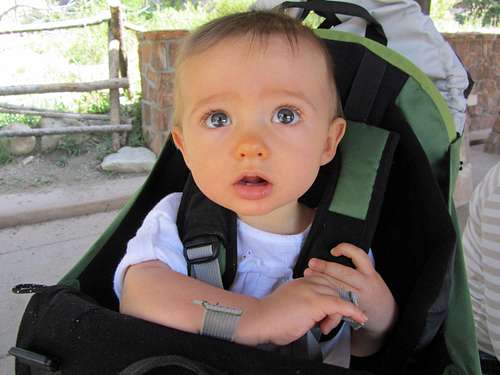
![Precious Cargo]() Come back home safely, Daddy!
Come back home safely, Daddy!


Comments
Post a Comment