
-
 3692 Hits
-
 83.1% Score
-
 16 Votes
|
|
Route |
|---|---|
|
|
36.13190°N / 115.5016°W |
|
|
Trad Climbing |
|
|
Spring, Fall, Winter |
|
|
Half a day |
|
|
5.7 (YDS) |
|
|
4 |
|
|
Overview/Approach

Rawlpindi and Big Horn (5.8) are alternative climbs for folks stuck behind the inevitable crowd looking to get on Birdland (5.7). Rawlpindi stays left of Birdland for the full length of both climbs, getting close enough at the top of its second pitch to hand the folks on Birdland a beer. The best pitch of climbing in this area is the second pitch of Big Horn which Rawlpindi runs past during its second pitch. The second pitch of Big Horn can be climbed and rapped backed to route (rappel rings) whether you are doing Birdland or Rawlpindi and I recommend doing so. It is a beautifully varnished crack for the grade at Red Rocks.
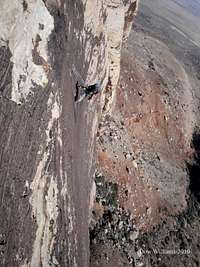
 3rd Pitch- 160’- 5.7
On Bridge Mountain’s lower southeast face lies the Spectrum area, home of Birdland and Rawlpindi. Birdland, as popular as it has become, sits across from the even more popular Dark Shadows, 5.8, on Mescalito’s north face. I don’t know how much traffic Rawlpindi sees, but I suspect it to be a certain quantity due to its location. I don’t see much difference in terms of climbing between it and Birdland. Where the fourth pitch of Birdland serves as its crux, the third pitch of Rawlpindi is its crux pitch. The first two pitches ramble up a gully/chimney section and end by burrowing through a chock stone and out onto a ledge that traverses right to almost as far as the Birdland line. The third pitch is a long pitch supplemented with two pieces of fixed gear; one bolt soon off the deck and one towards the fixed station 160’ above. At times, it takes some thoughtful route finding as you pull an interesting varnished flake and use pockets and such for pro as you try and find that single bolt above amongst the sea of white, yellow and black rock. The final pitch is fairly straight forward up a short corner and seam to a final fixed anchor. The first two stations on this route are not fixed, but the final two are. You rap from those two fixed anchors into the rap line for Birdland and continue your descent from there.
Park at the Pine Creek trailhead and proceed west along the trail towards Mescalito. When the trail follows the wash and meets up with the red rock band on the right, divert off the main trail and start ascending a fainter trail that leads back up and right to the Spectrum and Brass Wall areas. Birdland and Rawlpindi can be located at the very south end of the east face of Bridge Mountain. A deep half arch sits in the middle of almost solid black varnish on the lower wall. Another smaller arch sits below that arch to the left. Birdland follows a line that angles left to right up the face that the before mentioned arches lie on. Two distinct chimney/seams border this face on each side. Rawlpindi starts in the left one.
Route Description
580+/-’, 4 Pitches, 5.71st Pitch- 200’- 5.7/ Handren has all of these pitches rated 5.7 but I don’t remember much 5.7 on this first pitch. I mostly just ran up the chimney, turning the overhang to the left and belayed a full 200’ on a comfortable ledge with a gear belay. I almost reached the base of Big Horn’s 2nd pitch.
2nd Pitch- 120’- 5.7/ You have several options here, but I chose to burrow behind the chockstone in the chimney. Knowing my wife does not like such tight spots, I then untied and retied in front of the chockstone(s) so she could climb the right face to traverse the ledge. Doing it this way really helps on rope drag as well. Traverse right along the ledge to a gear belay with Birdland just feet away.
3rd Pitch- 160’- 5.7/ This is by far the crux pitch of Rawlpindi even though they are all rated 5.7 in the book. First, identify the fixed belay 160’ up and slightly right. You will have a bolt shortly after you leave the ledge and one right before you make the hanging belay. Placing gear in between is part of the challenge of this pitch. Aim for the large black varnished flake. Tread lightly over this flake and find nice horizontal pockets to ascend varnished ground that turns a bit sandy before you reach that second bolt. Follow the seam rightward to the hanging belay. From reading summit logs, folks get lost on this pitch, so keep that flake and fixed belay in sight.
4th Pitch- 100’- 5.7/ Follow the corner up to a seam. This last pitch is mostly light colored sandstone. Follow the seam up to a comfortable fixed belay.
Climbing Sequence
 |
 |
 |
 |
 |
 |
 |