
-
 9790 Hits
-
 75.81% Score
-
 6 Votes
|
|
Route |
|---|---|
|
|
44.36580°N / 73.9031°W |
|
|
Mixed |
|
|
Summer, Fall, Winter |
|
|
A long day |
|
|
A fall would result in serious injury, if not death |
|
|
Class 4 |
|
|
5 |
|
|
Approach
 Route Map
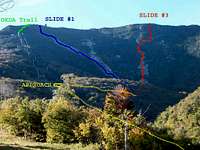
 Ascending the ski slopes to Slide Out
Ascend the ski slopes (2,000 vertical feet) to Slide Out, located at the bottom of the Summit Quad lift. Slide Out will lead to the bowl at the base of the backcountry slides. As an alternate route (not attempted), you may be able to ascend the bedrock in the streambead from Ladies Bridge up to the slide bowl.
Click here for a ski trail map. Be patient, it may take a minute to download.
After summiting, hike back to the Ski Center via the ORDA trail that descends to the upper ski lift from the south ridge. During the summer, the upper ski slopes are a rocky clear-cut mess of stumps and slash. It is easier to descend towards Little Whiteface then down to the Ski Center. Some of the mountain bike trails are very nice hikes through the woods, and break up the monotony of the ski slopes. Another option is to spot a car the the Atmospheric Research Center, Wilmington reservoir, or Connery Pond trailheads.
Route Description
 Route Map
 Peering down the slide
 Traverse to Slide #4
A total of five major slides (and a possible overgrown slide) are located on the east flank (ski slopes) of Whiteface. When looking from the Ski Center, they are numbered 1-5, starting at climbers left. This route gains approximately 1,350 feet (410 m) in 0.35 mile (0.55 km), resulting in an average grade of 36 degrees.
To access Ski Slide #3, briefly climb up Slide #1 from the bowl (climbers left). Exiting before reaching the first pitch, take the obvious finger to the right. Head directly toward the large dark rock outcrop at the top of the slide. This slide is all slab, and is VERY steep. The rock is polished, and doesn't provide a lot of grip. Even so, I'd rate this section at Class 2+, since handholds weren't absolutely necessary.
You will come to a series of 5-foot ledges. You must climb on a bench in the first ledge to ascend the others. After these ledges, the climbing becomes nasty. You must bushwhack through a couple bands of fir/spruce trees, and then you come to a 45-50 degree slab with a 4-foot step at its base. You may need to bushwhack up a crack in the rock to climbers left. A ski sign behind will say "Slide 3". Once on the slab, angle right. As you angle right, you will see another ski sign that says "Slide 4".
Bushwhacking through the brush at the base of this sign, you will immediately hit a 60-degree headwall. Rock shoes will be necessary to ascend this Class 4 wall. A bit more bushwhacking from the top of this wall will lead to another wall, this one pushing 70-degrees. NOTE: each of these walls had dry lichen that would flake away beneath your feet, and very slippery wet sphagum moss near the cracks/edges where it could anchor itself around vegetation... take extra precaution. Another short bushwhack from the top of this second wall leads to a 10-foot vertical step. In order to ascend this step, you need to kick/punch through 1-foot thick moss to get a grip on the rock beneath.
A few more minutes of bushwhacking straight up leads to the base of the ridge (Class 3). Once on top, the ridge trail is located approximately 15 feet directly in front of you.
Essential and Recommended Gear
Summer: Hiking boots or approach shoes (trail runners) with good sole for the section up to the ledges, rock shoes for terrain above. Rock shoes would be preferable to boots/approach shoes for descent of the slide. Some may opt for gaiters, pants, long-sleeve shirt, and eye protection for the bushwhack portions. Rope and a hiking partner would be advisable.Winter: Agressive snowshoes, 12-pt crampons, ice axe, avalanche safety gear
Climbing Seasons
Visit the Whiteface Mountain webpage for ski lift operating hours, open ski trails, and mountain conditions.WINTER: Uphill travel is not allowed during ski season, so if attempting during winter, you must be on the slide by the time the chair lifts begin operating. If there is enough snow, the Ski Center will open the slides to skiing, and uphill travel will not be allowed. Obviously, be aware of avalanche potential... these slides are here for a reason.
SUMMER: Uphill travel is allowed, but be aware of mountain bikers bombing down the trails, trail maintenance equipment, and logging operations. If you don't want to hike the entire mountain, the gondola to Little Whiteface remains operational during the summer, but you will be charged a fee.
SPRING: Expect ice and snow to remain on the upper portions of the slide into mid-May. The backcountry slide area of Whiteface is a notorious blackfly breeding ground. Typical blackfly season is Memorial Day (late May) to Independence Day (early July).
FALL: Expect ice and snow on the upper portions of the slide beginning in early October. Since the slide faces east, morning frosts will likely melt by late morning.