
-
 8220 Hits
-
 76.66% Score
-
 7 Votes
|
|
Route |
|---|---|
|
|
51.12361°N / 115.11667°W |
|
|
Trad Climbing |
|
|
Summer |
|
|
Most of a day |
|
|
5.10a (YDS) |
|
|
9 |
|
|
Overview/Approach

Chockstone Corner Direct is a 5.10a variation of the original Chockstone Corner Route (5.8+) which is one of the more historical routes on Yamnuska (Yam) established in 1963 by Lofthouse and Kahl. The only variation involved is the more direct first pitch which links into the original route between its first and second pitches. Chockstone Corner is a fairly direct route by Yamnuska standards that links several separate corners into a chimney system near the top as it trends rightward up Bottleneck Wall. Chockstone offers up mostly a trad experience lacking much of the fixed gear that is found on many Yam routes.
 1st Pitch- 55m- 5.10a
The start was not that obvious in regards to the guidebook description we went off. We stood below the direct start (which is what we sought) for a good 15 minutes or so trying to figure out where the direct start was (thinking it was further right studying the description). This is due partly to the fact that the 5.10a direct start looked like 5.7 ground to me, therefore I thought we were below the original start. Once on the direct variation, although sporty, I still did not think the pitch was worthy of the 5.10 grade, particularly if you have any crack skills. Once we topped out on the first pitch, it became obvious to me that we had done the direct start, looking down to the first belay of the original route to my left and up the second pitch corner.
I combined the nine Chockstone Corner Direct pitches into five total pitches utilizing a 70m rope. I combined pitches 2-3, 4-5, 6-7 and 8-9. The crux of the route was definitely the contracted section of the first chimney pitch (Pitch 8, 5.8+). As you lose your stemming walls, the inside of the crack is quite wet and muddy making it a sporty transition to break out of the chimney proper. The last pitch finished out on run out ground that is more of a true squeeze knee and arm bar chimney with one large chockstone to sling for pro if you really want to make the effort. Outside of pitches 1, 8 and 9, the rest of the route if fairly uneventful, with moderate climbing to be had here and there.
Follow the climbers trail up 1500’+ to the base of the wall. Turn left and follow the wall past the first ramp (Bottleneck) to the second ramp which is a pure slab ramp with scree on top that angles right up to a point. The direct version of Chockstone Corner starts about three quarters of the way up that slab ramp, not more than 10 minutes from where the climbers trail hits the wall. There is no fixed gear to mark the start, but an obvious relatively clean yellowish crack is the first pitch. The 5.10a comes in where it is slightly overhung.
Route Description


1000’+/-, 9 Pitches, 5.10a
1st Pitch- 55m- 5.10a/ I observed somewhere on the net where someone thought this pitch was hard for 5.10. I thought the exact opposite. A great crack takes you through the overhanging crux about half way up. After that, you move up easy ground (cracks on the right wall) to a bolt that takes you left across a slab. You have to continue above the slab up into the corner above to build a gear belay in the start of the original route’s second pitch, but well above the first pitch belay which comes in from the left.
2nd -3rd Pitches- 55m- 5.6/ I easily combined these pitches with a 70m rope, albeit with some rope drag. Continue up the easy corner and maneuver right well below a rap station (2009) on a ledge quite a distance, step down and around an arête and continue walking over to a cool separated mini tower. Stem up the tower with little if any pro to belay on top of a huge chockstone near the top. Some pitons as I recall combined with a solid gear crack.
4th-5th Pitches- 70m- 5.8/ Again I easily combined these two pitches with a 70m rope, but with considerable rope drag. The fourth pitch is a decent pitch. Take the steep finger crack above past a piton or two (were not needed, good crack) until the climbing starts to dwindle, then just trend right below the wall, climbing easy but loose ground past a slung block (2009) (starting the easy 5th pitch) and angle out right on the slab aiming for a corner below a small roof where you will find several pitons, but can also set up a gear belay at several locations where the slab meets the wall.
6th-7th Pitches- 60m- 5.8/ The 6th pitch is the most confusing. I went straight up from the pitons and traversed right on run out (harder than the grade) face climbing. Instead, move right at the base of the wall along the slab several more meters and angle up easier ground until you can venture into the large gully of sorts below the chimney pitches. Continue up this easy gully until you hit a steep wall with corners on either side (start of 7th pitch). Take the right side corner (5.8) for some fun steep climbing that lands you in the base of the chimney. This belay can be had with a .3” and/or 4” piece of gear at the very edge without going in the chimney.
8th-9th Pitches- 70m- 5.8+/ The 8th pitch is the crux of the climb, even considering the 5.10 direct start. Easily stem up the chimney at first staying relatively to the outside (a piton or two). Eventually it constricts. At this point the hand jams feel a bit slippery (white mud dust and wet). Place a 4” and make a hard transition out of the chimney to the right on steep face climbing which quickly eases (another piton or two). Continue up wandering steep and loose ground until you reach a small ledge and can walk over to the entrance of another, much deeper chimney with a chockstone high up (right side). Enter the narrow chimney and do knee and arm jamming to elevate yourself on small foot edges here and there. If you want to take the energy to sling the chockstone, go for it, but I just ran it out, even took my helmet off at one point to get through and wiggle myself to the top. That will pretty much be a full 70m, but if you coached your 2nd ahead of time to simul-climb with you, you can continue up and over the top of Yam and belay off of a bolt put in for the via ferrata used for the scramble route. There is not a good gear belay anywhere on top of the route.
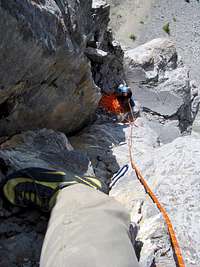
Climbing Sequence
 |
 |
 |
 |
 |
 |
 |
 |
 |
Descent
Walk off the east via the scramblers trail. It is not worth rapping, way too much loose rock. We carried our packs and shoes with us and used the direct east descent once we got down to the eastern col, which I really can’t recommend (too tore up). Either use the hikers large switchbacks trail further east or circumvent back west underneath Yam and descend via the climbers trail that you came up. If you do this option, you can suit up there in the morning and climb without your packs.Essential Gear
More fixed gear than was advertised on this route. Single rack to 4” with doubles from .75-2” should be sufficient. Draws, shoulder length slings and several double length slings help in making a nine pitch route a five pitch route. A 70m rope is essential for that as well. Helmet is a must on Yam really. Biner your shoes to your harness for the walk off. Never want to rap Yam if you can avoid it.External Links
- 100’s of Canmore and Banff National Park multi-pitch rock climbs, ice climbs, alpine climbs and scrambles, just scroll down to routes
- OR: Best True Technical Clothing and Accessories in the Outdoor Industry
- Scarpa, has surpassed La Sportiva in terms of quality, function, value
- Osprey Backpacks, Not a Second Choice
- Great Outdoors Depot
- Mont-Bell
- Cascade Designs (MSR; Thermarest; Platypus)