
|
|
Route |
|---|---|
|
|
41.02861°N / 122.79526°W |
|
|
Technical Rock Climb With Much Scrambling |
|
|
Most of a day |
|
|
II, 5.5 |
|
|
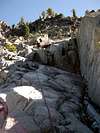
Approach
Follow directions to the ledges beneath the prominent dihedral at the west edge of the north face. The dihedral hides a gully in its corner. The route starts at slabs about 30 to 50 feet left of the dihedral (see photo with pitches numbered on it).
 |  |  |  |  |
Route Description
The description here is "our interpretation" of what the book (S. Mackay's guidebook) calls "Sleepwalk". The text description in the book is vague and it's hard to determine whether you're on book's route or not. The route reaches the summit of Ycatapom in approximately 10 easy (quick) pitches (mostly class 3 with single low 5th class moves scattered throughout).
Pitch 1: 200 feet, 5.5. Climb up the low angle slabs bypassing a huge flake on its right side and reaching a small ledge with a small tree. It'll take you most of the rope (60m) length to reach this belay
Pitch 2: 200 feet, 5.5. Move left off the belay ledge about 10 feet and climb up passing one rightwardly slanting ledge system. Reach the second ledge system and traverse it up and slightly right. Finish pitch on dirty, sloping ledge (you'll see a tree about 20 feet above you but unless you simulclimb, the 60 m rope will not reach it). Note that at this point you should be just about level (perhaps 20 feet below) the prominent dihedral across the gully to your right (dihedral mentioned in the Approach).
Pitch 3: 200 feet, 5.0. Move left (about 20 or 30 feet) and move up low angle gullies and slabs. Pitch finishes on the left side of a dihedral (NOT same "prominent dihedral" described in Approach section). There's a tree growing horizontally in the side of the dihedral.
Pitch 4: 150 feet, 4th class. Move up and left following low angle slabs and dirty gullies aiming for a "tower" on the left side of the skyline above you. Finish pitch when you run out of rope. Your goal for the next pitch is the top of the slope below the "tower".
Pitch 5: 100 feet, 3rd class. Traverse left up the dirty slope to reach the highpoint directly beneath the base of the "tower". Belay from here.
Pitch 6: 200 feet, 3rd class. Climb down 15 feet on the other side of the "dirt hill" you just climbed and follow the narrow (2 feet) ledge left. The ledge is a break in low angle slabs above and below. Belay once past the slabs when you run out of rope. From this point on, the summit lies about 600 feet above you.
Pitch 7: 200+ feet, 4th class. Climb directly up meandering inbetween short headwalls. Stretch the pitch by simulclimbing this easy pitch for an extra 30 or 40 feet until you arrive at the base of a steep headwall (which doesn't look like it can easily be bypassed).
Pitch 8: 100 feet, 5.5. Climb up the squeeze chimney on the left side of the headwall. Move right and reach a comfy belay ledge with a huge tree via a few mantle moves.
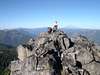
Pitch 9: 400 feet, 5.3 (mostly class 3). Climb up from the belay ledge to reach a sloping sandy ledge. Move right walking upu the sloping ledge. The summit is directly above you at this point. Keep moving right until you arrive at the base of slabs. Move up the slabs (few low 5th class moves) to reach the top of the summit ridge about 75 feet right (west) of the summit (it has a 2 foot metal pole on it).
Pitch 10: 75 feet, 4th class. Follow the ridge to the summit.
Descent:
The descent involves some 4th class downclimbing and much 3rd class walking. From the summit, climb down directly (do not follow the ridge back west from where you came) on the south side of the summit. You might want to belay this pitch. You'll reach class 3 ledges about 75 feet below the summit. You can unrope at this point. Move 50 west beneath the summit pinnacle on the south side. Downclimb the somewhat exposed 3rd and 4th class gully until you see an easy way to move further west (about 300 feet below the summit). Move west traversing the 3rd class slopes. You will see a distinct formation (The Tooth) on the ridge well west of the summit. Aim for the "pass" immediately east of the formation. Cross over to the north side of the ridge through this pass. Traverse just slightly further west under the north face of The Tooth and begin dropping straight down the dirty, wooded gully. Drop down (c. 800 feet?) until able to traverse right back towards the base of the climb. If you have left stuff at the base of the route, traverse the exposed class 3 ledges back east dropping down only as far as is needed to get around the base of a rock rib. From the base of the climb, retrace your steps back down the boulder fan ending up on the trail. Do NOT be tempted to veer right through what looks like a brushy meadow - the "meadow" is a boulder field (pick up sized boulders) overgrown with dense 15 foot bushes. This will be the most memorable bushwhack of your life!
 |  |  |  |  |
Essential Gear
Helmets are essential - lots of loose rock. A light rack with small to medium nuts and cams up to 3 inches. Many extra long slings for slinging very thick trees. One rope is sufficient. Though the route was described in 60 m pitches, a 50 m rope will do (plenty of belay ledges to choose from).
Miscellaneous Info
If you have information about this route that doesn't pertain to any of the other sections, please add it here.