
-
 7882 Hits
-
 78.27% Score
-
 9 Votes
|
|
Route |
|---|---|
|
|
38.90813°N / 106.43005°W |
|
|
Hiking, Mountaineering, Scrambling |
|
|
Spring, Summer, Fall, Winter |
|
|
Most of a day |
|
|
Class 3 with a few possible 4th |
|
|
Overview
Ice Mountain has a long reputation for being a dangerous and loose climb worthy of the heartiest climbers. Overall this reputation lives up however there is a route on this mountain that has much less class 4 climbing then the standard Northeast Ridge route. This is the southwest face. Although the climbing and traversing is much more sustained on this route, is is technically easier and less exposed than the standard route. There are two ways to do this climb depending on the season. I will describe them both. In the spring and early summer, variation 1 is recommended which takes advantage of the Apostle couloir. In late summer and fall, variation 2 is recommended which takes you up and over West Apostle from Lake Ann.A map of the routes is shown below:
 Route Map showing the SW face options
Getting There
The approach for this route is the same as the one for the Refrigerator Couloir and North Apostle. Start at the South Winfield trailhead (same as for Mount Huron) at the townsite of Winfield which lies at the end of Chaffe County road 390 12 miles from Highway 24. This road is a good gravel road suitable for almost any car although it is almost always washboarded. From Winfield, the Huron 4WD road continues up Clear Creek for two miles which is passable for higher clearance passenger cars (like a Subaru Forester). My 2WD Toyota Camry stationwagon made it just fine. 4WD is certainly not required for this road as it is not very steep...just rocky. Fall foliage at Winfield
Variant 1 - Apostle Couloir
From the trailhead described above, (where a green gate can be found and room for about 20 cars) there are two trails, the one that heads left up the hill is bound for Mount Huron. This is not the trail you want instead head streight ahead as the other trail follows Clear Creek on fairly flat ground. Follow this for 1.2 easy miles to a sign right before it crosses Clear Creek and heads up towards Lake Ann. This signed junction is key to the entire approach. Roach's description for this area is way off so ignore his approach description. If you are bound for this variant (The Apostle Couloir) you must take the left fork following the well established boot path into Apostle Basin. The Three Apostles from the trail along Clear Creek near the junction
Follow this trail as it crosses the stream that drains Apostle Basin right before it converges with the main Clear Creek drainage. There are some minior ups and downs before the trail makes a steep 50 foot climb up to a small ridge seperating these two creeks. From this little vantage you can peer down either side at two different creeks right as they converge. It's a cool place.
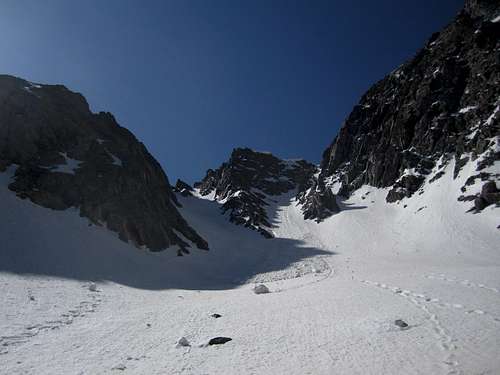
Continue up this trail as it follows on the right side of the creek often with a steep drop on the left into the creek. You will eventually emerge into an open meadow area where the trail becomes less defined just below treeline. You will cross back to the creeks' left side then you will likely have to do a little bushwhacking through the willows but if you head for a small island of trees it will save you some effort. From this small elevated area with trees (great campsites) you will have a perfect view to the south of the Apostle Couloir. To get to it, climb steeply for about 50 feet up the terminus of a large rock glacier and follow the talus up towards the saddle of Ice Mountain and West Apostle.
 West Apostle from the base of the rock glacier. Climb up the steep talus here
The rock glacier is pretty loose but if you're here early enough in the season it may still be snow covered. Continue up the rock glacier until about 12,400 feet where the terrain begins to get considerably steeper. Ideally, there will be nice snow in the couloir above you. Put your crampons on and start climbing the couloir which gets gradually steeper with the steepest parts around 40 degrees near the top. Whenever you are faced with a split in the couloirs, always stay to the left. This 800 foot couloir dumps you right at the 13,200 foot saddle between West Apostle and Ice Mountain.
 Looking at the Apostle couloir from the rock glacier. It's the left-most one
From the saddle, climb up the class 3 headwall to the east and begin a long traverse across the southwest face of Ice Mountain. There are not many cairns on this traverse but as a good rule of thumb, you should gain about 200 feet in the first initial climb out of the saddle, then stay more or less at the same elevation (about 13,400) as you cross at least 5 small ribs and gullies. Keep in mind you are constantly traversing above a huge set of cliffs that guard the lower part of Ice Mountains' south face. Although the traversing is mostly class 2+, care must always be taken to avoid a casual slip. I felt the crux of this traverse was right after the climb out of the saddle when we crossed some smooth slabs that would be pretty slick if wet. This was also the spot with the most exposure as we were right above the lower cliffs as oppsoed to a hundred or so feet above them on the rest of the traverse. The rock throughout this traverse was generally pretty solid on the ribs and loose in the small gullies. A helmet is mandatory though.
 A look back to West Apostle from the start of the traverse
As you continue the traverse keep picking the easiest way through the gullies and ribs by doing short ups and downs while maintaining around 13,400 feet in elevation. You will eventually come across a set of two much larger gullies (trust me, you will know it when you see it - these gullies are WAY bigger than the ones you traverse across). These two gullies are seperated by a large rib (much larger than the ones you crossed) and either of these two large gullies will work for your final 600 foot ascent.
The Left Big Gully
Note: This is not the standard way up but I believe it is both safer and more fun
The one on the left (first one you get to) is much more solid but steeper and has more class 4 climbing near the top where you will hit the saddle between the false and true summits.
 A look at the false summit from the top of the left big gully
If you decide to take this left, more solid gully, you will have to traverse the west ridge of Ice slightly until you reach a 40 foot overhanging cliff which marks the top of the rib seperating the two large gullies leading to the summit. This 40 foot cliff also lies right over the notch that the Refrigerator Couloir route brings you to. To avoid this cliff Drop down to the south (class 4) and get into the right gully 100 feet below the summit which then takes you directly to the top (class 3).
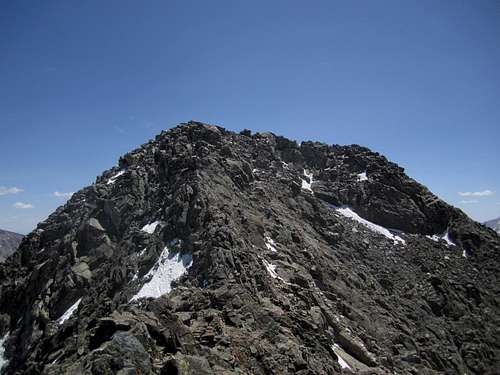 The true summit from the 40 foot cliff just above the top of the Refrigerator col
The Right Big Gully
This is the standard way up
From the end of the long traverse, cross the first big gully you see (described above) and cross below the large rib seperating them (you may have to descend slightly to do this) then start your final 600 foot ascent up the right gully. This gully is VERY loose so i would advise everyone in your party to climb together. The difficulty doesn't exceed class 3 but keep in mind, I thought this gully made Thunder Pyramid feel like solid granite! The nice thing though is that the rocks are mostly scree and small cobble sized so knocking a 500 pounder down isn't as likely. This gully takes you directly to the true summit.
When I climbed Ice Mountain, we ascended the left gully and descended the right gully. Return the way you came on the traverse. If you feel up to it, from the saddle above the Apostle Couloir, the ascent up West Apostle is an easy (class 2) 400 foot climb and the views of the southwest face on Ice Mountain are remarkable!
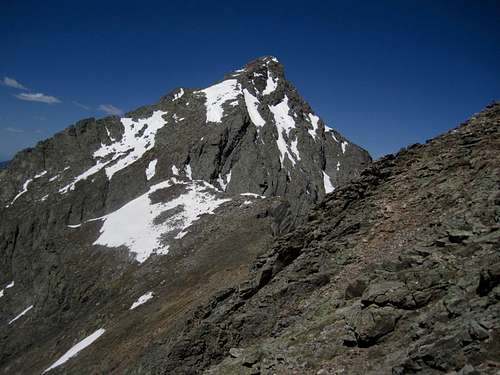
 Ice Mountain and North Apostle from West Apostle
When snow filled all the way to the bottom, the Apostle couloir makes a great glissade or ski for those who have the skill and experience to do so. Small rocks that have fallen from above can be scattered around though.
Variant 2 - Lake Ann/West Apostle
For this variation, which is better done in late summer and fall when all the snow has melted brings you past Lake Ann. This is a much longer day and required more up and down. From the signed trail junction 1.2 miles from the 4WD trailhead, instead of heading left up the Apostle Basin trail, bear right, cross Clear Creek immediently and continue up the very well established trail to Lake Ann. From the lake, you will follow the West Ridge Route on West Apostle to the summit. See Larry's description via the link. Basically you start climbing talus eastward from the lake, cross one N-S ridge and climb south up the second one to a small saddle in the main west ridge of West Apostle. You should see a small tarn just to the east below the N-S ridge you climb. A look down the ridge that leads you to the main west ridge on West Apostle
Continue up the class 2+ west ridge to the summit of West Apostle. You can preview the southwest face route from here very well as well as take a good look at the weather. Plan on at least 6 hours round trip from here. Descend the class 2 east ridge of West Apostle to the saddle above the Apostle Couloir and continue on the route described in Variant 1. Return the way you came.
 A look towards Lake Ann from the summit of West Apostle
Essential Gear
If you do the Apostle Couloir, bring axe, crampons, stiff boots and approach shoes of some kind (for the rock and trail approach). Otherwise, a sturdy pair of boots, standard hiking gear and a HELMET!A lot of mountaineering experience particuairly on loose rock would help as well as a perfecr weather day. Escape off Ice Mountain is very limited.