
-
 7829 Hits
-
 73.06% Score
-
 3 Votes
|
|
Route |
|---|---|
|
|
36.57700°N / 118.265°W |
|
|
Trad Climbing |
|
|
Spring, Summer, Fall |
|
|
Most of a day |
|
|
5.6 (YDS) |
|
|
Mostly 3rd class with a short technical pitch and some 4th |
|
|
1 |
|
|
Overview
This route was first climbed on September 7th, 1936 by William Rice, Robert K. Briton and Glen Dawson. The first ascensionists gave the route a curios, but fitting name “Stemwinder.” A name that harkens back to the mid 1800’s when a French watchmaker invented the first stem wound watch. Before this watches had to be wound with a somewhat awkward key. The stemwinder was such an astonishing invention at the time it won a Gold Medal at the French Industrial World’s Fair. The term “stemwinder” became a slang term for anything excellent, exciting, or something remarkable of its kind.After first peering up at the South Face of Thor from Bighorn Park Meadow, I found it quite remarkable that a mostly non-technical route could scale that ominous wall. The exciting route starts with a couple awkward technical moves and blossoms into a highly exposed, excellent scramble.
This route is not regularly climbed because it requires a Whitney Zone Permit. Most weekend warriors are not willing jump the regulatory hurtles involved in acquiring one of these permits. However if the route is snow free in the Whitney shoulder seasons (May and October), when permits are easier to come by, be sure to give the climb a try.
Approach
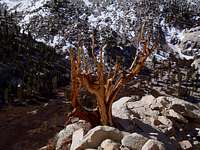 The "Old Snag"
 The "Approximate" Approach Route
From the Whitney Portal climb approximately 4 miles up the Mt. Whitney main trail past Lone Pine Lake. The quickest approach leaves the switchbacks somewhere above the lake, crosses the creek, and moves west along the base of Thor’s south face toward Bighorn Park Meadow. However, if this is you first time up the route you may want to continue up the trail to the south side of the Meadow. This will give you a better opportunity to view the off trail approach, pick the proper line and take some great pictures of the route. If you choose that option you’ll need to follow the trail all the way to Outpost Camp and then head East along Thor’s South Face until you reach the bottom of the benches.
Trekking across the meadow is not really an option: A) it’s a kinda sensitive ecosystem B) you’ll get you shoe’s, sox, and feet wet, in the swampy meadow.
While hiking along the south side of the meadow identify the old snag (dead tree) pictured to the right, which marks the start of the route. Trace the benches and ledges down the edge of the meadow and head for that spot. The approximate route is pictured to the right.
Route Description
 The Route in Blue
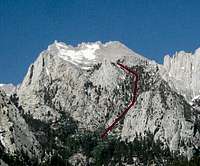 The Usual Descent
After reaching the “old snag,” look to the left for a ledge that leads you to the opening, grunty, 3rd class chimney. Climb pass this and continue across the ledge another 50’ to corner where the 5.4 chimney starts.
You’ll probably want to build an anchor here if you’re not planning on soloing the route. About 10’ up, to the left side, you’ll see a pin. If you don’t trust it you can easily place a nut just above it. This is where it gets a little weird. There’s no straightforward way to progress; it’s just plain awkward! I don’t know how any rating could accurately reflect this short section. Just stick your right shoulder into the crack and grunt upwards for a few feet until you can turn and face the rock again. Move up a few more feet to and find a spot where you can belay your partner. You’ll probably want to take your pack off for this section and haul it up, on the rope, from the belay. Good news is the "grunty" section is done and the fun begins.
Continue to move right up the ramp to a shelf. For the next 300’ to 500’ the route moves up and slightly right toward the “pale red pinnacle,” but getting off the shelf presents the next chalange. Directly before you is an obvious corner (that I climbed). It climbs easily for the first 20’ and then becomes more difficult climbing up to the next shelf. I suspect climbing the face to the right might have been easier? From here its ariy 3rd class up to the pinnacle.
When you arrive at the “pale red pinnacle,” you’ll notice you’re climbing choices are slim. There’s a corner to the left that looks like it goes about 5.10, or a steep slab that seems to fall off into a void, to the right, behind the pinnacle.
You probably guessed; you’re headed out onto the slab! Don’t fret! It’s not as bad as it initially looked. If you’re roping up, sling a rock before you venture out on to the slab; it’s probably the only protection you’ll need. The first ten feet are indeed a bit scary, after that it quickly becomes 3rd class slab. You’ll probably need to climb about 110’ to a point where you can set-up a proper belay. It's been reported that you may find another pin there for your anchor. From here continue to climb the ramp and you’ll be on the summit plateau in a few minutes.
After popping up onto the summit plateau your inclination will be to climb directly to the first peak in sight (as I did), but Thor has several false summits when traversing its plateau. Instead traverse across the summit plateau until you can clearly identify the last peak on the ridge, which is Thor’s true summit.
For the descent move to the left of the large rock formation a quarter mile below the summit and descend the gully back to the Mt. Whitney main trail.
Essential Gear
All that is required is a small alpine rack. I only used 2 nuts and a sling to protect my leads and nuts and tricams for anchors; however a set Link Cams might have make things easier, and of course a rope. Helmets and approach shoes recommended.External Links
Good trip report:http://www.supertopo.com/tr/Thor-Peak-Stemwinder-TR-rhyang/t199n.html
Photo TR:
http://www.rickkent.net/ViewerPlus/viewer.aspx?FolderID=516