

-
 27444 Hits
-
 88.89% Score
-
 29 Votes
|
|
Route |
|---|---|
|
|
37.89970°N / 119.2203°W |
|
|
Trad Climbing |
|
|
Summer |
|
|
Most of a day |
|
|
5.10b (YDS) |
|
|
5 |
|
|
III |
|
|
Overview
High quality alpine granite in an almost surreal setting, the Third Pillar of Dana sits at the edge of the Dana Plateau with views of Mono Lake thousands of feet below you. One of the more popular routes in the Sierra, the Third Pillar sees it's share of traffic. But it is a relatively short climb with excellent belay ledges, so the crowds are nothing to fear.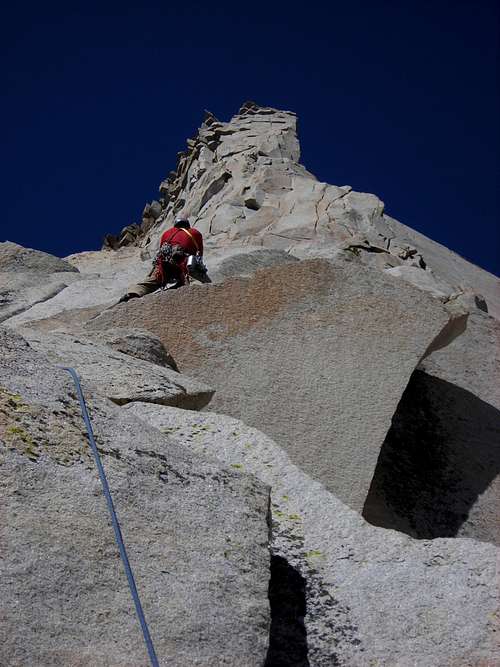
Approach
The Third Pillar is unique in that you hike to (almost) the top before descending to the base of the climb.
Pillar's summit viewed from the start of descent
From Highway 120 (Tioga Road) park at the small lot just above Tioga Lake. This lies just outside of Yosemite National Park, approx. 1 mile East of the entrance station. Follow the trail around the south side of the lake and into Glacier Canyon. After approx. 2 miles begin climbing the scree slope on the NE side of the canyon to gain the Dana Plateau. Once on the Plateau head East, aiming towards Mono Lake in the distance. At the Eastern Edge of the Plateau you will find the Third Pillar.
If leaving things here, be sure to hang packs/food from one of the many large boulders. The marmots are abundant in this area.
Descend third class blocks, ledges, and talus down the rib that is just to the North of the Third Pillar. Do not descend all the way to the bottom of the Pillar. When the angle changes and the descent becomes less steep, begin traversing towards the Pillar, aiming for a blocky ledge on the other side of the gully. In the early season this traverse may still be snowy. At the ledge you will find a short, right facing corner, which is the start of the climb.
Route Description
This route has a definite alpine feel to it. Short cruxy sections are mixed in with stretches of moderate climbing and comfortable belays.There are a handful of different variations and ways to climb this route.

P.1 (5.9) I found this pitch to be maybe 5.8 in difficulty. After traversing the snow slope you end up on a large horizontal ledge. You start up and traverse around a giant flake, get on it and traverse into a great finger crack. Enter by stemming, protect, move in for the kill. It is very easy to protect once you are in the crack. Jam one foot and stem the other. Than move into full crack climbing mode as desired. The finger crack itself is a 5.8. After this crack the climbing decreases to 3rd class for 60ft or so and couple of 4th class moves get you to a large belay ledge with a tree and a horn one could sling.
P.2. We climbed straight up and into a flaring finger crack which was a bit run out. This section felt like a 5.9R. Some balance oriented and delicate moves lead the climber to a small traverse right to a small ledge. Pitch after this starts with a wide crack straight up. I do not think we were ‘on route’ at this point because other people report climbing a hand crack that narrows to a finger crack higher up and has a 5.10 move. Than it widens up with a belay ledge after it. To find this ‘correct’ crack we were supposed to traverse a bit more left from the belay ledge.
P.3. 5.8 We climbed the wide crack straight up using a fist jam and there was a hold on the inside as I remember. After you overcome this there are a few more fun steps with some straight in jams and a big ledge before the 5.10c crux variation we took.
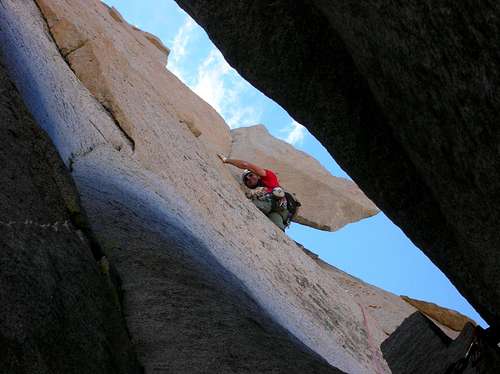
Correct variation I climbed second time I did this route takes 5th class up to a 5.8 hand jam/bear hug flake and continues to a crack 5.7-5.8 bellow the chimney 5.6. Chimney protects great with a #3-4. You top out on a flake (I wonder how long will it stay there). Make sure to pass your camera to the leader and get couple of your shots taken on this "spectacular belay ledge"
4th pitch
P.4. 5.10b-5.10c depending on the route chosen. We belayed the 10c lie back bellow and a bit to the right on a big ledge. It is a very physical move with not much quality pro for 5 feet or so after the initial nut placement. When you get over it you get into a very fun 5.8ish hand cracks that are not difficult at all. Than you climb past the flake ("spectacular belay spot", up and under another flake- squeeze chimney type. Above that is a 5.9 move that is not protected till you clip a piton (was removed in 2011 by Mark Westman himself) which is higher. Falling here is not a good option. Mental crux of the route. Climbing up and above it is another cruxy finger crack with two pitons for protection. Climb higher and belay at the tree.
Correct variation (I climbed several months after) of route takes you up from the "spectacular belay ledge" and up to either 5.8 squeeze chimney or 5.10 finger crack on the left side, than you climb up some blocks and make a delicate step to where the piton used to be (removed in 2011-can protect it with something small). This is probably the crux of the route. Fall here would not be pretty. After that you climb up and left and up to the belay ledge with a tree

P.5. This pitch was described as "the best 5.9 pitch in the universe" (Moynier, p. 374). It was one of the best clean pitches I have climbed. Although rated as 5.9 in the past supertopo mentions a 5.10 move and I could not have agreed more. The 5.10 move is a crack with two little knobs to pull yourself up to a next ledge. This move is a lie back. After getting over another ledge follows a 5.9 finger crack. Jams are solid and give one just enough to move the feet up some little knobs and move on to 5.9 hand crack. Hand crack section felt more like a 5.8 though. Great holds on vertical rock continues for a bit more and ends with a delicate traverse right and a mantle on to the summit. Plug in 3 cams for an anchor and belay from there.

View down from the top of the "best 5.9 in universe"
For a detailed topo map pick up one of the many climbing guides to Tulomumne Meadows:
'Climbing California's High Sierra' by John Moynier and Claude Fiddler (Falcon Guides - Globe Pequot Press)
'Rock Climbing Tuolumne Meadows' by Don Reid and Chris Falkenstein (Falcon Guides)
or
'Tuolumne Free Climbs' by Barnes, McNamara, Snyder and Roper (Supertopo)
Essential Gear
Bring a set of nuts and doubles for cams from .4" to 2", we brought a single 3" as well and found it to be sufficient enough.When to Climb
This is best climbed during the summer months, when Tioga Pass is open. The Pass typically opens in June, but this can vary greatly depending on the previous winter. In the very early season, it is typical to encounter snow/ice in the gully that separates the Third Pillar and the descent (approach) route. Due to it's Eastern exposure, the Pillar sees sunlight first thing in the morning, and goes into the shade in the early afternoon.
asmrz - May 22, 2007 1:46 pm - Voted 10/10
Third Pillar in WINTER ?The idea of climbing this Regular Route in Winter never saw us succeeding, but (at least in my mind) it is an interesting proposition. The route can be approached on skis from the low bench at the entrance to Lee Vining Canyon or via the long ski over Tioga Pass and the Glacier Canyon. The idea (in the late 80s) never got very far past planning stages for Miguel Carmona and me, but maybe somebody young reading this today might find the idea interesting. The Pillar faces mostly EAST and gets some sun in mid winter. The protection posibilities on the route would be ok even in winter time. Just a thought...
Noondueler - Feb 13, 2012 8:50 pm - Voted 10/10
3rd pillar additionWhy not put this on the Dana Plateau page?
Vitaliy M. - Feb 14, 2012 3:55 pm - Hasn't voted
Re: 3rd pillar additionIt was attached to Dana when I got co-ownership of this page. I think it should stay this way since most people go to Mt. Dana page to see all the attached routes (including ice climbs in Lee Vining etc). I am not sure Dana Plateau could be considered as a peak in general? It looks like a plateau with a ridge leading further to Dana. At least as you hike up it. I did not see any significant summit that I had any desire to hike up.