
|
|
Route |
|---|---|
|
|
17.5146°S / 149.78419°W |
|
|
Semi-technical, but very scary climb. |
|
|
Most of a day |
|
|
Class 4-5.? |
|
|
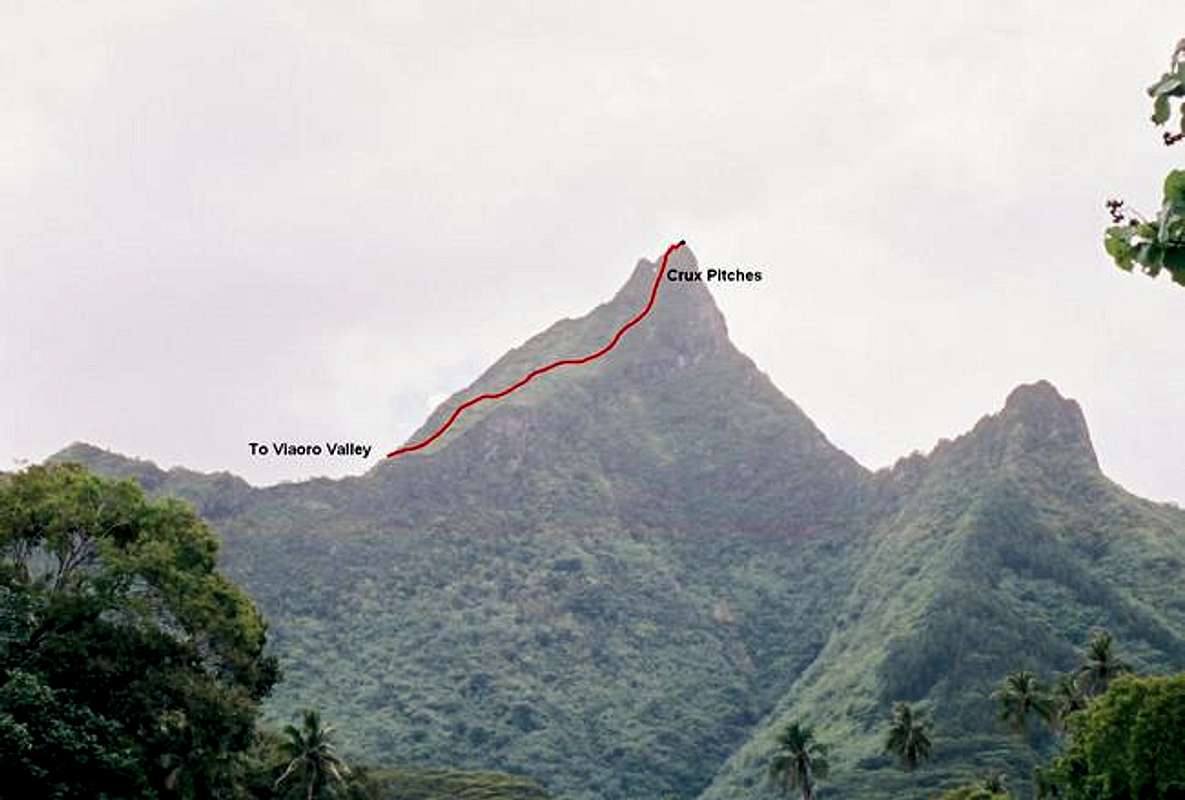
Route Diagram
Approach
Getting to Moorea is easy. First, you must fly to Papeete (actually the suburb of Faaa), the capital of French Polynesia which is located on the island of Tahiti. From the wharf at Papeete, several ferries depart for the island of Moorea between the hours of 6 am and 5:30 pm. The boat ride cost $9-10 each way in November 2005, and takes 30 minutes to an hour depending on what boat you book with (ferries that take vehicles are slower).
Once on Moorea and at Vaiare, you will notice two busses waiting for passengers. Bus schedules always correspond with the ferry schedules on Moorea. You want the bus heading south. Get on the bus ($3) and follow it to the village of Afareaitu. Get off at Afareaitu. To locate the route to the trailhead, walk to the northern section of town and to the Vaioro River. Hopefully the weather will be clear enough to locate the correct river valley, as there is one to the south as well. The one you want is the valley that you can see that ascends towards the peak. The hole in the mountain can be seen. Follow the road along the west side of the river and towards the Afareaitu Waterfall.
Route Description
From Afareaitu, follow the Vaioro River (see above) up along a road. The crosses the river and eventually becomes a well used trail that heads up to some nice swimming holes and the high and spectacular Afareaitu Waterfall. Hopefully there will be some locals around, because the next section of the route is very difficult to locate.
Backtrack and locate the hidden trail on the west side of the river (you must cross the river), about 180-250 meters/600-800 feet below the waterfall. The route is steep and slippery and will take you around the waterfall.
Higher up, you will pass through a little valley and then follow a hopefully dry creek bed. The trail eventually reaches the ridge. Climb up the trail and up the steep ridge. The last part of the ridge is very difficult, at least when wet. Try to go when it hasn’t rained for several days. If it is, or has been raining, this will be a very dangerous climb. Say your prayers make sure your life insurance is paid, and climb the eight fixed ropes to the summit. IF it is clear, you will have some really spectacular views.
Do not under estimate this climb. It is scary, exposed, and very dangerous, at least when wet. Do not try the route in the rain. I feel lucky to still be alive!!! Getting down is much more difficult then getting up the route. If it has been wet at all, I would recommend taking your own climbing rope, so you can rappel down the steepest parts.
Update: Of note, the route has been much improved in recent years and is a lot easier now than when I made my climb.
Essential Gear
If the weather is wet, or has been wet in the past few days, I would strongly recommend taking a climbing rope, slings, and rappelling gear in order to make it down the slippery slopes safely. In dry weather, you may get away with using the fixed ropes. Make sure to take lots of water and a good pair of boots. Forget the rain gear, as you will be soaked with sweat the whole time anyway.
Miscellaneous Info
If you have information about this route that doesn't pertain to any of the other sections, please add it here.