
|
|
Route |
|---|---|
|
|
37.84650°N / 119.4418°W |
|
|
Technical Rock Climb |
|
|
Half a day |
|
|
5.7 |
|
|
Approach
The approach to the dome and this route cannot be more obvious. Park your car at the dirt pullout, scramble down towards the creek, cross the creek and hike up to the base of the dome. It helps to have a topo with you in order to locate the beginning of the route.
 |  |
Route Description
Zee Tree is one of the best moderate climbs in Tuolumne if not the best. It is easy to get to it, features excellent rock and various types of climbing (face and crack). However, one should consider Tuolumne ratings with a grain of salt. Even though this climb is not considered as a runout in guidebooks, it has spots with either no pro at all or with a 60-80' fall potential. These runout sections are relatively easy but can become death traps if you attempt to climb this dome in the rain.
This route can be climbed in five or six pitches, depending on the rope length and your level of comfort.
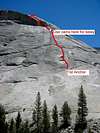
Pitch 1 (5.2, 150'): There is no pro on this pitch aside from the top anchor, so you have to be prepared to free-solo it. It is helpful to locate anchor bolts and slings before you begin, and choose the shortest way up. At first, it follows low angle knobby slabs but steepens towards the end. Don't hesitate here and just go for it! :)
Pitch 2 (5.7, 180'): The first crux of the climb. The crux move is right above the anchor before the first bolt. Holds here are small and the angle is steep. After the first bolt, the climb slightly eases but remains pretty sustained at 5.6-5.7. The routefinding on this pitch is pretty straight-forward since there are 9 bolts between anchors. You will need to pass "zee tree" on the right side and keep going for four more bolts until you reach the two-bolt anchor.
Pitch 3 (5.3, 100'): Easy knob and face climbing. Since there are only 3 bolts on that pitch, it really helps to locate them one at at time before you start climbing so you don't miss them and have to traverse or downclimb. There is another two-bolt anchor at the top of this pitch.
Pitch 4 (5.4, 100-180'): More easy knob and face climbing (although steep) until you reach the roof/flake. Place some trad pro here (.5-1.5"). This spot can be used as a intermediate belay station. Continue around the roof on the left and up until you get to the easy slab at the base of the vertical crack that leads to the very top of the dome. Set up your belay station here (pro .6 to 2").
Pitch 5 (5.7, 120'): The second crux of the climb. From the belay station climb straight up to the base of the vertical wide crack. Lieback the crack until the angle eases. Follow the crack for a bit longer until you reach the big rock. Turn right at that rock and scramble up the easy slab until you get to the belay tree. Few tips for that pitch: bring large gear for the crack (3-4.5"), use lots of slings and runners to minimize the rope drag, use radios (it is almost impossible to hear each other).
Descent: Once you top out, walk to the far northeast corner of the dome. You should find rappel slings and a station there. After a short but mostly overhanging rappel, go left and downclimb the 3rd-4th class boulders to the base of the dome. Circle around the dome to reach the parking lot.
 |  |
Essential Gear
Ten quickdraws, one set of .6 to 2" gear (cams would be preferred), one-two sets of 3 to 4.5" cams (depends on your level of comfort on the final 5.7 lieback), slings for the last pitch
Miscellaneous Info
If you have information about this route that doesn't pertain to any of the other sections, please add it here.