Summary
A friend of mine and I did this 2-day hike on Labor Day weekend after a less-snow-than-average winter, so the roads and the entire hiking route were clear of snow, until the summit plateau at 14,000ft. With no snow, there is a clearly defined dirt trail from the trailhead all the way to camp, and surprisingly, there is a fairly well defined path to follow all the way up to the summit. With the exception of a slight downhill as you approach camp, and very minor declines here and there, this route climbs steadily from trailhead all the way to the summit. From trailhead to 13,800ft the terrain gets worse the higher you go. Then it levels out a bit and is a bit more stable until the final push around and up the summit pinnacle. It took about 2 1/4 hrs to get to the camp. Then on summit day, about 6 3/4 hrs to get from camp to summit, and about 3 hrs to decend back to camp. Then after resting and packing up camp, it took about 1 1/4 hrs to get from camp back to trailhead. These times include rest stops along the way. This route is in poor shape due to the lack of snow (which means loose terrain starting from above the camp and falling rock hazards in a short steep section of chutes around 13,500ft). However, this is considered the best route on the southside of the mountain right now.
Getting to Trailhead
From the town of Mt. Shasta, getting to the trailhead is straightforward, but longer than to the standard Bunny Flat trailhead. From the downtown area, go back south on I-5 one exit to hwy 89 and go south (east). Just less than 3 miles past the town of McCloud (which is about 10 miles after getting onto hwy 89), turn left onto Pilgrim Creek Rd (road 31). It is a paved road with a large sign so you can't miss it. Take this about 5 miles then turn left onto Widow Springs Rd. This road is dirt but well maintained. About 5 miles later you come to an angled intersection with Road 31 (called McKenzie Butte Rd at this point) and a side road on the left. There is a large brown sign on the side road pointing the way to the Clear Creek trailhead. Do not turn onto road 31, instead you sorta cross over it and turn left onto the side road. Several intersections and 2.5 miles later you're at the trailhead, each significant intersection has a brown sign pointing the way to the trailhead, you can't get lost. This last 2.5 miles has several sandy/ashy spots that may cause your backend to fishtail a little and some cars have been known to get stuck in them but I don't think it's a major concern and with my 4x4 truck I had no issues and didn't need 4x4 mode. When there is snow, the dirt roads may not be plowed so depending on the conditions and what vehilce you have, your hike may start several miles before the trailhead.
Getting to camp
Getting to camp was extremely easy for a Shasta approach hike. It was about 2.5 miles (the rangers claim it is closer to 3 miles) from the trailhead to the Clear Creek springs area which is the best place to camp. The whole hike to camp is on an established dirt trail and the elevation gain is from about 6,800ft to 8,450ft. The hike starts out in shaded forest, at one point we got an awesome view of the mountain, the Clear Creek route, and the small valley created by the creek. A little less than 1/2 way to the camp the trail comes out into a fairly wide clearing in the trees that continues to snake up the mountain toward the springs. The trail in this clearing is mostly in the sun and generally hugs the left side of this clearing. This is also very scenic with a nice partial view of the mountain. Finally you curve left and out into the open where the springs, the camp area, and the route to the summit all come into plain view.
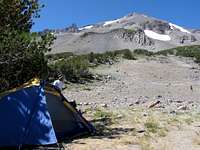
When you reach the springs, if you cross over the creek you'll find several good camping spots near a band of trees. We arrived around 1:15pm and were the first ones to set up camp. The flattest spots are found if you cross the creek, continue walking away from the creek and go slightly left, about 100 yards from the creek. A band of trees continues from your left to right, up the mountain for about 100 vertical ft, but the lower area is flatter. This is where we set up camp.
The hike to camp is continuously uphill all the way, except for a slight decline as you approach the springs area. The steepness is similar to getting to Horse Camp from Bunny Flat, so it's not that bad. It was a cloudless sunny sky with a slight breeze. It would have been hot if not for the breeze. We hung out at camp, which steadily got more populated as more groups continued to show up. In the end I'd guess there were 30-35 people camped there that night. We talked with a lot of different folks as we relaxed at camp. Another group of 3 joined us for dinner 'cause their stove broke. We talked with them and with another couple that camped next to us about the route. The couple wasn't planning to summit but brought everything they needed just in case (they both ended up making it to the top). One group of 4 continued past the springs area to camp in a not-so-protected pocket of rocks at 9,900ft. While they had a 1500 vertical ft advantage for acclimatizing (and less to climb on summit day), there is no access to water above 8500ft and if it gets windy overnight like it did when we were there, there is very little protection. I would not recommend camping above the springs area on this route.
I think sunset was around 7:30pm but I forgot, and we went to bed around 8:30pm. Neither of us slept well but I don't know why, it was breezy all night but our tent was perfectly placed to deal with that.
Getting to summit
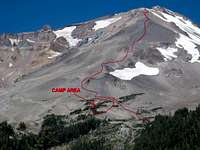
![Clear Creek Route]()
We got up at 3:30am, snacked and packed, and left camp at 4:15am. I was wearing everything I normally wear when I go snowboarding, except gloves, but I brought glove liners and was thankful for that later. Also, my hiking poles were my saviors on this day, do not leave camp on this snowless route without them!! Since the moon was more than 1/2 full we didn't really need our headlamps, but we had them anyway. We initially had mixed info about the need for crampons and ice axe. So we carried our ice axe and crampons up to camp, but after looking at the route above from camp and examining a photo I took of the upper part of the mountain, I decided we wouldn't need them, figuring even with zero-visibility you can tell the difference between walking on rocks vs. ice so we'll stay off the ice no matter what. So we left them at camp and that worked out fine. Initially six other people joined my friend and I out of camp, and I somehow ended up at the front leading this crew up the mountain. Things were going well for the first couple of hrs, with other folks joining and leaving our large group. However, somewhere between 11k-11.5k ft our nice little conga line fell into disarray, with some people falling back and others pulling off to the side to stop and rest. By 12,000ft there were 4 of us left, and by 12,500 I was solo, which was fine since I was continually catching up to others who were ahead and there were still others farther up that I could keep my eye on all the way to the summit.
As far as route conditions go, the path above camp is totally exposed to the elements all the way to the summit on a wide-open face of the mountain, with only 3-4 spots to pull over to get partial protection from the wind, and no protection from the sun. The wind steadily got stronger the higher we got, and sunrise at 6:30am didn't do much to warm us up. The dawn view with the sky changing colors was really nice though. Above 12,000ft, stopping for more than 2 minutes was a bad idea if you wanted to stay warm, and the wind became an unrelenting nightmare over 13,500ft. From camp up to about 13,000ft, the terrain was generally loose sandy stuff or small loose rocks/pebbles. My topo software showed this section to be a fairly consistent slope averaging about 45% grade, and it was maybe 2 miles long. Although we would slip/slide here and there, it was better than I was expecting, and the hiking poles helped quite a bit. Also there was easy access to spectacular views anytime I decided to look around me. From 13000ft to just under 14000ft it became more like walking/climbing on, around, and over large rocks and boulders, with hands needed for balance and occasionally for upward movement (class 3 hiking). This section of terrain was a slow frustrating struggle. However, I would have to say that up to about 13,000ft this was overall the easiest of the nine Mt. Shasta hikes I've done, even though all of the other hikes were mostly or completely on snow. And from my limited experience and knowledge, on Mt. Shasta hiking on snow is supposed to be easier than rocks/scree. But don't get me wrong, even below 13,000ft this hike is still steep and exhausting, and I was getting tired and slowing down, especially over 12,000ft.
Unfortunately, just when I was lulled into a false sense of security, I reached the steepest part of the hike, which is from about 13,000ft to about 13,800ft. My topo software showed this area maxing out at around 55% grade, but I can't get great resolution on small sections of the route with that software so parts of it could have been steeper. This is also where the terrain became a rock/scree scramble. Right after I passed a very large orange-colored rock sitting randomly in the middle of the route that everyone uses as a rest stop, I had to choose between crawling my way up to and through one of several chutes with falling rocks (the path leads up the chute on the far right), or hiking past all chutes from below, then turning left and going up a scree field with the chutes to my left and what's left of the Wintun glacier on my right. Instead, I chose the worst of both worlds, starting up the chutes and after having to dodge falling rocks coming loose from hikers above me, deciding to climb out of the chutes onto the scree field. I think the suffering is bad no matter which way you go, but I dropped into the scree field at about the middle and was extremely thankful I didn't start at the bottom of it because just climbing up the top 1/2 of it required far more cursing of the mountain and damning of myself for my lack of conditioning than I expected. I don't think I've ever spent so much time and energy to gain so little elevation before. I think it took about 45 minutes to gain 200 vertical ft. For anyone considering this route in these conditions, I highly suggest you put your helmet on, keep your eyes/ears open for falling rocks, and suffer your way up the chutes.
After getting past that hell, I was hit the rest of the way with a wind that was cold, strong, and consistent enough that my eyeballs actually got cold and the vision in my left eye began to blur. But with my good eye I could see the summit staring me in the face so I pressed on! The only snow on the route was while crossing the plateau at 14,000ft, but it's flat so no crampons needed. Also, unlike routes coming from Bunny Flat, you bypass Misery Hill on this route and end up reaching the plateau on the east side of it near the base of the summit pinnacle. Finally making it to the top at about 11:10am with a bunch of other fools was a great feeling, at least for the parts of me that hadn't gone numb yet! On this clear and sunny (but windy) day, I could see 12,000 ft down and maybe 100 miles out. There are no mountains higher than Shasta for hunderds of miles. After 30 minutes of picture-taking, story-telling, registry-signing, and recovering, I headed down. Normally going down is tons of fun, since the snow allows you to either glissade (slide on your butt) or ski/snowboard. However, relative to that kind of descent, this one was not as fun.
Getting back to camp
Getting to camp from the summit took about 3 hrs. I took the chutes route back down, which also was full of loose rocks/ash similar to the scree field I went up, but the chutes are narrow enough that while ascending them you can probably find better holds and footing than on the scree field by staying against the sides of whatever chute you're in. If you're used to descending without snow, this downclimb is nothing special, it is downhill all the way to camp and once you get below the orange-colored rock at around 12,900ft the pace picks up as you can slide a bit with each step. Yet another reason to have your hiking poles, as this is not so easy to do without them. I took 4 liters of water when leaving camp and ran out 20 minutes before getting back to camp. Not too bad, although I got thirsty even in those last 20 minutes. One thing worth noting, this is the 2nd time hiking Shasta using my Camelbak (just the bladder, stuffed carefully into my backpack). This was suggested to me by a friend and I've found this to be an outstanding improvement over past methods of packing 3-4 Nalgene bottles. At lower elevations you can drink while walking, and even though it's too tiring to do that at higher elevations, it's easier than having to keep pulling out and putting back a water bottle. With the bladder being 3-liters, I also brought one Nalgene bottle. Just my opinion. One other thing to mention, a lot of dust gets kicked up as you hike above camp, more going down than going up. Downclimbing with someone in front of you guarantees your face will be caked in dirt like mine was long before you get to camp. And it will get in your eyes and throat, but you'll survive. Leave some distance between you and the person below you when going down to help with this.
Getting back to trailhead
After spending almost 3 hrs recovering and packing up camp, we headed out. It took a little over 1/2 the time to get to the trailhead from camp vs. the other way around. My left knee, which was killing me for most of the descent from summit, was hurting even more with the extra weight and harder trail surface. My friend seemed to be doing much better than me on this part of the hike, although he had more energy since on the way to the summit, the difficult terrain and high elevations forced him to turn around at head down at around 12,500ft. The trailhead always seems farther away than it should be when your hiking back down to it, and this was true on this hike as well.
NOTE TO SELF (and to others): After driving away from the trailhead and going about 2.5 miles you get to the intersection that had the first brown Clear Creek Trailhead sign. At this intersection, do not turn left or hard right onto Road 31. Make a slight right (or almost straight) turn onto the road that has no name (but has a forest road # sign). This is Widow Springs Rd, which will lead to the paved Pilgrim Creek Rd. We didn't pay attention to this and ended up wandering on Road 31 for a while before figuring out this error. After that, the rest of the 5 hr drive back home was smooth sailing.


Comments
Post a Comment