
|
|
Route |
|---|---|
|
|
36.10810°N / 115.4894°W |
|
|
Trad Climbing |
|
|
Most of a day |
|
|
III 5.8+ |
|
|
5.8 (YDS) |
|
|
9 |
|
|
III |
|
|
Approach


 Start
Start

 Topo
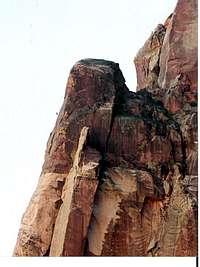
TopoCrimson Chrysalis climbs the north face of Cloud Tower - a pillar attached on at least one side to the north side of Rainbow Mountain. Cloud Tower is visible from most points along the scenic loop road (as well as from the state highway). The base of the pillar is located atop a low-angle ramp rising several hundred feet above the valley floor. Two options are available for reaching the base of the route:
(1) Shortest and most straightforward but limited by park loop road closure hours. Take the park loop road (see John's directions on main page on how to reach the loop road from the state highway) to the Pine Creek Trailhead (this is the next to the last trailhead on the one-way loop road). This is the standard trailhead for approaches to Mescalito and Juniper Peak. There's a bathroom there. From the trailhead, hike down to the wash as you would for routes on Mescalito or Juniper Peak. About 10 minutes into the hike, you'll pass the short Fire Ecology Trail (it leaves the main trail only to get back to it in about 200 yards). You'll also pass what looks like a wide trail on your left shortly thereafter - if it looks like it dead-ends about 30 yards off the main trail, it does. Stay on the main trail for another 15 minutes from Fire Ecology Trail - you're still heading in the direction of the Mescalito "pyramid" (longer than you'd expect). Eventually, you come to a signed junction. Leave the main trail and take a left here headed toward the wash. 200 yards from main trail, cross the wash and once on the other side turn right and follow the wash for about 100 more yards heading (again) in direction of Mescalito. The trail is fairly clear here. After 100 or so yards, it turns left sharply and heads uphill out of the wash in the direction of Juniper Peak (Olive Oil and Geronimo routes for example). Stay on this trail as it traverses below the east face of Juniper Peak for about 10-15 minutes from the signed junction. You'll pass an "arrow sign". Eventually, a well beaten path veers right toward the start of Olive Oil, Geronimo, and other routes. Take it. You're now headed in the direction of Cloud Tower and the mouth of canyon (bet. Juniper Peak and Rainbow Mountain). Stay on this trail for approx. 5-10minutes from the last junction. You're looking for "a" trail heading left into the wash (there are quite a few here some more prominent than others). The key here is to find the right trail - it's a gamble frankly. The downside of taking the "wrong" trail left is that you'll do some bushwhacking/boulder hopping - not fun. Once you take that "correct" left trail, it'll take you across two (pain in the butt) washes - each is an excellent spot to lose the trail. Try to stay with it - it's worth it! Once across the last of the washes, the trail heads steeply (tight switchbacks) up toward the ramp (atop which sits Cloud Tower). The trail climbs up to the ramp near its NE edge (steep class 2). Once on the ramp, follow it near the right side edge (decent climbers' trail) to the point where it crests. You're now at the start of the Crimson Chrysalis route (see photos to orient yourself as to where exactly P1 starts - you're looking for a right-facing dihedral in a kind of a notch below a big boulder).
(2) Longer but not limited to "operational" hours of the loop road. Take NV state highway 160 to where the park look road rejoins the highway. Park near the exit gate. Hike the loop road (walking against traffic flow direction) for approx. 1 mile to the signed (from the opposite side) turn-off for Oak Creek Trailhead - a dirt road on the left. This is the trailhead for routes on Solar Slab of Rainbow Mountain (Solar Slab, Johnny Vegas, etc...). Hike the dirt road to the parking lot at its end (0.5 miles or so?). Toilet facility available here. From the parking lot, take a trail (will look up the name later and add it in) heading right (or roughly north) - don't take the trail heading toward Solar Slab. Your goal is to traverse the east side of Rainbow Mountain northward. The easiest way (we've done the less easy way which involves very painful bushwhacking) is to stay on this main trail until you're almost at the base of Juniper Peak - much further than you'd think (i.e. you'll be hiking essentially past the Cloud Tower on your left...way past). You're looking for a prominent trail turning off to the left (the junction might have some signs - not sure). Once you find this trail, follow it all the way to the top of the ramp and base of Crimson (well-beaten). This approach is recommended only in peak season when you're trying to beat the crowds or when days are short and you're trying to maximize your day light for climbing. Hiking back to your car on the roads is NOT fun!
Route Overview & Topo
 Overview
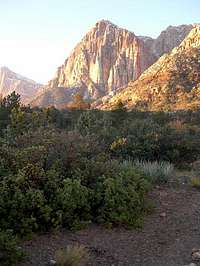 Long Range Overview
 Base View
Route Description


Crimson Chrysalis is (general agreement on this point exists) one of two ultra classic climbs or Red Rocks (the other being Epinephrine). The route is listed on Gary and Lynn Clark North American classic climbs web page. The route was put up by George and Joanne Urioste (two of the most prominent figures of Red Rocks climbing history) in October of 1979. The name of the route stems from the reddish coloration (near top) and the resemblance of the pillar to a huge buttrefly's cocoon (info. taken from Red Rocks Supertopo). Despite its moderate rating (Supertopo and Todd Swain's books rate it at III 5.8+; Urioste guidebook rates it at IV 5.9....the former is probably more accurate), the route is a nearly straight and vertical 1000-foot line up the north face of Cloud Tower. In fact, when viewed from its base, the route appears to pass through some overhung terrain (this is an illusion though there are steeper bulges to overcome in a nearly vertical wall).
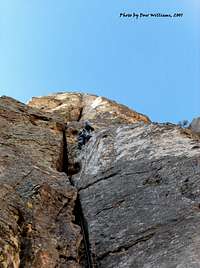
The climb reaches the top of Cloud Tower in 9 pitches of sustained 5.8 (though probably not quite 5.8+) climbing. Seven of nine belays are hanging which makes for one memorable day for your feet if you're not used to that sort of thing. All belays are bolted (most have 3-4 bolts expect topmost where you have 2 stations each with 2 bolts) and equipped with rap rings (leave your webbing at home). The route follows a prominent wide crack/chimney for the first 3.5 pitches, then a beautiful finger crack for 1.5 pitches, and finally the face (with intermittent cracks) to the top. Despite this variation in terrain, the route is mostly a face climb on nice, positive flakes (only a handful of jamming or stemming moves are needed). The route also crosses a full spectrum of rock typs encountered at Red Rocks: from the high-friction tan/greenish "stuff" low on the route, through the reddish zone 2/3rds of the way up, and finally the "chocolate granite" brown, slick band near the top.
There is quite a bit of discrepancy in the ratings of the pitches among the three available guidebooks: Supertopo, Swain, and Urioste. In my opinion, all pitches felt like an 5.8 (except for P6 which is supposed to be a 5.6 unless you're short then it's got a 5.9 move....well I'm 6'7" and could not find the 5.6 way through the crux) but the 5.8+ sections were not really noticable. Pitch lengths and ratings given below are from Supertopo (a great resource to have on this climb).
Pitch 1: 5.8, 140 feet. Start in the dihedral (see photos) and move up a well-featured hand crack for about 20 feet to reach the 1st bolt inside a pod. Plenty of trad pro. opportunities exist. Sling your bottom pieces with triple length runners or you'll experience some memorable rope drag as you're pulling the crux of the pitch near its top. Move up and right onto the face clipping four more bolts (sling those with long runners as well). The route allows you to return to the crack once in a while to supplement the sparse bolts with great gear. One more bolt and you're at the crux of the pitch (IMHO) - a flaring chimney move to reach the anchors. Belay from bolts (hanging).
Pitch 2: 5.8, 120 feet. Climb straight up clipping about 6 bolts and supplementing with trad gear where needed/possible. It's never runout. Another hanging belay from bolts.
Pitch 3: 5.8, 100 feet. Keep moving directly up past 4 or 5 bolts. I actually thought this was the hardest pitch of the route (but does not really stand out by that much...just a touch harder IMHO). Plenty of chances to place some natural gear if needed.
Pitch 4: 5.8, 160 feet. Keep moving right up a wide crack/chimney. Mostly face climbing with some stemming low on the pitch. There's a bolt low on the pitch. About midway up the pitch, you pull a bulge and the world opens up - for the first time the upper face pitches are revealed to you. The climbing also changes to a finger crack (most of the climbing is still on the face features however). This was probably the best pitch of the route. Enjoy the exposure below your feet (you're probably used it by now...it's been with you for the last 3.5 pitches) as you climb the beautiful crack. Top of this pitch also rewards you with a belay atop a small ledge (oh it feels so good not to have to hang!!!). Belay from bolts.
Pitch 5: 5.8+, 110 feet. This (according to Supertopo) is the crux of the climb. I did not think there was anything harder or different from the stuff you just covered below. Follow the beautiful finger crack straight up heading for the apparent bulge. Pull the bulge. Perfect pro available and many jugs for hands (plent for feet as well) - nothing bad. Above the crux clip a bolt (the ST shows the bolt as being below the crux - this is NOT correct) and reach the anchor bolts thereafter.
Pitch 6: 5.6, 100 feet. This is the start of face climbing. The Supertopo give this pitch a .6 rating or .9 - "reach-dependent". I thought the move in question was still an .8 - could not find the .6 way of doing it. From the belay, move up and slightly right past two bolts. Pull the crux bulge of the pitch and follow three more bolts over easy terrain to the top. Climbing is about 5.6 but the sparse pro keeps it interesting. Belay off of bolts.
Pitch 7: 5.7, 130 feet. Follow the moderate face protected by about 9 bolts up and slightly right from belay. You enter the red rock band midway up this pitch. Belay from bolts. This is probably the easiest pitch on the route.
Pitch 8: 5.7, 80 feet. Supertopo calls it a .7 - I thought that the crack near the top was harder than a .7. You enter the brown rock band on this pitch characterized by poor friction and small cracks. The Supertopo also mentions that you can link up P8 and P9 with a 60m rope. We did not do this due to big rope drag (due to rope catching on horns below). Climb up and right from the belay (steep) clipping a single bolt). Follow a ramp (gear) up and left. Two or three more bolts bring you the foot of a flaring crack. I thought this was harder than a 5.7 and pro is so-so (there was a fixed aid nut there when we did it). Belay from bolts above this flaring crack.
Pitch 9: 5.8, 75 feet. Move up past two (old) bolts and pull a bulge (crux of pich). Clip a bolt above and traverse right in a good finger/hand crack headed for the right shoulder of the Tower. Watch for loose rock here. Move up when (clipping one more bolt) its easy. Once on top, traverse back left to find a double-bolt anchor (one spinner hanger but bolt seemed solid; there's also a second double bolt anchor if you look carefully).
Descent: Not fun! Descent described here is with two 60m ropes. You definitely need double ropes to get off this climb. It's probably easiest to rig a double rope rappel all the way from the top of the climb (though you could do two single ones at the very top). From top of tower, rap with two ropes to top of P7. From here on, you're rapping one pitch at a time (down to P6, P5....) with two ropes. The pain comes from the fact that the face is so well featured with rope-lovin' flakes. The ropes can get snagged during the pull down process of course, but they also get caught BELOW you as you toss them. Supertopo suggests pulling ropes down and right (climber's right) to minimize chances of hang up's. This worked flawlessly for us. Use caution when rapping from top of P4 as there is a groove which will catch your knot (might not even have a rope left for releading the pitch if this were to happen)! There were no other parties on route when we did it and it still took a while (rope management in windy conditions). I can imagine it taking next to forever is there are parties coming up the route as you're rapping!!!
Essential Gear

Cams up to a 3.5 Camalot (4 inch piece) with possibly doubles in the <3 inch range (down to almost the smallest Alien micro cam...singles for the tiny ones). Some nuts esp. mid to very small sizes. Helmets.
Two ropes! Need those to rap the route. We did it with two 60m. Two 50m ropes would PROBABLY suffice - NOT sure though. Rap description given is for two 60's.
Helmets. Headlamps - if there are other parties on route, it might take you longer (much longer) than you think.
Internet Links

(1) A good pitch-by-pitch route description with a handful of photos (including a great route profile shot with climber on it): here.
(2) Excellent TR with great route photos: here.
(3) Two beautiful shots from the route by Guillaume & Jennifer are here.