
-
 4291 Hits
-
 79.04% Score
-
 10 Votes
|
|
Route |
|---|---|
|
|
51.12361°N / 115.11667°W |
|
|
Trad Climbing |
|
|
Summer |
|
|
A long day |
|
|
5.10b (YDS) |
|
|
X |
|
|
11 |
|
|
Overview/Approach

State of Confusion is a hybrid of three pre-existing routes as suggested by Nancy Hanson. I had yet to climb any of the routes that make up State of Confusion and the hybrid was said to contain the better sustained climbing pitches from those three routes (Corvus Corax, Dazed and Confused and Sunny Side of the Alps). Andy Genereux states in his Yamnuska guide book: “hope this description will not leave you in a state of confusion”. I suppose the same might be said for my attempt. However, I thought the line was easy to follow until I got distracted with the “death pitch” on Dazed and Confused toward the end. The suggested finish via the guidebook is the Slovenian Finish as associated with Sunny Side of the Alps. The guidebook gives an R (run out) rating to the third pitch which I did not think deserved it. However, there were other hard to protect sections at a higher grade. The guidebook gives the X on the suggested finish, but I actually chose the “death pitch” option which was XXX with a skull cross bone symbol in the guidebook. After leading my way through that choss, I whole-heartedly concur. I would also give the last 5.10b pitch a solid X for ankle-busting potential. The pro is just not adequate on this short corner with a solid ledge below that is all quite distant to the belay. I still thought the route worthwhile however.


Of over forty long trad climbs I have completed on Yamnuska, State of Confusion was the first route I found a bit sandbagged. The route starts out with a fantastic, long and sustained first pitch at true 5.10 climbing. You traverse right over a few fixed pieces into a corner/crack that looks easier than it actually is. When you are done with it, you will be surprised how sustained it turned out to be by Yam standards. This first pitch is an aesthetic obvious crack when viewed from approach. The second and third pitches were uneventful. The fourth pitch is another rope stretcher (55m) with stout 5.9 slab moves to finish. This one has a little bit of everything. It starts out in a hand crack, then takes on a dihedral and finishes on pure slab through spaced out fixed pro. A solid pitch to be sure. The fifth pitch is uneventful. The sixth and seventh pitches are the crux of the climb, and both a bit stout for the grade I thought. The sixth pitch involves sustained climbing over the second half (30m). After you move up and left to below a classic corner, climb it to a funky traverse move back right protected by a bolt (2010). This move lands you back in the corner proper. Sustained climbing leads up to a roof (bolt-2010). Then committing moves on slippery hard to protect intermittent cracks takes the roof to the left. Your C3’s will come in handy for the whole route, but I would have hated to have tested my piece here. The move is committing and exposed to pull up the left side of the roof. The seventh pitch is an X pitch in my opinion. The guide book references the ability to protect a short closed, mostly featureless, corner with wires but I disagree. The corner is an ankle buster waiting to happen. The only fixed piece is a piton at its base. A #2 C3 protects a long fall, but if you miss the hard move above it, you will no doubt bust an ankle. You can easily run up the left side of this corner and hook back in to the belay station above. Pitch eight was a fun and relatively easy pitch at the grade (5.9). Take on the medium to large crack above and then traverse run out ground at a lesser grade up and right to a 5.9 slab move that leads to a waist high boulder (old pin). Save a large piece to fix a belay in a huge rotten block to the right. The ninth pitch involves an airy, but short, horizontal hand traverse out right below the huge rotten block. Fix a belay on the other side. This is where I ended up doing the “death pitch” on Dazed and Confused versus the suggested Slovenian Finish. I broke this disastrous finish down into two pitches. Run up the left facing chossy corner with horrible pro. Then bring the second up to the huge loose blocks at the top of that corner on a ledge. Then down climb to the right and head up another chossy corner to the top of Yam, but with better pro options. Take a huge breather when on top.
There is a relatively new flagged trail below Yamnuska that takes off at the base of the scree descent. This is the best approach for the western routes. At the Y in the approach trail, take the left Y versus the normal right option. Continue until at the base of the first patch of loose scree. Look for the flagged faint trail down and to the left. Continue following the flagged trail as it ascends the western treed rib below Yamnuska. This trail will put you right at the base of the obvious corner system that makes up Missionary’s Crack among other routes. Turn right to access the start of the Necromancer Wall routes. There is a significant tower to the left of the wall and an obvious solid scree littered ramp to the right (where Necromancer starts). State of Confusion (as well as Corvus Corax) starts between these two features via two bolts than jig right under a few roofs to enter the obvious crack/corner above. The route starts right at a waist high stone.
Route Description


1250’+/-, 11 Pitches, 5.10bX
1st Pitch- 55m- 5.10a/ The first pitch is perhaps the most enjoyable pitch on the route. Follow the two bolts via a rightward traverse (5.8) below several small roofs until you can engage the tall crack/corner above. Follow the sustained crack/corner with the crux moves at the upper third of the pitch, placing gear at will to a fixed belay/rap.
2nd Pitch- 30m- 5.6/ Run up the easy, but loose corner as it angles up and left to a ledge. Traverse left to a fixed belay/rappel.
3rd Pitch- 40m- 5.7/ The guide book has this pitch labeled as run out and 50m. It is a good 10m short of that and I did not feel it was run out. The topo even shows the run out section at 5.8, but I did not notice the run out or the 5.8. It was a fast and easy pitch I thought, following different breaks straight up to a fixed belay/rap at the base of a corner.
4th Pitch- 55m- 5.9/ This pitch might have been closer to a full 60m. It was quite sustained as well, involving three completely different sections. This is one of the better pitches on the route. Take the hand crack up and left to the base of a dihedral. Climb the fun dihedral up to below a large slab section. Follow the spaced out fixed pro up the slab. I thought they could have positioned these bolts a little better. Seemed like they were not protecting the crux 5.9 slab moves very well and you would lose some skin if you fell. Up to a nice ledge with yet another fixed belay/rap.
5th Pitch- 40m- 5.6/ Just straight up a corner and a couple of ledges via loose ground to yet another fixed belay/rap on a comfortable ledge. There are some large loose rocks on this pitch.
6th Pitch- 50m- 5.10b/ Where the fun begins! I thought this pitch was a bit sandbagged towards the end. The first 20m plus is just moving up and left via easy ground to reach the base of a corner. Follow a crack on the left wall up until it makes sense to traverse back right into the corner. There is a bolt on the right wall, but it sort of protects after you make the awkward traverse back into the corner. Good rock and climbing lead up to a small roof with a suspect bolt underneath and right. Move left into the intermittent finger crack and make some bold moves to exit the left side of the chimney. I had a C3 in here, but was not thrilled with the protection of these full on 5.10 moves. Another fixed belay, but this one had no rap tat in 2010.
7th Pitch- 35m- 5.10bX/ This pitch is a real ankle buster if there ever was one. A bomber #2 C3 could easily lead the novice trad leader into thinking he was protected up the short closed corner, but with the play in a dynamic rope and how far one is from the belay when he/she has to make the last move up the corner, a potential deck fall is not protectable in my opinion. Run up and left on easy ground to the base of the closed and mostly featureless corner (piton at the base). Place a #2 C3 and make a stemmed reach/jump for the jug or bypass this short corner to the left on run out, but easy ground, joining back into the fixed belay above on a ledge below a medium to large arching crack up and left. The thin crack that the guide book must be referencing to protect with a wire in the closed corner is shallow and evenly parallel making it difficult if not impossible to protect with cams or wires (pink tri-cam maybe).
8th Pitch- 30m- 5.9/ Climb the crack up and left on medium to large gear, but save a large piece for the belay. When it starts to arch, turn up and right on real positive but run out slab heading for a large rotten block. Just to the left of that block is a waist high squared stone with a rusty piton (2010) at the base of the wall behind it. Place a C3 or wire to protect a slabby move up to that stone. Move right and do a 4” gear belay in the block.
9th Pitch- 15m- 5.9/ Take the hand rail immediately out right (no feet) protecting the move with a small piece. This is more of a one move wonder that is probably easier than it looks to you. Gain the ledge on the other side of the rotten block and fix a gear belay.
10th Pitch- 25m- 5.8X/ I finished on the “death pitch” of Dazed and Confused. It is a squirrely pitch indeed. Run up the left facing chossy corner. Be careful with rock fall on the belay. Pull a very loose overhang (rotten piton-2010). None of the ground can really protect well, the rock is just too brittle. Once you make the hair raising pull on choss, you can feel better about life, but be careful among the large teetering blocks above. Set up a 2” gear belay in a decent horizontal slot just to the right of those blocks.
11th Pitch- 25m- 5.8X/ The pro is better on this last section, but I definitely advise keeping these last two pitches separate for rope drag and communication purposes. Down climb from the belay ledge into the gully to the right. Then climb up the gully until just below the roof above. Move out on very precarious holds to the right to exit the top of the wall. Set up a .5” belay in a ground crack to climbers left.
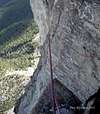
Climbing Sequence
 |
 |
 |
 |
 |
Climbing Sequence II
 |
 |
 |
 |
Descent
Walk off the western flank of Yamnuska. You can leave your packs at the base of this route as it is not much extra energy to re-ascend from the trail below to the base of the climb. Descend via a large scree gully back down to the lower trail that heads east back to the trailhead. Only thing that would be a bitch is if you lost an approach shoe on the climb, and yes I have done that. Your bare foot is tougher than you think.Essential Gear
60m Double ropes are usually best for Yamnuska (you are not in Kansas anymore). Of course they give you better bail options in terms of bad weather and in this case, help out with rope drag which is essential since several of the pitches are a full 60m in length. A single rack of cams including your micros to 4” with double 2’s to 4’s is the guidebook call and I concur. Some of these pitches are long and intricate. One set of smaller wires. Mostly shoulder length slings, one double length sling and a few draws. Helmets a must on Yam as always, this is a loose route! Biner your shoes to your harness (with a locker!) for the walk off. Never want to try and rap Yam if you can avoid it.External Links
- 100’s of Canmore and Banff National Park multi-pitch rock climbs, ice climbs, alpine climbs and scrambles, just scroll down to routes
- OR: Best True Technical Clothing and Accessories in the Outdoor Industry
- Scarpa, has surpassed La Sportiva in terms of quality, function, value
- Osprey Backpacks, Not a Second Choice
- Great Outdoors Depot
- Mont-Bell
- Cascade Designs (MSR; Thermarest; Platypus)