
-
 3773 Hits
-
 74.01% Score
-
 4 Votes
|
|
Route |
|---|---|
|
|
39.01130°N / 106.4535°W |
|
|
Hiking, Scrambling |
|
|
Spring, Summer, Fall, Winter |
|
|
Half a day |
|
|
Class 3 |
|
|
Overview and Approach
This is the most logical way to climb Ervin Peak, and the best for a combination route with Mount Blaurock. This is a steep climb to an airy ridge with loose rock and some class 3 scrambling.Round Trip Mileage - Appx 3 1/2 Miles
Vertical Gain - Appx 3100'
The route starts in an open meadow around 10,500' just to the west of Grey Cooper Creek. Cross the meadow to an old jeep road, cross the creek and head up the tree covered lower slopes of Ervin Peak's Southwest Ridge.
Route Description
Continue through the trees, the route finding here is pretty straightforward. Basically just keep going up! Around 11,200 you will reach a small flat spot where you can take a quick breather. To your south the views of Winfield Peak will let you know how much progress you have made.Continue through trees and talus slopes. The trees open up a bit here and the talus starts to dominate. The ridge here also becomes more defined, and you can see the ridge crest above you at 12,600'. The steepness relents briefly at this point, and it is a good spot for another breather. The views now start to include the Huron Peak group, and you can see the remaining climb, including a few towers on the ridge that may catch your eye.
Continue on the defined ridge crest, some of the talus here is a little loose and coupled with the steepness makes this section Class 2+. Climb through the talus to reach the western false summit at about 13,450'. This is where the fun begins!
Climb east on an ever narrowing class 2 ridge or if the exposure is not to your liking, traverse the slopes slightly to your north. About halfway to the summit it will become clear that those towers you saw from below cannot be easily bypassed without sacrificing precious elevation. What to do? Climb them!
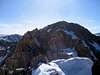
The first tower is reasonably straight forward with a few exposed class 3 moves required to overtake it. The rock here is loose, and in the name of safety I purposefully pushed a few to the snow below. That doesn't mean that you will take the same route I did, or that all of the loose blocks are cleaned. Take care in this section, some of the loose blocks were equal to a good sized flat-screen TV. The second tower is best bypassed on the right side on an airy ledge. There are a few short class 3 moves required to climb up the ledge. I initially thought the left looked better was extremely loose, the right is the safer bet. The bottom of this image shows the backside of this tower, the good ledge is on the left from this angle.
You are not out of the woods yet, while the primary difficulties are over, the rock is still loose on the class 2+ final summit pitch. Don't let your guard down! I almost pulled a briefcase sized block into my chest when I used it for balance. Be equally vigilant on the descent, weighting one of these broken slabs could send you for an unpleasant ride. The summit views are spectacular! Descend the way you came, or traverse over to Mount Blaurock for a nice circle tour.
 |  |  |
Essential Gear
Basic hiking gear is all that is required when this route is dry.With snow an ice axe may be useful at exposed sections of the traverse. In winter an ice axe and crampons both will probably be required.