
|
|
Route |
|---|---|
|
|
44.36870°N / 121.1309°W |
|
|
Trad Climbing |
|
|
Less than two hours |
|
|
5.7 - 5.12a/b |
|
|
Approach

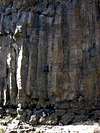
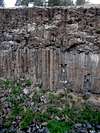
Catwalk Cliff is part of the West Side Columns area located in the Lower Gorge. Follow the directions on the main page under Getting There: West Side Of Crooked River.
Once you hike down into the Lower Gorge, follow a climbers' trail that runs along the base of the cliffs (follow it upriver). The first wall you'll pass (somewhat above and away from the trail) will be the relatively short Parched Cat Cliff. The first set of columns that the trail gets close to after that (couple of scrambling moves required to get across large boulders at its base) is the Wildfire Wall. Catwalk Cliff begins where the trail crosses a very narrow catwalk between the wall (on the right) and the river 20 feet below you. The first route on Catwalk Cliff you encounter is (acc. to Watts) Prometheus (5.10c); Chimney Of Ghouls (5.7R) route marks the end of Catwalk Cliff and the beginning of Star Wall.
For exact route locations, see Watt's guide with its very detailed route overlays - no sense in competing with something that's been done so well. In addition, look at photos included with each route below.
Route Descriptions
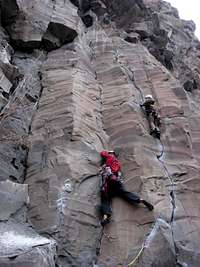
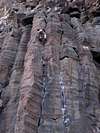
Catwalk Cliff hosts 46 established routes (acc. to Watts). They range in difficulty from 5.7 to 5.12a/b but the real gems (3 or more quality stars) begin at 5.10a. Most routes are traditionally protected though some (hard) sport routes also can be found here. All routes are single pitch.Last Chance 5.10c

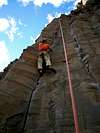
The route is located right after the narrow "catwalk" over the Crooked River as you hike upriver (see photo). Look for a clean finger crack in an oblique open corner (left of a bolted arete). Scramble up the frothy rock to the base of the clean crack. Move up the crack via finger locks and thin stemming. No move is particulary difficult but going is sustained with the cruxes coming near the top. Protection is great and so is the rock. Did I mention it was sustained?
Gear: Cams up to #0.75 Camalot (no #1's were used but one #2 was used). Heavy on finger and below sizes. Light set of nuts.
Photos:
 |
 |
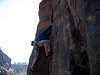
Bat Flake, 5.10a

After hiking past Last Chance (heading upriver) and before getting to Cruel Sister area, look for a series of roofs formed by adjacent basalt columns being missing. Bat Flake starts directly under the righmost roof. Bouldery start followed by stemming leads to a bypass move on the right side of the first roof. Cool featured rock! Second roof is also bypassed on right via finger jams. Then comes the namesake flake which is only partially followed (i.e. do not follow it hard right as the flake peters out, see this here topo). I think, to keep things at 10a, move and left. Either make your way far left (per guidebook) or foot shuffle on a narrow ledge 3 feet right to good anchors.
Gear: Cams from blue Alien/purple TCU to #3 Camalot. Extras in #0.5 to #2.
Photos:
Rising Star 5.10b

After hiking past Last Chance (heading upriver) and before getting to Cruel Sister area, look for a series of roofs formed by adjacent basalt columns being missing. Bat Flake starts directly under the righmost roof. Rising Star starts 2 feet left of Bat Flake. Move up a good handcrack to a mini-roof and pull it. A short tips crack above brings you to a larger roof. Pull that (crux) on the left and into a decent handcrack. My rope got sucked into and then stuck in the crack next to the roof (major cluster F!). Continue through a slight bulge (stemming and jamming) to a crapping anchor consisting of two angles (now supplemented by our medium nut).
Gear: Cams from blue Alien/purple TCU to #3 Camalot. Extras up to number 2 Camalot.
Photos:
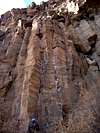
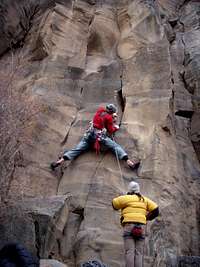
Quasar 5.10a
 Quasar
Located 12 feet right of Blood Clot. Climb 15 feet up the frothy-looking rock directly below the thin crack visible above (limited pro here). Finger jams and smeary feet (some OK pockets) take you to the top. Going is sustained and the route feels kind of hard for the grade. Double bolt anchor on top. Lower half (above frothy rock) is the crux.
Gear: Doubles from blue Alien to #1 Camalot. Optional #2 Camalot. Some small to mid-sized nuts.
Photos:
 |
 |
 |
 |
 |
 |
 |
 |
 |
 |
 |
Erogenous Zone 5.10c
Look for a thin crack (black/blue Alien) starting above an 8-foot pedestal immeidately left of Quasar. The first 10 feet off the pedestal are probably the crux but the route seemed to stay hard & sustained all the way. Belay on right from Quasar bolt anchors or climb 20 more feet to independent set of anchors - the crack seems to become pretty intermittent at that point (add in: reportedly the crack peters out altogether above these Quasar anchors & the going does not ease up much).
Gear: Set of cams from black Alien to #1 Camalot. Doubles in micro cams up to red Alien (or #0.5 Camalots). Optional double #1 Camalot. Set of nuts from small to medium.
Photos:
 |
 |
 |
 |
 |
Battle Of The Bulge 5.10a

The dark recessed corner to the left of Erogenous Zone and to the right of Blood Clot hosts this line (roof-capped corner on right in this photo). Look up for a "roof" just right of Blood Clot - that's what you're aiming for. There are a couple options of how to get there. Watts guidebook draws a stragight line up from base to roof but that looked much more guano soaked. Instead, I went right and right of a dry bush growing 20 feet above ground and then traverse to the roof (which is reportedly the money move of the line). Pull the roof and climb the widish crack (followed by some fingerlocks). Step left to bolt anchor atop Blood Clot. This is a nice line if a bit dirty, watch out for what look like large wedged blocks under the roof (there's no need to touch them though).
Gear: Set of cams from blue Alien/TCU to #4 C4. Extra #0.5-#1 Camalot.
Blood Clot 5.10b

Located 8 feet right of Cruel Sister. Route begins with a good hand crack (#1/#2 Camalot). Crux hits about 25 feet up as crack closes down to very thin fingers. Crux is only ~10 feet long but stout. Going eases just above. Double bolt anchor on top.
Gear: From green Alien to #3 Camalot. Extra #1 and #2 Camalots. Optional #3.5 (near top). Single small-mid sized nut. Crux takes nut and/or green Alien.
Cruel Sister 5.10a

Located well past the catwalk section of the trail directly across from Shakespeare Cliff on the opposite bank of the river. Classic hand crack and probably the best of its grade in Smith! It starts with good hand jams (#2 Camalot). Crack fluctuates from #1 to #3 Camalot above. Crux is probably near the top as crack widens to #3.5 and briefly to #4 Camalot. Easier if you have big hands. Double bolt anchor on top. I found this route to be a couple notches easier than Karate Crack in The Dihedrals (tuff) area.
Gear: Doubles from #0.75 to #3 Camalots (possibly extra #1 and #2). Single #3.5 and #4 Camalots. No nuts; no smaller cams needed.
Photos:
 |
 |
 |
 |
 |
 |
 |
 |
 |
 |
 |
 |
 |
 |
 |
Patent Leather Pump 5.10a

This line is located about 40 feet left (upriver) of the Cruel Sister "alcove". Look for an open book - see photo and consult Watts' guidebook for exact location. Start up the dihedral/open book and pull a bulge 25 feet up (crux?). Continue stemming and jamming your way up using either crack for pro. At top, step left to bolt anchors.
Gear: Set of cams from #0.5 to #3 Camalot with double in #0.75 to #2.
Photos:
 |
 |
 |
 |
 |
Old And In The Way 5.10c
Climb is immediately left of Patent Leather Pump - look for a thin crack in a smooth face leading to a ledge 16 feet up. Line consists of 2 cruxes. The first comes in the opening moves required to reach the ledge (boulder problem with a not-so-great landing). The second crux comes shortly after the ledge as you exit a weird flared stem. Easy crack (#1-#2 Camalot) to top. Traverse right to Patent Leather Pump bolt anchor.
Gear: Set of cams from black Alien to #1 or #2 Camalot. Double yellow & red Aliens or equivalent. One or two micro and/or medium nuts.
Photos:
 |
 |
Conversion Excursion 5.10a

This line is located several columns left (upriver) of Patent Leather Pump - see photo for location & consult Watts' guidebook. Climb a nice dihedral with two converging cracks inside. Crux might be getting into the dihedral off the ground. At the top, either belay from a slung boulder or traverse left ~20 feet to bolt anchors atop Wasted Words.
Gear: Set of cams from Camalots #0.5 to #3.5 or #4.
Photos:
 |
 |
On The Spot 5.9

This is left/upriver ~30 feet of Conversion Excursion - look for a semi-detached 15-foot block sitting at the base. Either start up directly (left side of block) via wide crack with chockstones or scramble up from the right (from near the start of Conversion Excursion) side into the short squeeze behind the block. Climb the varying crack above left side of block. Going quickly eases. Pass a ledge & climb another short hand/thin hand crack. Undercling around the bulge (left or right) and belay from bolt anchor above.
Gear: Set of cams from #0.5 to #3 Camalot. Optional one extra #1 and 2 Camalots.
Wasted Words 5.10a

This line is located well left (upriver) of Conversion Excursion - see photo for location and consult guidebook. Climb the right of the two closely spaced cracks (the left one is the start of Lost Souls) up to loose-looking (felt solid though) block. Step right and into an OW crack through the bulge (crux). Follow wide crack to a ledge and then a thin hand crack up and right around roof to bolted anchor.
Gear: Set of cams from #0.5 Camalot to #4 or #4.5 Camalot.
Lost Souls 5.9

See photo for start of this line and consult Watts' guidebook. Climb the left of the two closely spaced cracks (the right one is the start of Wasted Words. Pull the bulge around loose-looking (but felt solid) block and enter a lower angle (nice!) finger crack.
Gear: Cams from green Alien to #3 Camalot.
Religious Fervor 5.10a

This is the next crack climb left of Lost Souls. Climb follows the obvious wide/wavy clean OW crack (#4 and #4.5 Camalots) staring atop a pedestal in a left-facing dihedral (probably easier to lieback than jam…). Climb this crack (crux) to a bulge. Follow lower angle cracks (right one of the two) to top. Bolt anchors are above and slightly to the left (easiest access by stepping right, up, then back left on bird-shit coated ledges).
Gear: Cams from #0.75 to #4.5 Camalot.
Sitting Duck 5.9

Look for a crack located between Religious Fervor to the right and Greasy Sppon to the left. Climb the crack through a bulge (crux) 20 feet up. Above bulge follow crack on the left till it closes up and then step right to low angle crack on upper portion of Religious Fervor. Bolt anchors are above and slightly to the left (easiest access by stepping right, up, then back left on bird-shit coated ledges).
Gear: Cams from #0.5 to #3.5 Camalot.
Greasy Spoon 5.10a

Climb the clean finger crack 15 feet to a bulge with a wider pod using some stemming. Pull the bulge (crux) and climb the lower angle wide cracks to top. Traverse left (~20 feet) at top to bolt anchors atop Dire Wolf and Delicatessen.
Gear: Set of cams from #0.5 to #4 Camalot. Optional #4.5 Camalot (or #5 Friend).
Fun
 Last Chance
 Cruel Sister