
|
|
Custom Object |
|---|---|
|
|
37.77987°N / 121.97791°W |
|
|
Construction Page |
1

Sed ut perspiciatis unde omnis iste natus error sit voluptatem accusantium doloremque laudantium, totam rem aperiam, eaque ipsa quae ab illo inventore veritatis et quasi architecto beatae vitae dicta sunt explicabo. Nemo enim ipsam voluptatem quia voluptas sit aspernatur aut odit aut fugit, sed quia consequuntur magni dolores eos qui ratione voluptatem sequi nesciunt. Neque porro quisquam est, qui dolorem ipsum quia dolor sit amet, consectetur, adipisci velit, sed quia non numquam eius modi tempora incidunt ut labore et dolore magnam aliquam quaerat voluptatem. Ut enim ad minima veniam, quis nostrum exercitationem ullam corporis suscipit laboriosam, nisi ut aliquid ex ea commodi consequatur? Quis autem vel eum iure reprehenderit qui in ea voluptate velit esse quam nihil molestiae consequatur, vel illum qui dolorem eum fugiat quo voluptas nulla pariatur?
Overview Test
Packing Light: Ditch the Nalgenes!Ok... this is about a lot more than ditching Nalgene bottle, but how do you get your pack under ten pounds? Is it worth it?
Over the past two or three years I have had a sort of competition with myself to see just how light I can get my pack… without skipping any desirable gear. Obviously there are many different approaches and styles to heading out into the wilderness, and for some it may not be worth leaving those extra layers, toasty sleeping bag, down pillow, camp slippers, or four room tent behind if you are heading to Thousand Island Lake for a multi-day weekend with the family, dog, and fishing gear to set up a nice base camp for enjoyment of the mosquitoes.
All too often, however, I have seen folks struggling in agony under insufferable loads trying to do far more, even hauling heavy gear on long and strenuous outings like the 210 mile John Muir Trail or 6000 feet up Taboose Pass… this isn’t necessary!!!
When I did the John Muir Trail seven years ago I thought I was packing light, but I wasn’t even close. We struggled under huge loads. And after food resupplies we even had to help each other put our packs on. My empty pack alone weighed six pounds! As I have tried out new gear and leaving other gear behind I have amazed myself with how much more I am capable of doing with a lighter pack. And I don't miss my extra gear!
No longer is a base camp necessary or even justified, I can just haul everything I have straight up to the summit and down the other side to continue my journey. More remote areas can be reached far more quickly, in just part of a day even… and still I have everything I need. With lighter loads I’ve found I have more time to enjoy the destination rather than the approach. And it feels so sweet when my pack is so light I needn’t even bother with a hip belt (for me this point seems to be under 11-12 pounds).
And did I mention the benefits of fitting all your gear into a daypack? Permits… Well you don’t need a wilderness permit if you only have a daypack do you?
My normal base load had finally gotten below ten pounds… and yes… it has been worth it.
First… Weigh Your Gear!
This should be obvious enough, but too many don’t think about just what that 3 pound sleeping bag is doing to them, or compare the weight of new gear before buying it. The first thing I always look at is the weight… then the price. There is no point in buying new gear if it is going to be too heavy to use comfortably or long term.
Only very recently I discovered that I could shave another 1/2 pound off my pack weight by ditching my previous standard of two lightweight thermal tops for a single heavier weight one. The loss in flexibility is slight, but well worth another 5% in weight savings. And at night I am just as warm as I was before.
Also… invest in a portable scale.
I weigh my pack before and after every trip. When you unpack pay particular attention to any gear or food that you did not use. Consider dumping it next time. Also note that when I refer to pack weights here I am usually referring to the weight after the trip. If you eat all the food you brought then fair enough… it doesn’t count!
Too many times folks talk in generalities, and I will try to cover that, but also list at lot of the gear I use so you can see exactly how I made it work.
So on to some specifics…
Sleeping Gear
This is first because this is where most folks I meet have a HUGE opportunity to reduce weight.
Sleeping pad
Therm-a-Rest NeoAir XLite Small
Measured weight 8 ounces
I cut no corners here. When you can use the same gear every single trip it’s worth going all out for it.
This pad 2.5 inches thick, comfortable, and warm enough for me to use year-round, even in the snow. More importantly, the NeoAir XLite doesn’t have foam insulation (it has more efficient reflective layers) so it packs super small, which helps you reduce your backpack size too. Like you will see in many areas the weight savings can compound itself. Smaller pad… smaller pack. So you save more than just the weight of the pad.
And get the short pad. Use your empty backpack to place under your feet when you sleep. The idea is to have multiple uses for everything… it is a bit useless for your pack to be lying next to you doing nothing each night. Use it for part of your sleeping pad and your pack will be 4-8 ounces lighter every trip you take simply because you don’t have a long sleeping pad.
Sleeping bag
Mountain Hardwear Mountain Speed 32 degree bag
Measured weight 16 ounces
DOWN! Ditch the old synthetic bag and by the lightest down that fits your budget. I recently upgraded to this bag and this was a key step to finally keep me under 10 pounds longer in the season. It has 850-fill down and a super light shell. Pricey but I can use this bag on nearly every trip. Even better it packs down to about a liter, again enabling even more weight savings since I can now use an even smaller and lighter pack.
Previously my normal bag was a 40 degree REI version which still worked for most of the year. Sleep in ALL your clothes, and you will be surprised at how warm a sleeping bag you can deal with. Again… a complete waste if your clothes are piled up next to you while you are snuggled up in a 0 or 20 degree bag. Wear two pairs of socks if your feet are cold. Maybe wrap your feet in your shell jacket as well. Maybe you use one layer for a pillow, but everything else should be worn or wrapped around you all night.
LEAVE AT HOME
Pillow. Use one of your existing layers.
Shelter
Tent
Black Diamond Beta Light
Measured weight 23 ounces (incliding 6 stakes)
Again, depending on where you live, sooooo much weight can be saved here. The Beta Light is perhaps the best purchase I have ever made, and it works great in most seasons (including many winter conditions). 60 mph winds aren’t ideal for this tent, but unless you are camping on a summit that is rarely a consideration. I have used it throughout the Sierra and much of the Cascades and been through snow, hail, and rain… all without any problems.
The tent is plenty big enough for two people, larger than many two person tents, but is light enough to be ideal for one. It uses trekking poles to save on weight, and it is floorless so I use a lightweight ground tarp to protect my gear and keep it clean.
Ground Tarp
Gossamer Gear Polycryo Ground Cloth
1.6 ounces each
My props to SP member Marmaduke for turning me on to this item. No heavy tarp needed. I’ve used one of these sheets for two years without having to replace it (ok… after two years a marmot finally went after mine, so now I am on my second version). Thin, lightweight, and very surprisingly durable. It looks like it doesn't last, but it does. One medium sheet works perfect for each person who might be using a floorless tent.
Trekking Poles
Black Diamond Trail Trekking Pole
18 ounces per pair
I list this under Shelter because this isn’t really gear that I consider part of my pack weight, yet I am able to utilize them for the Beta Light while I am in camp.
There are many options available here, but for me this is the best model available. Carbon fiber is lighter but I would suspect not as durable given the abuse I put mine through (using them as sort of an ice ax for stability on spring snow for example or as a brake when glissading). I like the foam handles, they collapse to be about as compact as any model out there, and the FlickLock mechanism is FAR superior to models that require twisting, especially in wet or freezing conditions… they never wear out!
Note again, however, that as I carry these in my hands and they are rarely in my pack, I haven’t included these in my pack weight.
Bivy
REI Minimalist Bivy Sack
15 ounces
Alternatively, an extra half pound or more can be saved if going solo by using a bivy sack instead of a tent shelter and the associated stakes that go along with it. This model is super light and relatively inexpensive and works great for ridge traverses or summit bivies. It has a mesh face cover, so not ideal for extended rain... but you will survive (can always turn over or use your jacket shell as a cover). The Black Diamond Twilight Bivy is even lighter (10 ounces) and has a full top cover, but I have no experience with this model yet.
LEAVE AT HOME
Heavy tarp or tent footprint, full size tent, tent floor
Clothing
Simple really… just don’t bring more than you need. No need for that extra layer than you might only wear for only 20 minutes after sunset. Why carry something around all day if you are barely going to use it? Also if you can afford it, replace that fleece jacket with a down one.
| Item | Weight | Comments |
|---|---|---|
| Sun hat | X ounces | |
| Warm hat | X ounces | Always bring this, excellent warmth for the weight |
| Neck gaiter | X ounces | Also weighs only a little but can add a ton of warmth |
| Lightweight gloves | X ounces | |
| Spare socks | X ounces | I usually bring one extra pair, and often wear both when I am sleeping |
| Towel | X ounces | OK this is extraneous, but I often take a washcloth sized towel. Tiny but still good enough for after a dip in the lake or for wiping condensation or frost off the tent. |
| Long underwear | X ounces | Good in the morning/evenings and always used in the sleeping bag. Usually I bring two layers for the top. |
| Down sweater | X ounces | I have a Patagonia Down Sweater for my main layer, and if colder than normal I might bring either a third thermal top or a Mountain Hardwear Ghost Whisperer down jacket as well. |
| Hardshell jacket | 14 ounces | I use a Marmot PreCip Rain Jacket (after using a softshell for years) When going light use a hardshell, always lighter and more compact. If the weather warrants this can often be skipped altogether, or lighter options are available. |
LEAVE AT HOME
Crocs, spare pants, extra shirts, flip flops, spare layer for ‘just in case’ (you can surely get by without those layers you seldom put on)
Food
This is up to you, the main thing is to eat everything and not have any leftovers. Anything you don’t eat is not only waste, but dead weight carried throughout the trip. Bring food you like and will eat, and ditch the stove!
I take a stove if going on a 4+ day trip, or 3 days with others and sharing the weight. But otherwise it is just too much gear for 1-2 nights. Sandwiches, burritos, pizza, wraps, granola bars, Snickers bars, cheese and crackers… there are plenty of options for leaving the stove behind. This will save 1-2 pounds easily… remember no matter how light the stove you have to consider the weight of the pot and fuel too!
I carefully weigh my food before every trip. As long as I am bringing high caloric food like peanut butter and jelly sandwiches I know I can get by with about 2.5 pounds of food on an overnight trip, and 4 or 6 pounds for a 2 or 3 night trip respectively. If I have food with extra water content like a burrito (full of rice or beans) I probably need to up the amount by a half pound or so.
It doesn't really matter specifically what you bring for each meal, just keep an eye on the total weight and it usually works out to be enough, without a lot of leftovers.
Sometimes a stove is needed for longer trips, or melting snow. In these cases I use a regular model Jetboil. There are lighter versions available now, but I don’t carry the stove often enough to justify the expense for a better model.
LEAVE AT HOME
Stove
Other Gear
On every trip there is a small pile of tiny items that must be brought. Here is an outline of what I bring along:
Water containers
Empty Gatorade Bottle and Platypus 34 ounce SoftBottle
Less than 2 ounces
FORGET THE NALGENE!!! Nalgenes are heavy!!! OK... finally to the title of the article... over 2000 words in. The hard sided bottles are over 6 ounces each… when empty! This is dead weight, and nearly everyone can save weight here. Gatorade bottles work just as well and weigh less than an ounce. You can replace them cheaply instead of worrying about cleaning them when they get dirty (or use them as a pee bottle if you can’t be bothered to leave your tent). I use a 20 ounce bottle but 32 ounce ones are great too.
If additional capacity is needed for detours to summits or snowmelt, an additional lightweight Platypus bottle works as well (no tubes or fancy tops). Many of my friends say the Platypus bottles leak, but if you take care of them and do not fold them up they last for years.
Headlamp
Black Diamond Spot Headlamp
3.2 ounces with batteries
First, I use rechargeable batteries. This allows me to begin every trip with a full charge on my headlamp and eliminates any need to carry extra batteries. The headlamp is incredibly bright, 90 lumens (whatever that means), and has lot of modes including a spotlight, red light, dimmer, and you can lock the device to prevent accidentally turning it on in your pack. By the way… when I say incredibly bright… I mean it.
Knife
Victorinox Swiss Army Silver Alox
0.6 ounces
No need for a machete. Includes scissors, knife, file, and screwdriver tip in less than an ounce.
Sunscreen
1.25 oz refillable GoToob bottle
Less than 2 ounces with sunscreen
I purchased a refillable 1.25 oz GoToob bottle from REI. Much cheaper to by sunscreen in large 8-10 ounce tubes and put only what is needed in a smaller container. 1.25 ounces has always been plenty for a long weekend, even in the snow. No need to carry a 4-5 ounce tube along. I’ll also carry a small stick of chapstick.
Duct Tape
I carry a small amount of duct tape everywhere, usually to tape my feet and prevent blisters. Could also be useful to repair gear or as temporary first aid assistance. To keep it down to what I need, I just wrap the duct tape around an empty toilet paper roll and cut the roll down to size. Add to the roll as needed after each trip.
Toiletries
Toilet paper, toothbrush, toothpaste, floss
x ounces
Toilet paper… just pull some off a roll and stick it in a ziplock bag. Shouldn’t need a whole roll. Also a tiny container of Purell (see Water Filter comments below).
Toothbrush with a shaved off handle (mostly so it fits in a ziplock rather than the weight savings)
Ultra tiny toothpaste tube (can get these from hotels or airlines in business class, then I refill them using my regular toothpaste at home)
Floss (piece by piece in a ziplock, no need to take the whole container)
Sometimes a tiny bit of soap or shampoo
Map
Instead of a big national park or forest map that covers a huge area (some of these are over a couple of ounces), I just print out what I need using TOPO! software from National Geographic. There are many other mechanisms too, but a printout on a sheet of paper often works about as good as anything and has more detail than a large, bulky map.
Cord
A pair of extra shoelaces or some short cord to secure food away from marmots and mice. See Bear Can notes below.
Alarm
Since I usually don’t have a phone (see below) and I don’t wear a watch, I have a small, cheap Casio that I can use for an alarm. OK… I paid more than I should have… but I wanted pink.
Items to Leave at Home
Water filter
Ditching this depends on where you go, but if you are concerned about pathogens you are definitely better off sanitizing your hands after making a deposit in the woods than worrying about contaminated water. Too often I see people expending tons of effort preparing water, then doing nothing about their own filthy hands. A small container of Purell is less than an ounce and you can refill it from a cheaper, larger container.
Also note that by ditching the water filter you no longer need to carry any water (a HUGE weight savings). Since water can be taken immediately at any source, seldom do I need to carry more than 20 ounces even if I am heading up a route where water may not be available. In fact, at least 90% of the time I carry no water at all.
First Aid Kit
I carried a small ziplock bag with some bandages and tape in it for years, but now I don’t carry one… I rarely used it. Bandages are trivial items, bring them if you think you need them, but you can often improvise for such minor injuries. If anything serious happens you can use clothing, duct tape, or other items you have with you. You don’t need to be prepared to place sutures while you are out in the backcountry. If something serious happens… stabilize the situation and leave immediately or get help. If it isn’t serious... well... then it isn’t serious is it?!!!
Bear Can
These are 2-3 pounds… WAY too heavy. Sometimes you may need one, (i.e. if you are spending the weekend at Woods Creek in Kings Canyon) but if up above treeline this is unnecessary gear. I’ve gone out for years and never had a problem with bears getting my food. Just don’t camp in heavily trafficked areas… it is more enjoyable that way anyway! Instead I just bring a couple of shoelaces or some short cord. Use this to hang your food off a rock so mice and marmots can’t get to it, or while offtrail and on the move it can be useful to lower your pack down a difficult area.
But what about canister requirements? Again, savings in one area help compound savings in another. Now that you can fit all your gear into a daypack, no one will be looking for a bear can right?
Going light and fast, and staying above the crowds, rangers, and animals is often the good way to go.
Phone
I’ll take a phone on some trips, but if there is no reception or I need to go ultra light this should be left behind. Many phones weigh over 5 ounces!
GPS
These are heavy (with batteries), and with good map reading skills they should be unnecessary. Heading through the woods in the winter is different, but often a GPS is extraneous. In some cases it may be worth bringing a small compass… these are much lighter and they always work!
Pack Cover
This usually isn’t necessary. If concerned about the down gear and clothing a small drybag or even a ziplock can be usefull and generally weighs less than an ounce. If the forecast is poor there are plenty of light methods to keep your bag and clothing dry.
Backpack
This is where it all pays off. By using lightweight and low volume gear and leaving behind what you don’t need, your pack can become dramatically smaller and lighter too. Lightweight and compact gear, especially with respect to your sleeping pad, tent, and sleeping pad can double your weight savings by enabling you to use a much smaller pack. And while most gear tends to get more expensive as you go lighter, the lower volume packs cost less too!
Pack
REI Stoke 29
24 ounces
Currently my normal overnight pack is a REI Stoke 29, advertised as a daypack, weighing in at 24 ounces. Although there are smaller and lighter options available, the padding starts to get a little thin in other versions. Still… I am currently on the lookout for my next pack. I can usually fit crampons, gaiters, and/or a stove in the pack if I need to.
For larger outing where a rope, harness, or other gear may be needed I use a recently acquired Osprey Talon 44. At 2 pounds and 7 ounces there are lighter options available, but I've found it to be a pretty fair balance between padding and weight for when the additional gear is needed.
Snow Gear
Sometimes you can’t get away with leaving gear behind, but you needn’t be prepared for a run up Cassin Ridge if your real objective is to get up a simple snow couloir and over a Sierra pass. Two pieces of gear I’ve found very useful in many situations, and weigh very little:
Grivel Air Tech Light Crampons
21 ounces
These will fit will on most any boot or shoe. Not great for blue ice but I have used these on solid snow slopes exceeding 45 degrees. They are far more versatile than Kahtoola Microspikes, but a bit heavier overall. And they aren’t needed on every trip anyway.
CAMP USA Corsa Nanotech Ice Axe
9 ounces
Far lighter than most ice axe alternatives. This makes it much more realistic to carry an axe if you may only need it for a short distance or aren’t sure of the conditions, and it also works well as a second axe when doing moderate glacier routes. I’ve yet to bring this item along without one of my partners being jealous!
Total Pack Weight
So what does it all add up too?
| Gear | Item | Weight |
|---|---|---|
| Sleeping pad | Therm-a-Rest NeoAir XLite Small | 8 ounces |
| Sleeping bag | Mountain Hardwear Mountain Speed 32 degree bag | 16 ounces |
| Tent | Black Diamond Beta Light and stakes | 23 ounces |
| Ground Tarp | Gossamer Gear Polycryo Ground Cloth | 1 ounce |
| Clothing | Sun hat, Warm hat, Neck gaiter, Lightweight gloves, Spare socks, Pack towel | x ounces |
| Long underwear | One bottom layer, two upper layers | x ounces |
| Down sweater | Patagonia Down Sweater | x ounces |
| Hardshell jacket | Marmot PreCip Rain Jacket | 14 ounces |
| Water containers | Empty Gatorade Bottle and Platypus 34 ounce SoftBottle | Less than 2 ounces |
| Headlamp | Black Diamond Spot Headlamp and batteries | 3.2 ounces |
| Knife | Victorinox Swiss Army Silver Alox | 0.6 ounces |
| Sunscreen | 1.25 oz GoToob bottle and chapstick | 2 ounces |
| Toiletries | Toilet Paper, Toothbrush, Toothpaste, Floss | x ounces |
| Other Items | Duct Tape, Map, Cord, Alarm | x ounces |
| Backpack | REI Stoke 29 | 24 ounces |
Do you really need anything else?
Oh yeah… your wilderness permit… maybe…
Getting There
 Route Map
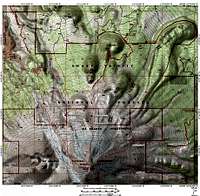
 The Approach from North Gate
The most logical approach to the Hotlum-Bolam Ridge is from the North Gate Trailhead. The drive in to North Gate is a bit rough and more easily (and quickly) done by high clearance vehicles though this is far from a requirement and cars are frequently seen at the trailhead.
If it is early in the season check the USFS Mount Shasta Climbing Advisory for information on trailhead access or call the Mount Shasta Ranger Station directly. The road to the trailhead is not open in winter.
North Gate (41.46840° N, 122.17401° W)
From Interstate 5 in Weed head northeast on Highway 97 for 15 miles until reaching Military Pass Road. Follow Military Pass Road for 3.6 miles to a junction with Andesite Logging Road and bear right as indicated by road signs. Continue on Andesite Logging Road for approximately five miles passing several forks and junctions en route to the trailhead. The drive is well signed from Military Pass Road and drivers should have no issue navigating the route (other than the rough terrain and possible bump of the oil pan).
Approach
 Above the Rabbit Ears
North Gate (Aproximately 5 miles and 7200 feet elevation gain one way)
From the North Gate Trailhead follow the trail as it heads up to the open area south of the North Gate Plug at 8500 feet (even when snow covers the path it is generally easy to follow as you keep Mount Shasta ahead of you and the North Gate plugs to your right).
From the flat area at 8500 feet there are numerous route options in the immediate vicinity as the ridge is approached or reasonable camp locations sought out. No path is particularly better or worse than the other. See the Camp Locations section for a few possibilities on where to set up for a night.
Route Description
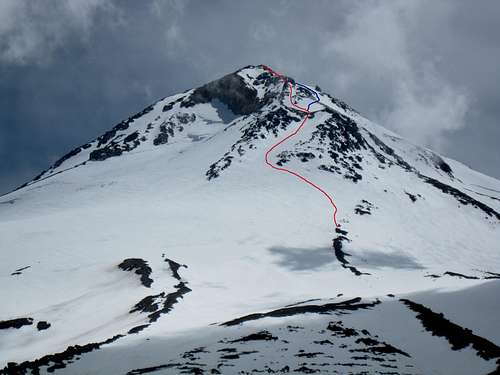 The Hotlum-Bolam Ridge Route
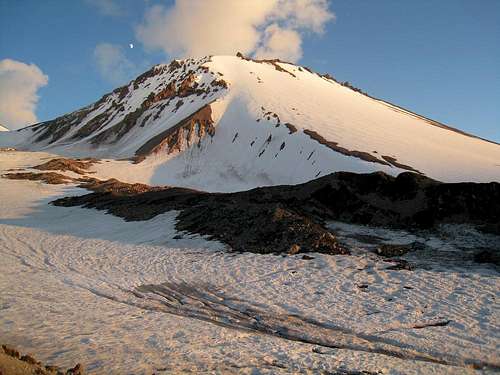
The Hotlum-Bolam Ridge is a great route for intermediate climbers in the early to mid season, but later in the season it can get more challenging as snow in some of the gullies becomes hard or icy.
Depending on your camp location ascend either directly up (if camping a bit east of the North Gate Plug) or climb diagonally to the east to reach the first snow ramp above the Hotlum Glacier. The ramp continues diagonally up and to the right above the lower rocks on the ridge. This first chute often forms icy patches within it later in the season, but they can usually be avoided. Also note the location of the crevasse on the Hotlum Glacier below this chute (if open) so that it does not cause problems on the return.
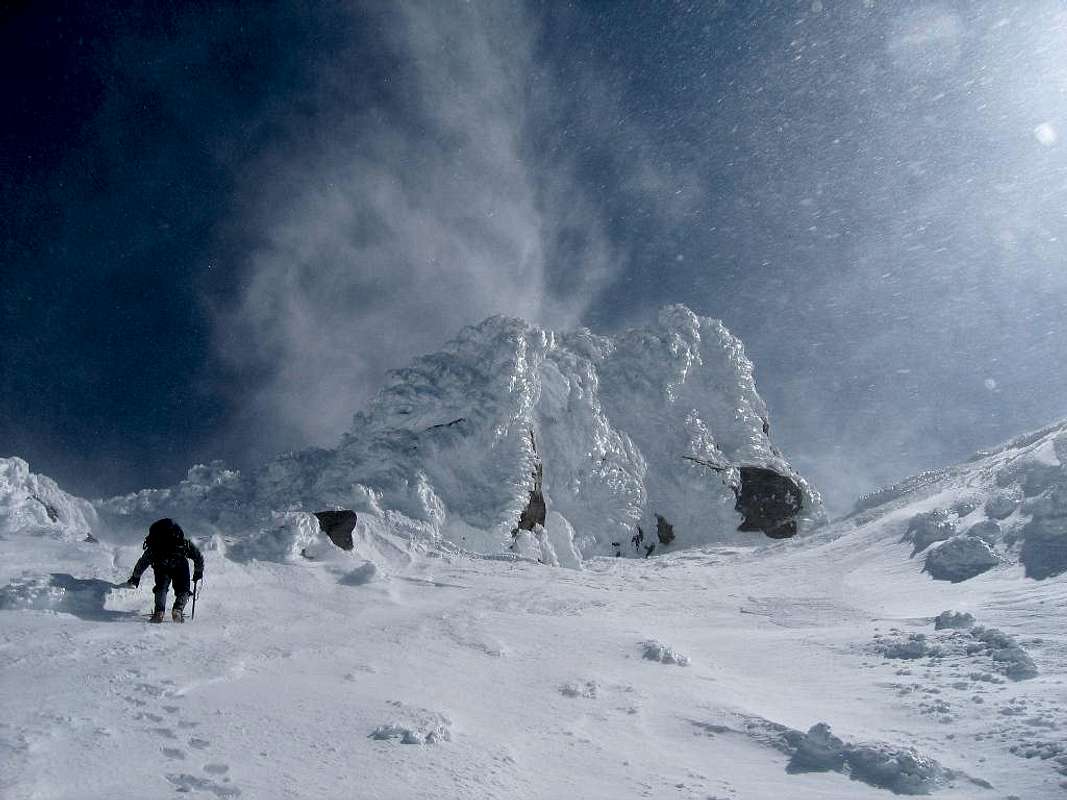
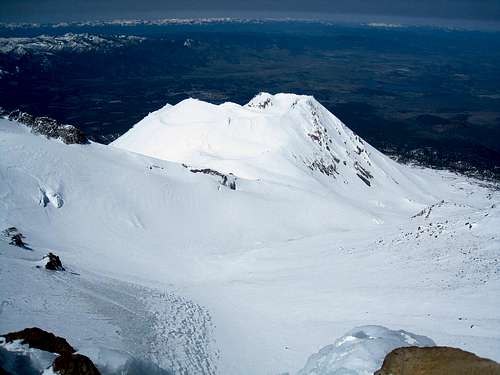
Once at the top of the first chute (named ‘The Step’) at 13000 feet there are a couple of options to reach the summit. Often climbers continue directly up a second snowfield until the ridge becomes rockier near two prominent and obvious rock towers called the Rabbit Ears. From below the Rabbit Ears most climbers traverse right a bit onto gentler terrain above the Bolam Glacier and make the climb up to the northern end of the summit pinnacle. Taking this option bypasses The Sharktooth (another prominent blade of rock at about 13,800 feet) on the left shortly before reaching the summit area.
Alternatively (and less frequently) climbers can stick more properly to the Hotlum-Bolam ridge from below the Rabbit Ears all the way to the summit by following class 2 rock on the ridge. Some rock of at least class 3 will normally be encountered depending on route finding and current conditions.
Descend via the climbing route. On the way down remember where the large crevasse is below the first chute. If glissading below The Step, stop and move to your left (climbers right) near the bottom often enough to be sure you are clear of the crevasse. The crevasse can be difficult to see from above.
Current Conditions
Current NOAA / National Weather Service ForecastCamping
Be serious...Etymology
The Hotlum-Bolam ridge is named for the Hotlum and Bolam Glaciers running on either side of the route. These glaciers, along with a few others, were named by western explorer Major John Wesley Powell.“Powell was a brilliant scholar who collected over two dozen dictionaries of Native American languages and dialects. During 1879 he came to northern California to study the Wintun tribe, and climbed Mt. Shasta on November 1, 1879. Afterward, he named Shasta’s four other major glaciers with Wintun words in honor of the tribe: Hotlum (‘steep’), Bolam (‘big’ or ‘great’), Konwakiton (‘muddy’), and Wintun (the tribal name). The names were inscribed in official records maintained by the US Geographic Board in 1897.” – Andy Selters, Michael Zanger, The Mt. Shasta Book: A Guide to Hiking, Climbing, Skiing, and Exploring the Mountain and Surrounding Area (2006)

Pics
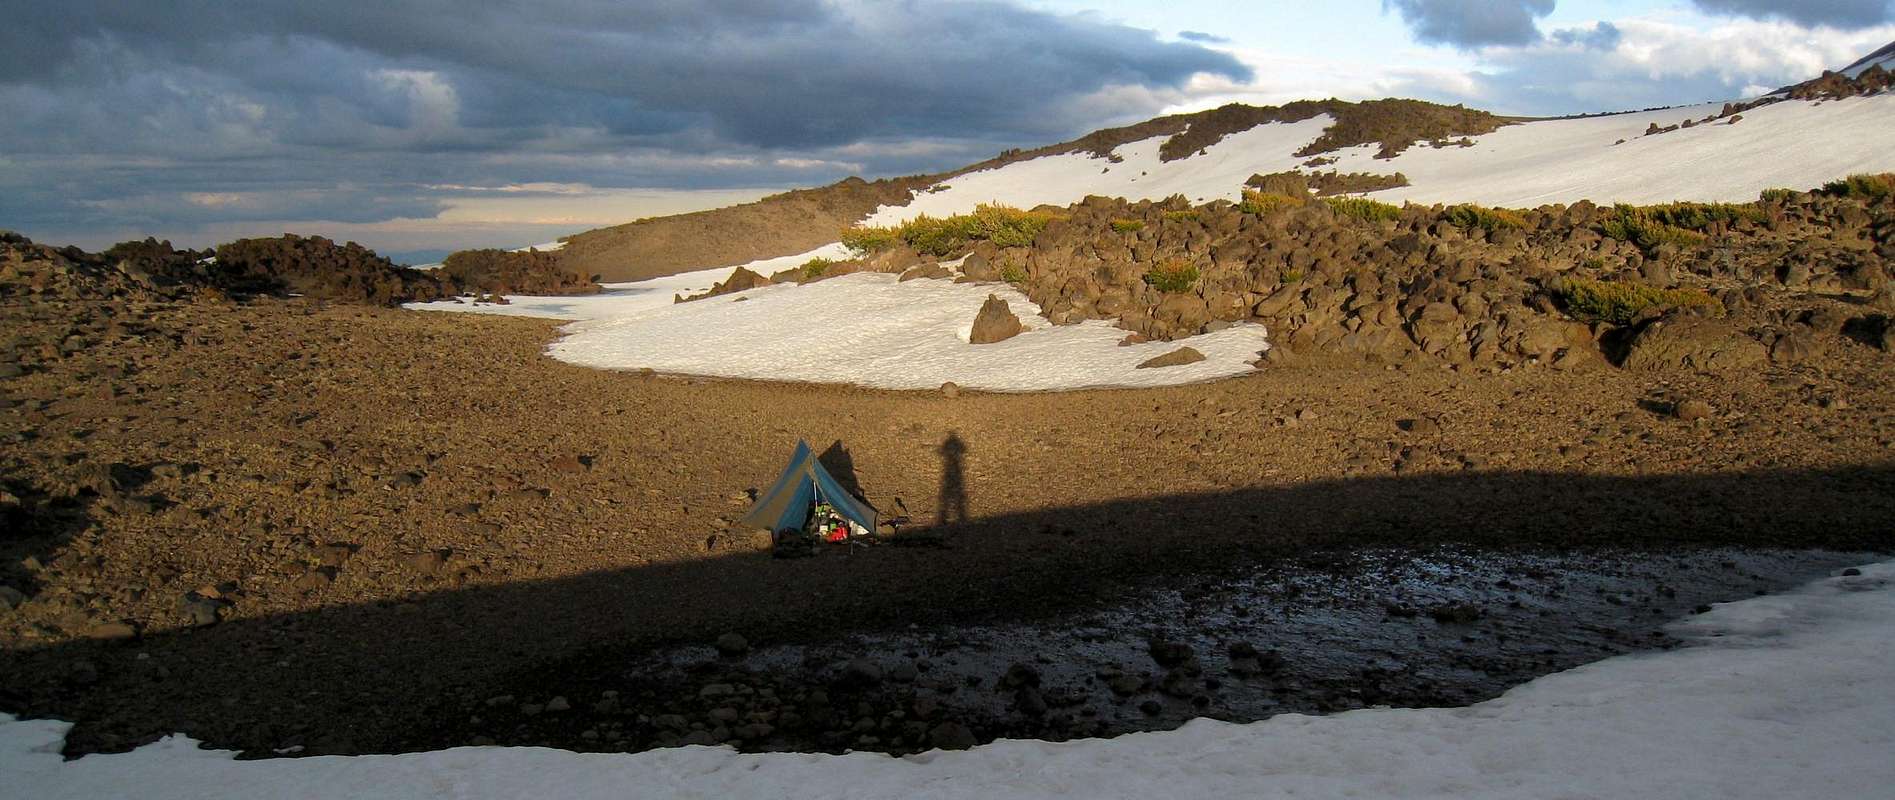
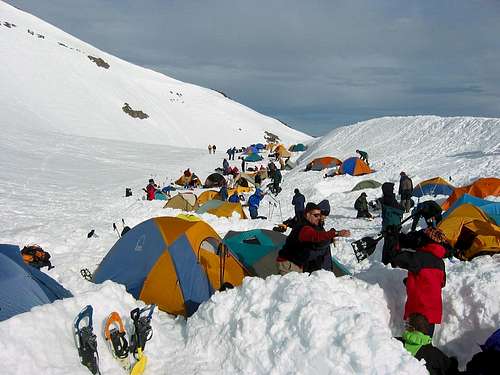
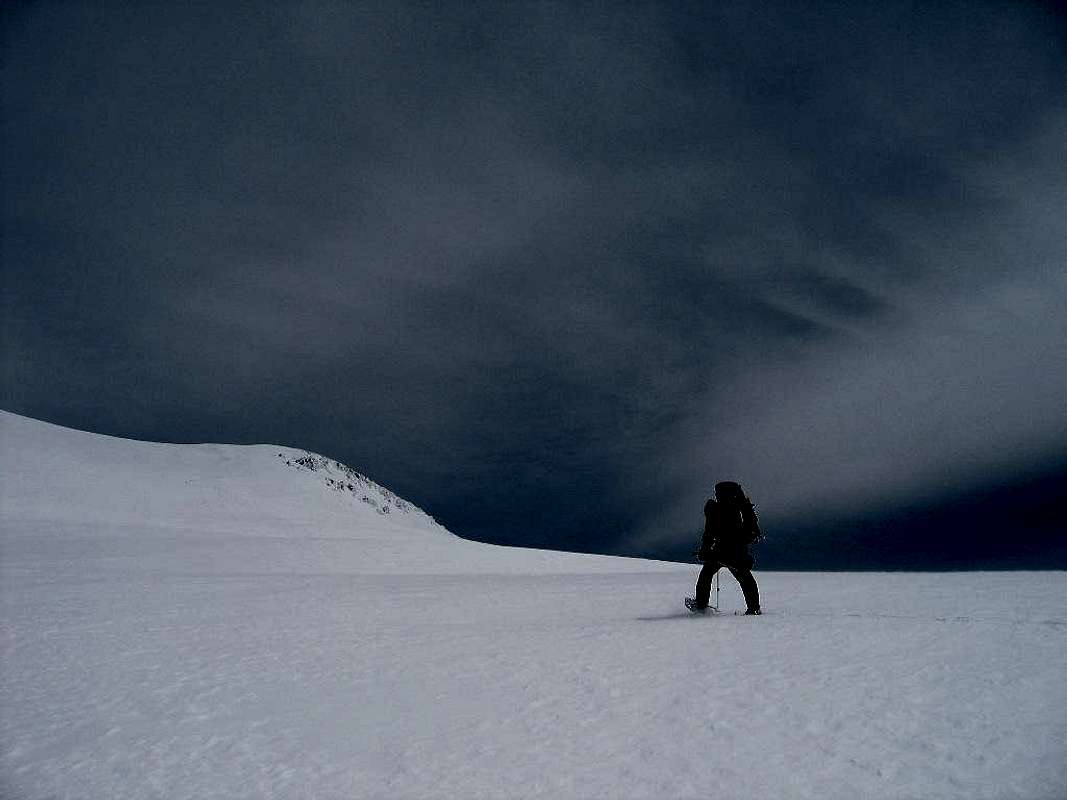
2263Bolam Glacier Camp
Camp at about 9600 feet directly beneath the Bolam Glacier on Mount Shasta, with the Whitney-Bolam Ridge rising to the right (trust me… it’s all there). Weather had the mountain completely socked in on our approach making us nervous about the climb, but we had splendid conditions the following day.
October 2012
2378
Bolam Bergshrund
My partner poking about before we cross the Bolam Glacier bergshrund in October 2012
2388
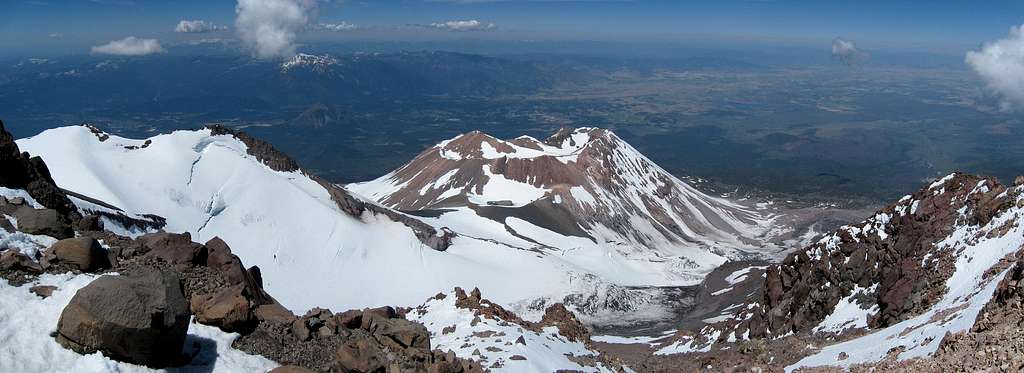
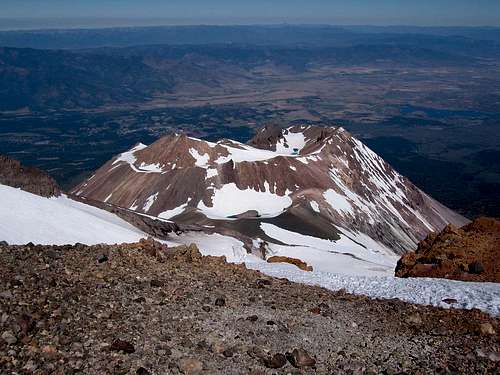
Shastina from Bolam
Looking west to Shastina and the Whitney-Bolam Ridge from above the Bolam bergschrund in October 2012
2458
Shasta in October
Fantastic conditions on the summit following a climb of the Bolam Glacier in October 2012. Mount Lassen is visible on the horizon to the left.
2464
Descending Shasta’s Summit
My partner begins the descent from Shasta’s summit following our trip up Bolam Glacier in October 2012.
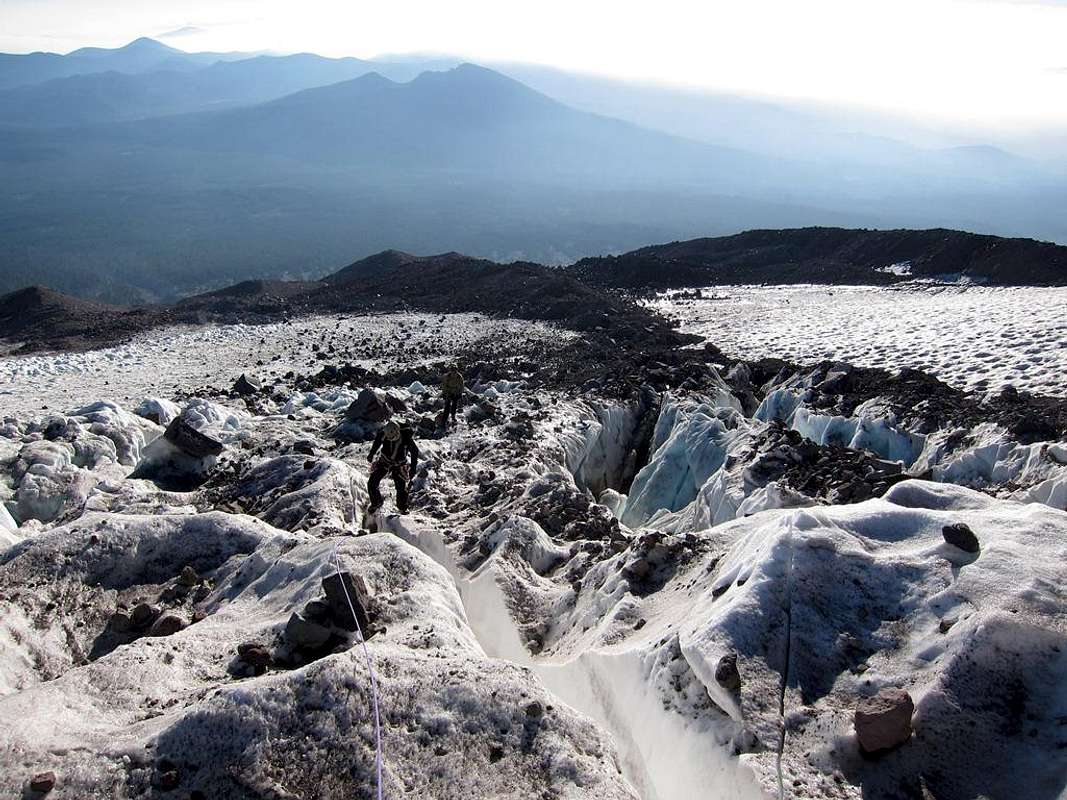
2491
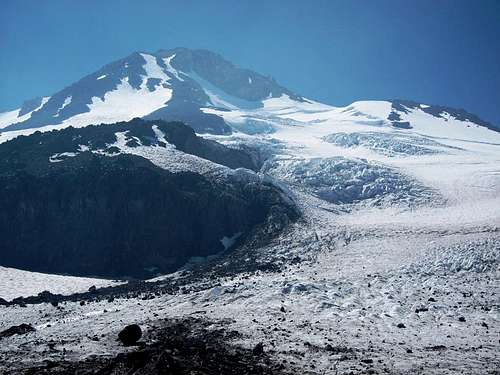
Bolam Glacier
Features on the Bolam Glacier seen from the Whitney-Bolam Ridge in October 2012
2498
Whitney-Bolam Ridge
Looking up the Whitney-Bolam Ridge with the Bolam bergshrund on the right in October 2012. To ascend the ridge simply follow the crest to the saddle visible above and reach the sulfur vents below the summit pinnacle.
2501
Descending Whitney-Bolam Ridge
My partner descending Whitney-Bolam Ridge, right at the edge of the Bolam Glacier. The Rabbit Ears are visible near the summit on the far left.
October 2012
2511
Whitney-Bolam Descent
Somewhere between 10500 and 11000 feet as we descended the Whitney-Bolam Ridge in October 2012. Waves of ice are visible here at the edge of the Bolam Glacier.
2522
Camp from Whitney-Bolam Ridge
Looking down at camp (orange) from near the bottom of Whitney-Bolam Ridge in October 2012
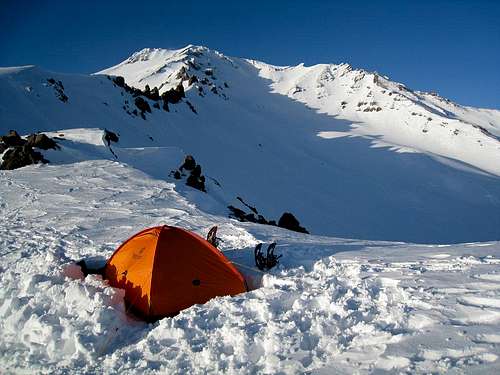
2523
Camp below Whitney-Bolam Ridge
Camp at 9600 feet on the northwest side of Mount Shasta with the Whitney-Bolam Ridge and the summit rising in the background.
October 2012
2528
Shasta from the Northwest
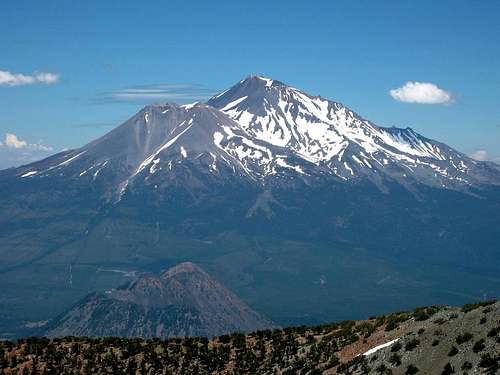
Mount Shasta and Shastina looked spectacular from this less frequented view as we approached camp below Bolam Glacier. The brush here is a bit annoying without great routefinding but not too problematic.
October 2012
2531
Shasta and the Bolam Glacier
One of my favorite views of Mount Shasta, seen from the northwest as we headed to the Bolam Glacier. The Whitney-Bolam Ridge follows the right skyline.
October 2012
Shasta
1:3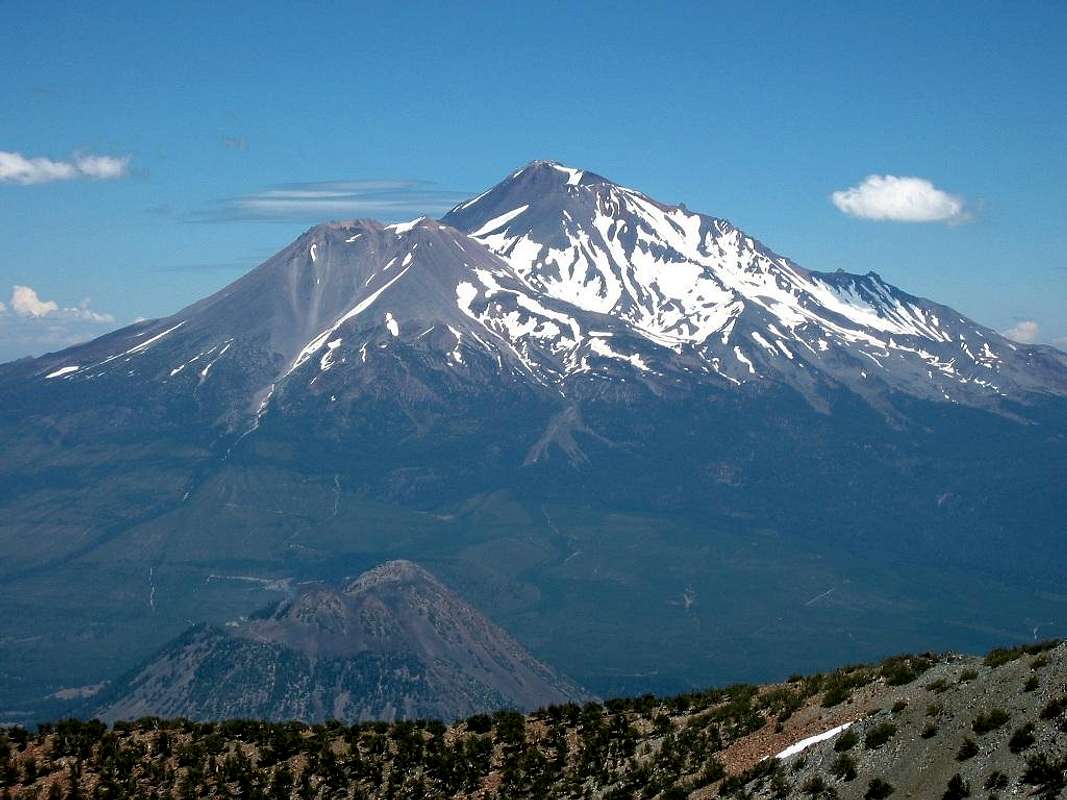 Diller Canyon and Shastina Diller Canyon and Shastina | ||
 Diller Canyon and Shastina Diller Canyon and Shastina | Diller Canyon and Shastina | Diller Canyon and Shastina |
2:2
| Diller Canyon and Shastina | Diller Canyon and Shastina |
| Diller Canyon and Shastina | Diller Canyon and Shastina |
2:3x
| Diller Canyon and Shastina | Diller Canyon and Shastina | ||||
| Diller Canyon and Shastina | Diller Canyon and Shastina | Diller Canyon and Shastina | |||
2:3
| Diller Canyon and Shastina | Diller Canyon and Shastina |
| Diller Canyon and Shastina | Diller Canyon and Shastina | Diller Canyon and Shastina |
Page
Hotlum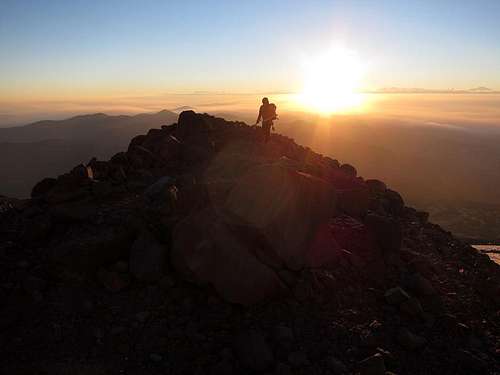 Sunrise from Camp Sunrise from Camp | 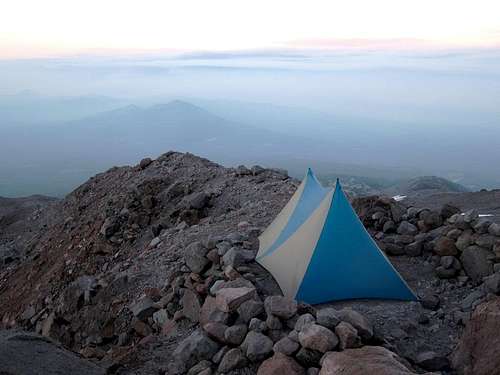 Camp on the Moraine Camp on the Moraine |
 The Hotlum Glacier The Hotlum Glacier | 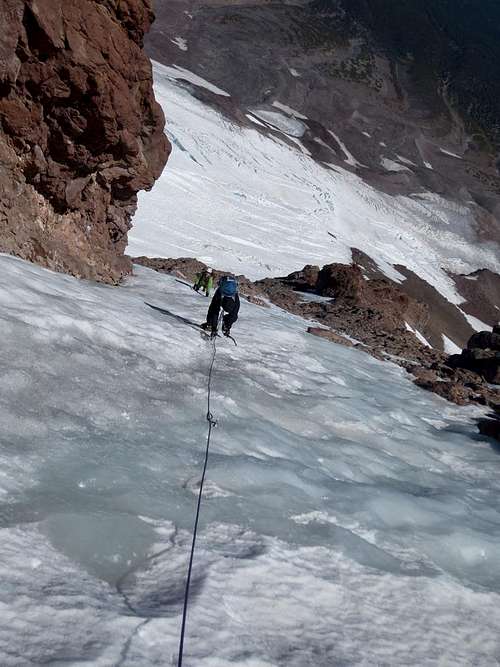 Left Ice Gully Left Ice Gully |  Base of the Glacier Base of the Glacier |
Green Butte
 Climbing Green Butte Ridge Climbing Green Butte Ridge | ||
 Approaching Camp Approaching Camp | 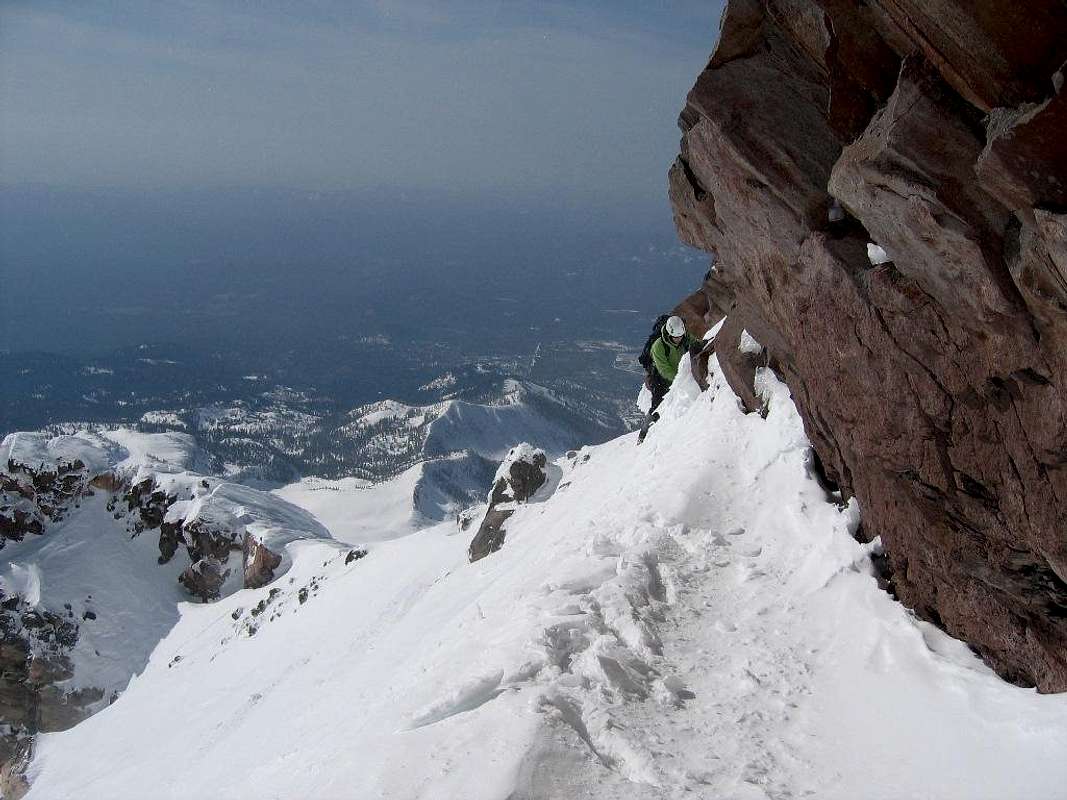 Traverse East of the Ridge Traverse East of the Ridge | |
Whitney Glacier
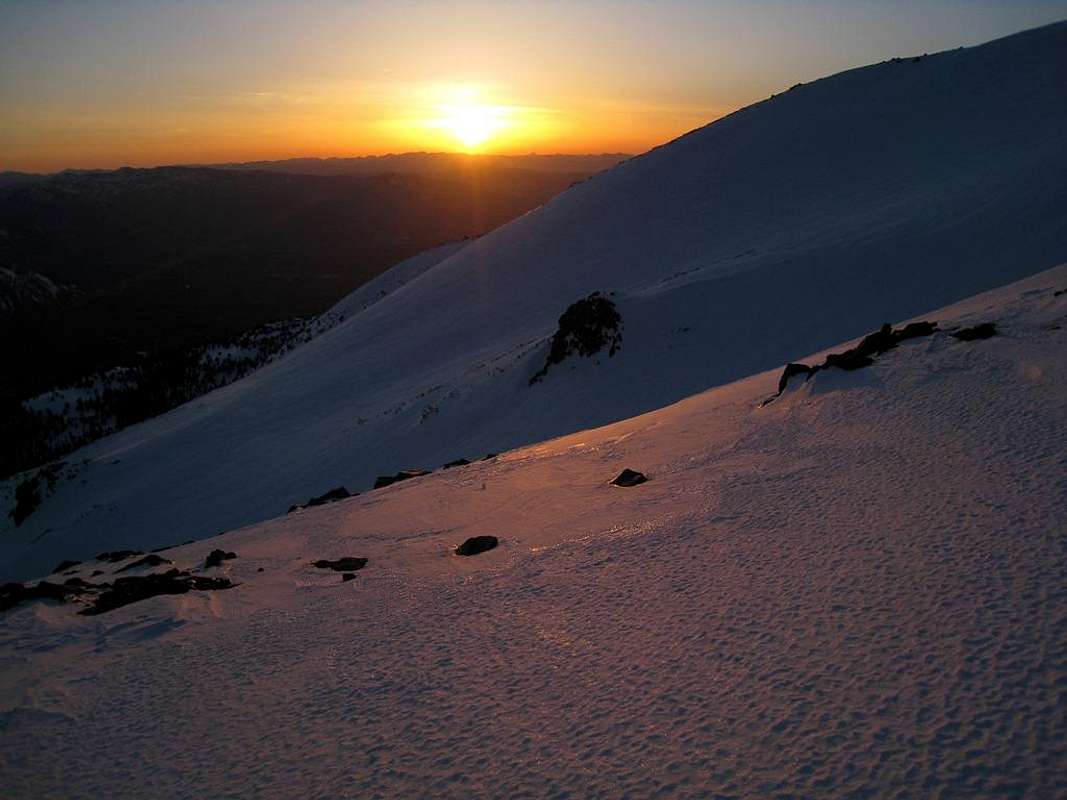
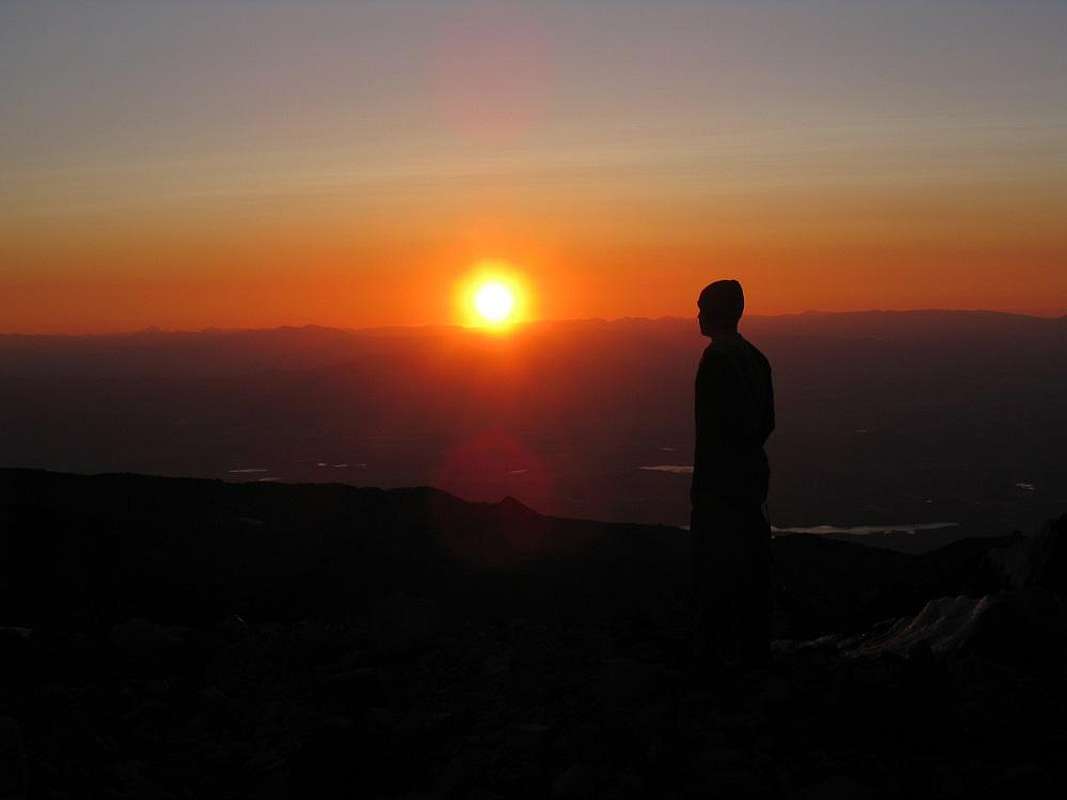 Sunset from the Whitney Glacier Sunset from the Whitney Glacier | ||
 Shastina from the Glacier Shastina from the Glacier | 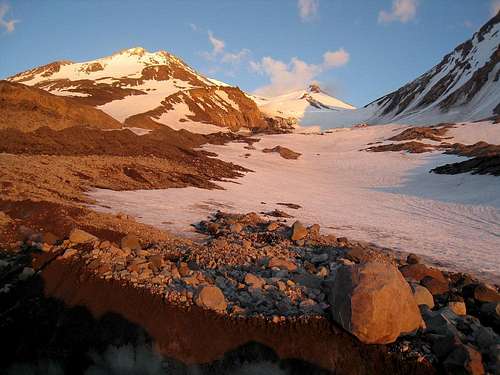 Whitney Glacier from Camp Whitney Glacier from Camp | |
Casaval
 Camp on Casaval Ridge Camp on Casaval Ridge | 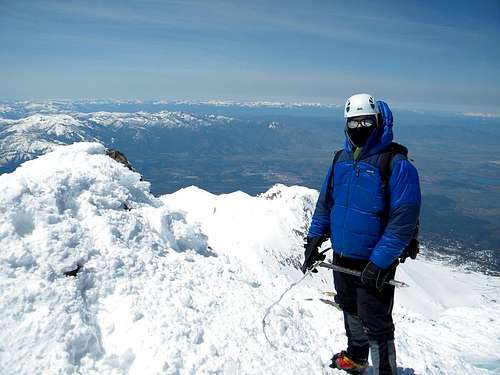 On the North Summit On the North Summit |
 Shastina Shastina |  Sunset from Camp Sunset from Camp | 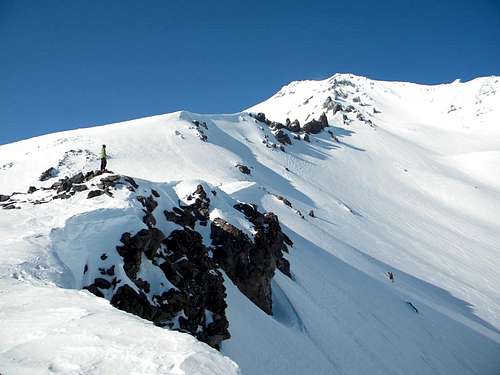 Checking out the Route Checking out the Route |
Wintun
 Panorama of Shastina from the Summit Plateau Panorama of Shastina from the Summit Plateau |
Hotlum/Wintun
 On the Summit On the Summit |
West Face
 Shastina from the Summit Plateau Shastina from the Summit Plateau |
Avalanche Gulch
 Helen Lake Helen Lake |  Panorama from Helen Lake Panorama from Helen Lake | ||
Page2
Sargents Ridge 11/4/12 Ski Bowl Solo SR/SBBolam Glacier 10/28/12 Coquette Partner WB
Hotlum Glacier 8/26/12 Brewer Creek Group HG
https://www.summitpost.org/hotlum-left-ice-gully/829183
https://www.summitpost.org/images/original/829183.JPG
https://www.summitpost.org/hotlum-glacier/829184
https://www.summitpost.org/images/original/829184.JPG
https://www.summitpost.org/beginning-the-hotlum-glacier/829185
https://www.summitpost.org/images/original/829185.JPG
https://www.summitpost.org/camp-at-hotlum-glacier/829186
https://www.summitpost.org/images/original/829186.JPG
https://www.summitpost.org/sunrise-at-the-hotlum-glacier/829187
https://www.summitpost.org/images/original/829187.JPG
Cascade Gulch 5/13/12 Bunny Flat Partner WF
Green Butte Ridge 4/8/12 Bunny Flat Partner AG
https://www.summitpost.org/green-butte-ridge/799782
https://www.summitpost.org/images/original/799782.jpg
https://www.summitpost.org/approach-to-green-butte-ridge/799780
https://www.summitpost.org/images/original/799780.jpg
https://www.summitpost.org/traverse-on-green-butte-ridge/799781
https://www.summitpost.org/images/original/799781.jpg
Whitney Glacier 7/10/11 Whitney Falls Group WG
https://www.summitpost.org/shastina-from-the-whitney-glacier/729941
https://www.summitpost.org/images/original/729941.jpg
https://www.summitpost.org/whitney-glacier/729937
https://www.summitpost.org/images/original/729937.JPG
https://www.summitpost.org/sunset-from-the-whitney-glacier/729953
https://www.summitpost.org/images/original/729953.JPG
Hotlum/Bolam Ridge 6/26/11 North Gate Solo HB
Casaval Ridge 5/1/11 Bunny Flat Partner AG
https://www.summitpost.org/casaval-ridge-camp/828219
https://www.summitpost.org/images/original/828219.JPG
https://www.summitpost.org/sunset-on-casaval-ridge/828218
https://www.summitpost.org/images/original/828218.JPG
https://www.summitpost.org/casaval-ridge/828217
https://www.summitpost.org/images/original/828217.jpg
https://www.summitpost.org/shasta-summit/828216
https://www.summitpost.org/images/original/828216.jpg
https://www.summitpost.org/shastina-in-spring/763169
https://www.summitpost.org/images/large/763169.JPG
Wintun Ridge 7/10/10 Clear Creek Solo CC
https://www.summitpost.org/shastina-and-whitney-glacier-panorama/763171
https://www.summitpost.org/images/large/763171.jpg
Hotlum/Wintun Ridge 6/2/07 Brewer Creek Solo HW
https://www.summitpost.org/shasta-summit-view/618533
https://www.summitpost.org/images/original/618533.JPG
Avalanche Gulch 8/7/05 Bunny Flat Group AG
West Face 7/17/05 Bunny Flat Group WF
https://www.summitpost.org/shastina-in-summer/764814
https://www.summitpost.org/images/original/764814.JPG
Avalanche Gulch 6/7/03 Bunny Flat Partner AG
https://www.summitpost.org/helen-lake-panarama/569249
https://www.summitpost.org/images/large/569249.jpg
https://www.summitpost.org/colorful-camp-at-helen-lake/569243
https://www.summitpost.org/images/original/569243.jpg
Liberty Cap
“Broderick’s name was originally placed on what is now known as Liberty Cap. (Whitney Survey, Geology, 1865, pp. 418-419.) Displaced in 1865. … On Wheeler Survey map of Yosemite Valley, 1883, it appears in present location. David Colbert Broderick; born in Ireland, 1820; U. S. Senator from California, 1857-1859; killed in duel with David S. Terry, 1859.”– Francis P. Farquhar, Place Names of the High Sierra (1926)“The resemblance in form of the mountain to the cap of Liberty on the half-dollar of the early nineteenth century was brought to attention of Governor Stanford in 1865 by J. Hutchings. Standing before the mountain, Stanford proposed that it be called Cap of Liberty instead of Mount Broderick or other names by which it had been known. (Hutchings: In the Heart of the Sierras, 1886, p. 445.) In recent years the name Liberty Cap has become the usual form.”– Francis P. Farquhar, Place Names of the High Sierra (1926)