

-
 26593 Hits
-
 81.18% Score
-
 13 Votes
|
|
Route |
|---|---|
|
|
42.78060°N / 109.2322°W |
|
|
Technical Rock Climb |
|
|
Most of a day |
|
|
III, 5.6 |
|
|
Approach
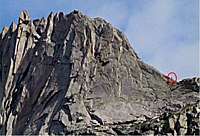 Start Of E Ridge.
Typically, the East Ridge route is assumed to begin at the low point between Tiger Tower and Wolfs Head. Everything prior to this point should therefore fall under "Approach". Two variations exist for reaching this starting point:
(1) (firsthand experience) Scramble to the base of south face of Wolfs Head almost directly below the above-mentioned low point (just west of the southern base of Tiger Tower). You're looking for a prominent (dirty and wet!) chimney which starts at ground level. Scramble up the intermittent and grassy ledge system starting immediately left (west) of this chimney (don't climb the chimney!). Many apparently call these ledges class 4. We thought they were harder - though there is much class 4 terrain, we encountered moves up to about 5.4 on wet, slick, and dripping rock. Many variations up the ledge system probably exist - some might be easier than others.
(2) (have not done) Apparently, an alternative to above approach involves going up a class 3 gully between Tiger Tower and Pingora (gully immediately west of Tiger summit and again on the south side of the formation). Low to mid fifth class climbing is required to top out on Tiger followed by a rappel into the Tiger-Wolfs Head notch and the start of East Ridge route proper.
Route Description
This is one of (two in the Cirque) the classic climbs listed by Roper and Steck. Deservedly so in my opinion!! The climb is fairly long (~10 pitches or so), offers a variety of challenges in terms of technical rock climbing, traverses beautifully clean and solid rock throughout its length, and offers an unforgettable position. The route ratings for East Ridge in published literature range from a grade II, 5.5 (Roper and Steck) to a grade III, 5.6 (Kelsey) - with the latter probably being more reasonable and in-line with what an "average" weekend warrior expects. However, don't take these too lightly as the route is very committing and when combined with the lightning-storm prone weather of the Winds dangerous epics are never too far off. If caught in a storm once atop the ridge, escape would not be trivial - best bet MIGHT be to either quickly double back or quickly push forward. Dropping down directly via either south or north faces is probably not recommended (though a 5.10 chimney on the south side of the formation is mentioned as being an [bad = implied in Kelsey's book] option for rapping off) - you'd be in unknown territory and having to leave gear behind would most likely be the least of your worries.Most parties doing the route do at least some simul-climbing esp. during the initial easy few pitches required to reach the top of the ridge. I will describe the route as we did it and provide some additional comments.
Pitches 1 - 3: Climbing is probably in the 4th to low 5th class here and the goal is to reach the point on the ridge where the grade essentially flattens out. Start up the initial (and overhyped IMHO) "2 foot wide 5.6 friction slab with no pro".......it really is not that bad. The "slab" is very low angle, probably more like 5 feet wide, and offers comfortable amount of gear (and more realistically it's much easier than 5.6!). There are several comfortable belay "ledges" along the ridge, with the first being less than a 50m rope length above the start of the route. Above this first "ledge" terrain steepens for next 2 or so pitches but handholds and cracks abound.
Pitch 4: This is mostly a class 4 scramble (with low 5th moves) along the portion of the ridge where it flattens out after the initial climb out of the Wolfs Head-Tiger col. The goal of this (very roughly) pitch is to reach the east side of the First Tower (one of many gendarmes of the ridge). You'll know which one is the first tower (forget the little spires you'll pass off to your sides - they're not it) as it looks like it blocks further progress. Right before the tower, you'll downclimb south (left). Belay somewhere before this tower or rope drag will eat you up.
Pitch 5: 5.6. This is the first true 5.6 pitch - even that, we're only talking about one move. This is also (more or less) where we switched from simul-climbing and into belaying individual pitches. Downclimb (I've read somewhere on the web that some rap this section??) about 20 feet of class 3-4 terrain on the south (left) side of the ridge. You're now at the east edge of First Tower on its south side. Step across (awkward but short and well-protected) hugging a boulder. Traverse along south side of tower and enter a narrow (and I mean very narrow!!) slot that separates First and Second Towers. Move via slot to north side. My fat behind refused to fit through until I removed a camelbak from my back. It's slightly wider higher up but kind of spooky. Exist onto ledge on north side and belay (rope drag might be bad at this point). This is a wide ledge at the north base of Second Tower (can see two good pitons further on the ledge).
Pitch 6: The "piton pitch"! This is the second honest 5.6 pitch of the route. Continue traversing westward along the northern base of Second Tower. The ledge becomes progressively narrower and eventually ends. Keep on traversing moving onto a face (friction and some features) beyond ledge. Clip 3 or 4 good-looking pitons along this traverse. Beyond the pitons, move up and regain ridge crest via a 5.6 lieback up a crack. Belay on ridge crest.
Pitch 7: This pitch presents the third true 5.6 section of the route. The last pitch should have deposited you at the eastern base of the Third Tower. This one is characterized by two parallel horizontal cracks on its north (right) side. Move up to gain the lower of the two cracks - use it for feet or hands whatever your perversion but do protect it sufficiently depending on your second's confidence level. Traverse the cracks westward with the crux being the exit move at the end. Beyond move over easy terrain (first on north or right side) and regain the ridge crest. Your goal here is to reach the eastern base of the Fourth Tower. Specifically, you'll downclimb into a cave-like hole (on south or left side of ridge crest) formed by the tower and a flake/boulder on its SE side). Belay here.
Pitch 8: The fourth 5.6 crux of the route. From "cave", exit south (left) and begin a 20 foot traverse on south side of Fourth Tower. Looks harder than it is once you get on it. Protect it well for your second. You can tie off a large horn at the end of the traverse for your follower's benefit. Here you have some options for remainder of the pitch. The goal is a nice ledge formed by a huge chockstone about 20 feet ahead and 20 feet above you. You can either face traverse straight toward the corner/chimney (looks like no pro) then climb the chimney up to finish the pitch....OR....Climb down about 20 feet (low 5th class) to reach a ledge, then traverse over the to start of the chimney and climb it from the bottom. If you choose to downclimb, protect it well for the second as they will be doing it w/o the toprope.
Pitches 9 - 10: 4th to low 5th class climbing. Start by traversing over easy terrain on north side (right) of ridge crest. Gain ridge crest where convenient. End last pitch on summit block.
Descent: This can sound a bit confusing when reading Kelsey's description......what "west face"? From your vantage point in the Cirque, you'd think that there should be no west FACE but only a west RIDGE. Actually that's not true and becomes apparent only once you're there. Strategy is to drop west then drop some more south, then do a long traverse south to reach Wolfs Head-Overhaning Tower Col.
Details go something like this:
Find rap slings 5 feet below and on right side of summit. Single rope rap (50 is fine too I think) brings you to a talus-filled ledge. This is R1 on topo.
Look on right side of ledge for another set of slings. Do another single rope rap to a larger ledge - R2 on topo.
Walk the "trail" left (that's RAPELLER's left) or south around a wall, then descend about 50 feet down a gully (which is facing south). Class 2-3 with only the final section of the "walk" being exposed (hip belay??). Find rap slings.
Do another rappel (southward - looking in direction of Overhanging Tower). We did single 60 m rope and could not reach next rap station - had to scramble easy terrain (class 3) to get to it. This is R3.
Two more raps. Again we did single 60m raps and were short every time requiring an easy downclimb/walk. These are R4 and R5 on topo.
After the last rap (I'm ALMOST certain I have the count right!!), look for a "trail" heading left on narrow ledges around a corner. If you look down the rap line, you should see just a void!! The walking portion starts here. Take the "trail" which crosses weaknesses in slabs (quite exposed at times) on the west side below the crest of the ridge between Wolfs Head and Overhaning Tower. Walk for several hundred yards. You should start seeing some cairns and exposure becomes lesser as you near the Col (Wolfs Head-Overhanging Tower Col).
The "trail" ends at a horn with slings just above the Col. Rap into Col - we used double 60's, single would PROBABLY suffice here as well. This is R6 on topo. Walk 30 feet to top of Col and hike down the east side. Scramble down talus fields (snow in early season) towards Cirque Lake.
Essential Gear
Standard rack with cams to about 3" size. Helmets.Topo
This is not a topo in the true sense of the word. It's a sketch meant to assist in understanding the overall picture of the route: East Ridge on Wolfs Head
Alan Ellis - Aug 18, 2004 12:51 pm - Hasn't voted
Route CommentThis is how a route should be done. Thanks for submitting!
rpc - Aug 18, 2004 1:02 pm - Hasn't voted
Route CommentThanks Alan!
I wish we could go back there this year.....not realistic unfortunately. Great area!
Eric Sandbo - Nov 19, 2004 2:38 am - Hasn't voted
Route CommentExellent route description! When I climbed this in about 1990, I was amazed at the complexity of the route, for one that follows a single, straight ridge. We had to stop & refer to the guidebook a few times. Made me appreciate the perseverance and creativity of the first ascent team. Also made me grin all day.
Thanks for the write-up!
Alan Ellis - Nov 19, 2004 10:28 am - Hasn't voted
Route CommentAlong with the topo, this is the best route description of Wolf's Head on the planet. The guidebooks don't even come close. If someone can't find the route after reading this, they need to stay home. :-)
rpc - Nov 19, 2004 1:06 pm - Hasn't voted
Route CommentThank you gentlemen.
Not sure about "the best" but I've tried to achieve a high degree of "anality" :)
lloyd - Mar 18, 2008 1:02 am - Voted 10/10
ThanksWhat a great route description! We're planning on doing this August '08. This will be very helpful.
rpc - Mar 18, 2008 11:46 am - Hasn't voted
Re: ThanksNo, thank YOU Sir :) Hope it's useful & thanks for good word! Don't forget to bring Brutus Of Wyde's topo for NE Face rt. on Pingora if you're planning on that one (best topo for it!).
PellucidWombat - Aug 26, 2012 7:50 pm - Voted 10/10
Correction to P8 & the DescentFirst, great page! Your info was very helpful on our climb. On P8 I took the downclimb option as it looked like the thin crack petered out to face climbing. However, as I climbed up the chimney and looked back, I saw a nice flake that created a nice hand-fist crack that was invisible from the approaching side. Looked like a fun and protectable hand traverse. So perhaps you can adjust the description of this pitch? Knowing about this ahead of time would make for a more elegant and fun line! Also, one bit of confusion on the descent info was the chute you descend for R3. You say it faces south. The chute faces west while the climber is facing south as one climbs into it. Also, knowing that it is a very short walk from the R2 before the downclimb would be helpful. We overshot the gully and had to come back!