
|
|
Route |
|---|---|
|
|
36.10810°N / 115.4894°W |
|
|
Technical Rock Climb |
|
|
Most of a day |
|
|
III 5.9 |
|
|
Approach
Ginger Cracks route climbs the north/northeast face of Ginger Buttress - a triangular-faced formation at the northeast base of Rainbow Mountain. The Buttress is visible from most points along the scenic loop road (as well as from the state highway). The base of the Buttress is located at the left (lower) end of the low-angle ramp leading to Cloud Tower and Crimson Chrysalis route. Follow approach directions on the Crimson Chrysalis page to reach the low-angle ramp. Once at the lower (left) end of the ramp, find a wide wash heading up and left off of the ramp toward the base of Ginger Buttress. The wash can be wet with some slippery slab sections. To avoid these, look for a climbers' path on the right side of the wash (through the bushes).
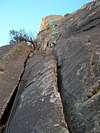 |  |
Route Description
The route climbs to the top of Ginger Buttress in seven enjoyable pitches. The climbing is somewhat similar in nature to Crimson Chrysalis next door (though it is slightly more difficult and more varied than Crimson and unlike Crimson has some loose rock) and provides a good option for those who get to the base of Crimson and find a huge line. Note that belay stations for pitches 1 - 4 are bolted with at least two new bolts each. Backing off of the line is therefore not a problem. If so desired, backing off from tops of pitches 5 and 6 could also be done without having to leave gear (though no bolted anchors exist). The climbing is sustained at about 5.8 level.
Pitch 1: 5.7, 130 feet. Climb either of the two wide cracks (Swain shows the left crack to be the "correct" one) for about 20 feet to reach a large ledge with a tree on it. From here, move right and up the right side of a huge flake. Climb up another ~20 feet and traverse a few feet back left to the left side of another large flake. Enter an chimney-like opening on the left side of the large flake and make your way up to the top of the flake. Belay off bolts at a good stance on top of the flake.
Pitch 2: 5.8, 150 feet. From belay, move right and slightly down atop the flake until you're able to step right onto the main face. Follow the face straight up to the base of a short, flaring chimney capped by a small roof (~60 feet above belay). Enter the chimney (5.8 crux) and move up it till you encounter the roof. Pull through the small roof and continue up the face/cracks above (1 bolt half way between chimney exit and belay ledge). Belay on a small ledge with bolts at the base of a short, right facing dihedral.
Pitch 3: 5.7, 100 feet. Move up the dihedral and pull through the overhang (tricky for 5.7 IMHO). Continue straight up the cracks until you see a doubly-bolted belay station on your right. Hanging belay off of two bolts.
Pitch 4: 5.9, 160 feet. From belay, move back left into the crack system and follow it for ~20 or so feet. As the crack peters out a bit, you should spot a nice shiny bolt on the face to your right. Climb the face up and right following good bolts (can supplement with small cams; all bolts are beefy except one which is right NEXT to a beefy bolt). Watch for LOOSE ROCK on this pitch!! The bolts will get you past the steep face portion. Above the bolts, cilmb 5.8-ish terrain straight up to a bolted anchor atop a good "pedestal" below a small roof. Note that based on TR's I saw on the web, this pitch had most likely run into a retrobolter in the last couple years (used to have one bolt I think).
Pitch 5: 5.8, 150+ feet. Move up the crack on the right side of roof. Protect this pitch often as apparently the holds tend to pop off here (Swain's book warns of spectacular falls on this one due to loose rock). Continue up the steep crack (steeper than it looked from belay) until you reach 4th class ledgy terrain directly above. Belay (on gear) where convenient.
Pitch 6: 4th class, 120+ feet. Move up the easy terrain staying near the right wall. Move left and step up onto a good ledge at the base of a prominent left facing dihedral. Gear belay.
Pitch 7: 5.6, 140 feet. Fun pitch! Move up the left-facing dihedral past a minor overhang and onto a good ledge. Traverse the ledge 20 feet right toward the main wall and climb up the wide chimney/OW on right side of ledge. Belay in a huge notch formed by the summit pinnacle of Ginger Butterss (left, 20 feet above notch) and the main wall (gear). The 5.6 rating for this pitch (per Swain) is probably somewhat sandbagged - 5.7 might be more accurate.
Descent:
From the notch, rap into the cirque/bowl (direction opposite to where you came up) with double ropes (webbing around boulders). Note that I THINK a single 60m rope rap would suffice but I have not tried this!
Once in the bowl, scramble down and left (class 2 - 3) to the lowest point in the bowl to the top of a prominent black water streak (visible from highway). This is the top of Power Failiure route.
Do a double rope rappel from bolts. Next rap station is about 20 feet right (that's CLIMBER'S right) of the black water streak.
Two options from here (first works only IF you have 60 meter ropes!!). Option 1: Rap straight down (double 60's) to a large ledge (in fact from above, it seems you're rapping all the way to the ground) near the ends of your ropes (tie in knots!!!). From here, do another short (~30 feet) rap from slings around a bush to ground level. Option 2: Rap down and look for another bolted rap station on the right side of the wall. Do another double rap straight down to ground level (forget the large ledge in Option 1).
Scramble down the class 3 gully traversing down and left back to the base of the route.
 |  |  |  |  |
Essential Gear
A full rack including good selection of cams and a few mid-sized nuts. Used cams from about a green Alien (~0.3 inches) to #5 Camalot (this was kind of a waste as I think I used it only once on P1 - could've/should've gotten by with a #4). HELMETS - the route crosses some fairly loose terrain (for Red Rocks anyway). Two ropes for descent. Possibly some webbing to supplement/replace first rap station stuff.
Internet Links
Here are two excellent route descriptions (both have good photo topos):
(1) Ginger Cracks TR from Eric & Lucie.
(2) Route beta and topo from climbingredrocks.com.
Route Overview
 |
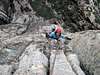
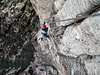
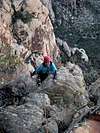
More Route Photos
 |  |  |  |  |