
-
 15479 Hits
-
 90.13% Score
-
 31 Votes
|
|
Route |
|---|---|
|
|
37.26417°N / 112.95361°W |
|
|
Mountaineering, Trad Climbing |
|
|
Spring, Summer, Fall, Winter |
|
|
Most of a day |
|
|
5.10c (YDS) |
|
|
10 |
|
|
III |
|
|
Overview

Iron Messiah is one of the finer free routes in Zion Canyon. It follows a classic dihedral/chimney corner system to the top of the canyon directly across from Red Arch. Darren Cope and Jeff Rickeri freed the route in 1988. Labeled a BYM route (bring your mama) by Alex McAfee in “Zion Rock”, Iron Messiah is a must have for any free climbers visiting Zion. Although McAfee labels Iron Messiah as an 11 pitch route, it goes in 7 pitches nicely, particularly with double ropes.

Iron Messiah appears to be climbed as often as the much better known aid routes in Zion, i.e. Touchstone, IV, 5.9, C2. If you read the summit log on Rockclimbing.com, you can find nothing but praise for the route and a variety of opinions regarding how many pitches it takes. McAfee has it at 11, but includes a scramble pitch, he calls 5.4, but the Falcon Guide calls it 3rd class. I tend to agree with the Falcon Guide on this one and we just scrambled up it in trail shoes quickly. From there, both guide books reference 10 pitches, but we combined 1 and 2 and 7 and 8 and recommend such with double ropes. In either instance, you won’t have but a meter left on 60m ropes. There are two crux pitches, 3 and 8. The crux of the third pitch is more of a reference to lack of pro than difficulty. The crux of the 8th pitch is towards the top, which is also the end of the dihedral. One of the most significant aspects not covered in detail in either of the before mentioned guidebooks is the shade element. I climbed Messiah in June during a 100F day and stayed reasonably cool due to the invaluable shade the corner throws along with the venting from the deeper chambers of the chimneys. By summer afternoon, the shade expands covering much of your rappel route!
Route Description


- 1st Pitch - 5.9+/ Sport Route!? Yes, you start off on one of the finer free climbs in Zion with five pins (I only saw two more the entire route) up a varnish face. Don’t let appearances fool you on this one; this is a very pumpy sport lead on crimpy varnish. You bounce back and forth, left to right and vice versa on a sustained, but relatively short first pitch. I passed the station at the top left to combine the first two pitches which worked well with good double rope management.
- 2nd Pitch - 5.8/ I combined the first two pitches which takes your 60m ropes to their max. If you did not manage your doubles properly, rope drag would no doubt discourage you from combining these two as it does require a sharp left hand turn. The climbing on this pitch is fairly laid back. Place a few pieces as you overcome a short overhang section and pull yourself into an easy going chimney. Placing gear is easy when and where you want until you reach a tree belay at the top. Do not get sucked left onto a ledge about ¾’s of the way up where there are pins, those belong to an aid route of some sort. Stay in the wide chimney until you reach a large treed ledge below the route’s dihedral above.
- 3rd Pitch - 5.10c/ Although mentioned as the crux lead in the Falcon Guide, several, including myself disagree. Most concur that it is pitch 8. The 3rd pitch is one of the shorter pitches, but not one to combine. Maneuver right, around the belay tree at the top of pitch 2 to the base of the wall. Wander up an unprotected section of the wall directly below the dihedral (1st chimney) into a sandy groove. You can protect the groove in about three spots, but the marginal aspect of the protection lends to the pitches rating. The 5.10c section is short and kind of reachy. I thought the rating should be a little less severe. Another crux, albeit much more fun, is the start move it takes to access the first chimney. Once in the left facing dihedral, continue up easy ground to a hanging belay on the wall to the left.
- 4th Pitch - 5.9/ I thought this was quite a bit easier than the 1st pitch sport route, but then I like stemming, cracks and chimneys. I am not sure I would rate this pitch any more difficult than pitches 5 and 6 even though it has a more difficult published grade. Real aesthetic pitch up blocky fragmented cracks that run parallel to the dihedral. Easy to place gear. Another hanging belay to the left in a small indenture.
- 5th Pitch - 5.9-/ Called a 5.8-5.9 in the Falcon Guide, I thought this pitch was as challenging as the 4th. The start is the crux, then it runs fairly smooth. Now you are looking to enter the chimney to the right for a standing belay versus hanging on the wall to the left.
- 6th Pitch - 5.8/ Fun but pushy chimney squeeze straight up and further into the chimney. Keep your gear to the sides and scrape for every conceivable feature to stem, squeeze and stuff yourself higher with. Hard to place gear, but you can use your Camelot 4 and 5 and a pin awaits you as you move out and on top of the chimney onto whitish/sandy rock. Turn left and continue up past one bushy ledge to the next for your belay. Stay left versus right here to stay on route. The sandy and loose section will give you several gear placements.
- 7th- 8th Pitches - 5.10b/ It totally makes sense to combine these pitches. It will use all of your 60m ropes, but it is straight up with minimal rope drag. The crux route and most desired climbing/rock of the day. Takes some time thinking about the unlocks here towards the top. Good gear placements. You pass the pitch 7 belay station right away. Both belays are standing ones.
- 9th – 10th Pitches - 5.10/ The real climbing (dihedral) is done at the top of the 8th pitch. The last two pitches are wrestling moves. A short scramble along the sandy gully to the right after you top out on the dihedral leads you to what the Falcon Guide refers to as a sandy crack; I call it an ugly sandy flake. Whip out your number 5 Camelot again and make an awkward move or two to swing into the flake and climb it to the top with a belay station on a large pine tree. It is best for both of you to scramble to the base of this crack, so you can combine these last two pitches. The last pitch is a run out 5.4 to the top which you can scramble to the summit.
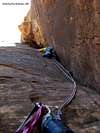
Climbing Sequence
 |
 |
 |
 |
 |
 |
 |
Descent

Rap back down to the gully and then back to the top of the dihedral (top of pitch 8). Then rap back to the top of pitch 6. Rap out left onto the wall (below and south of the pitch 5 belay station) to a relatively recent bolted (2007) station that allows you to only have to make one more rappel to reach the solid ground above pitch 2. This rap was also designed to keep your ropes out of the chimney and cracks. If you don’t use this rappel station, you will have to make two rappels from the top of pitch 5 to make the ground above pitch 2 with 60m ropes. From the top of the 2nd pitch, move west beyond the tree to atop another ledge to find a rap station that leads you down cleanly to the base of pitch 1. From there, use a tree rappel to take you down the scramble section for 60 meters which lands you onto the faint trail that will lead back down to Kayenta Trail.
Essential Gear
At least doubles from #.5 to #3 Camelots; one #4 and #5 Camelot each; at least one #1, #2 and #3 Metolius TCU each, one set of stoppers/nuts; double 60m ropes. All stations are fixed (2007). After the first pitch, you will only see about two pins. A shady climb, but don’t underestimate your water needs, take 2 liters at least in the summer.External Links
- The Many Free Routes in Zion National Park
- Oscar’s Café, the only place for climbers to truly fill their appetite (free range chicken, beef and Hank’s Tanker) and meet one of the finer climbers and individuals I know on the face of the earth, Zach Lee, someone who has established many of his own local FA’s in the area.
- Zion National Park
trail conditions or closures, wildlife notices/closures, weather conditions, camping permits, canyon water levels, etc.
- Best True Technical Clothing and Accessories in the Outdoor Industry, Hands Down....the Legit Climbers Gear at Real Prices
- Scarpa, has surpassed La Sportiva in terms of quality, function, value and actually stand by their warranties
- Osprey Backpacks, Not a Second Choice
- Great Outdoors Depot