
-
 5227 Hits
-
 79.78% Score
-
 11 Votes
|
|
Route |
|---|---|
|
|
37.22100°N / 112.963°W |
|
|
Trad Climbing |
|
|
Spring, Summer, Fall |
|
|
Most of a day |
|
|
5.11 (YDS) |
|
|
5 |
|
|
Overview/Approach

I was all set to go after Dances with Zulli when Zach pointed me in another direction, Holy Roller. Brody Greer put in Holy Roller in late 2006 and Zach estimated we might be the 3rd or 4th ascent. Zach obviously made the 2nd ascent of the route and I thought he had done a good job with Sharks Tooth Freighter which he had just put in during 2009 to the east of Holy Roller and I had made the 2nd ascent of just a month prior. So I took the bait.
 Crux move of the route

The first two pitches up Holy Roller are fairly tame. The first one is a 5.9 corner that lands you atop a comfy belay ledge. The second, 5.10+, is mostly bolted (7 bolts) through 90’ of face climbing with a small roof pull and then some trad and jamming to a semi hanging belay. The third and forth pitches are the business end of this route. The third pitch offers the most technical move of the route, 5.11, before you actually reach the bulge. It is mostly face climbing, protected with a few bolts and crack before you find the consistent crack which carries through the bulge and makes up the fourth and final pitches. The fourth pitch (5.11) is burly beyond measure: loose, dirty and sandy, without consistent hand or finger jams. Knowing the FA’s had a hard time with this pitch (based on who they are) restored a bit of my ego later in Springdale. The final pitch can actually be combined with the fourth pitch, which you might consider as that is a full on hanging belay. That last pitch finally did give up the perfect hand jamming we had hoped for lower down. All the stations are bomber bolts (2009) with rap rings. One 60m rope makes five raps.
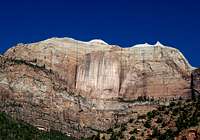
Drive or take the shuttle on the road leading back to the narrows in Zion National Park. You can ask the shuttle driver to drop you off if during the tourist season. At about 3/4 mile or so, there is a pullout to the right at a 4’ by 4’ cement road drain. There is another 4’ by 4’ cement road drain back west just a bit. You can take either drainage you want, but after going up the left one and coming down the right one, I advise you go up the one further west (right). There are no trails to these routes, just a ton of loose sand, rock and cactus. Below Mount Spry’s northern face is a short canyon wall of sorts that has to be circumvented to the right or left depending on which approach you used. The route is quite obvious as you eye a splitter crack up Mount Spry’s north face a ways starting in an obvious bulge, which is in fact part of the third pitch of Holy Roller. The most obvious feature on the wall however is the off width crack of the Central Pillar route which is just to the left of Holy Roller. The first pitch corner leading to the top of a pillar is a rather obvious start to Holy Roller.
Route Description


420’+/-, 5 Pitches, 5.11
1st Pitch- 90’- 5.9/ Climb the easy corner placing gear at will to the top of a pedestal of sorts (chimney to the left) with a nice size ledge and fixed belay. (photo)
2nd Pitch- 90’- 5.10+/ I made the mistake of seeing all the bolts and left the gear at the belay. In actuality, you do want to take several .75”-1” pieces with you, otherwise you will have to follow my lead and run it out a bit on 5.10 terrain. Follow the face bolts up as they trend right at first, then back left. Eventually you turn a small roof-like feature to the right. The crux move of the pitch is getting your left fingers, versus your right ones, in a small finger slot above on the narrow ramp. Your natural instinct is to grab this finger jam with your right hand, but I could not make the mantle that way. Instead, look for a small finger hold out right for your right hand and jam your left fingers in that slot hole. Pull up and on to the small ramp and jam your way to the fixed semi hanging belay above placing a piece or two on the way there. (photos)
3rd Pitch- 100’- 5.11/ These next two pitches are 100’ on the dime and are the business of the route. Follow a directional bolt followed by two others up and left through a scooped out face. Follow the thin seams up, placing a 4” in a large hole before making a hard traverse up and left (several more bolts) towards the bulge. Once in the bulge, follow the dirty overhanging crack (I broke a face hold off here) up and over to a hanging fixed belay. (photos)
4th Pitch- 100’- 5.11/ Climb the burly, sandy and inconsistent crack up to another hanging belay. You can combine these last two pitches if you want to avoid that belay. The top belay is on a decent ledge. I sewed this pitch up as I had zero confidence in my feet out on the smooth sandy and dirty face. The crack was never consistent, not allowing many good finger or hand jams, but rather a collection of different widths. I placed most of my double rack, except for the 3’s and 4’s. I advise carrying extra .5” and 1” pieces just for this pitch (which Joe and Brody call for anyway), particularly if you are going to combine the last two pitches. You do get rest stops on a variety of features. This pitch could be 5.10+ for that reason I suppose. But to on-site it, I would be prepared for the 5.11 grade. (photo)
5th Pitch- 40- 5.10-/ Now the great hand jams decide to show up. Follow the crack through a slight bulge to a decent belay ledge. The fixed belay is on the left wall above. (photo)
Climbing Sequence
 |
 |
 |
 |
 |
Descent
Just make five 60m rope rappels. The 3rd and 4th rappels both require swinging pendulums, first right and then left, with little rope left to reach the next rap. You might want to tie knots in the rope.Essential Gear
One 60m rope. Single from .3” to 4”, double from .5” to 3”, triple .5” and 1”. We did not place any wires. Northwest facing route, so not much sun to deal with on the climb itself unless later in the day. Was quite comfortable in April. Half dozen shoulder length slings and half a dozen draws. You will appreciate the slings on the 3rd pitch, it bends quite a bit left. Will descend back to your shoes and pack, no need to take much with you.External Links
- The Many Free Routes in Zion National Park
- Oscar’s Café, the only place for climbers to truly fill their appetite (free range chicken, beef and Hank’s Tanker) and meet one of the finer climbers and individuals I know on the face of the earth, Zach Lee, someone who has established many of his own local FA’s in the area.
- Zion National Park
trail conditions or closures, wildlife notices/closures, weather conditions, camping permits, canyon water levels, etc.
- Best True Technical Clothing and Accessories in the Outdoor Industry, Hands Down....the Legit Climbers Gear at Real Prices
- Scarpa, has surpassed La Sportiva in terms of quality, function, value and actually stand by their warranties
- Osprey Backpacks, Not a Second Choice
- Great Outdoors Depot