
|
|
Route |
|---|---|
|
|
37.82330°N / 119.3964°W |
|
|
Technical Climb/Scramble |
|
|
A long day |
|
|
5.6 |
|
|
Approach
From the Cathedral Lakes Trailhead, hike to Cathedral Pass. As the trail starts downward, leave the trail and follow the creek drainage to the left towards Matthes Crest. Leave the creek drainage when you can make a beeline for the south end of Matthes Crest, noted by the steep drop on the ridgeline. Hike through the forest down to the Echo Creek drainage and up the other side. Climb sandy granite ledges to the base of the climb, marked by a clump of pine trees.You can also reach the start from Cathedral Lakes by following the use trail up the Budd Creek drainage (used for the Southeast Buttress of Cathedral Peak), climbing over the ridge near Echo Peak #8, and down into the Echo Creek drainage. This route, suggested by Secor in his book, is shorter but requires more elevation gain and will take longer. A better way suggested by Jack Daniels is to skip the climb to Echo Peak #8 and instead skirt the west side of Echo Peaks. There is a broad, easy hike along the west side that takes you into the Echo drainage west of Matthes Crest. This cross-country route is probably the fastest/easiest way to reach Matthes Crest.
You can also reach the start of the route from the east above Matthes Lake. Climb the scree/sand slope to the notch below the steep dropoff on the south side of the ridge.
Whichever way you go, allow adequate time for the approach - it can be done in as little as 2hrs, though may take others twice as long. Leave early on weekends to get to the approach by 8a unless you don't mind waiting in line.
 |  |  |
Route Description
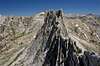
The starting point is just above the trees. There are several routes you can take (which is nice if there's more than one rope at the start). The easiest follows a wide crack diagonally up and to the right towards the east. The first pitch ends where the route then switches directions and heads diagonally up and to the left, staying on the west side of the ridgeline. The third pitch is easy and very short (can be done without a rope if desired).Alternatively, you can climb from the base starting further to the right, closer to the actual ridgeline. There is a belay point (sitting on top of granite rock) at end of the first pitch that lies just right and above the belay point for the other route. The second pitch continues to go up and right, with much face climbing, good holds, but poor protection (5.7). Again the third pitch is short and easy and can be done without a rope.
Once at the top of the ridge, put away your rope and enjoy an exhilarating class 3 traverse along the ridge. It has great exposure, a little bit of route-finding, and simply great climbing. A few easy class 4 moves along the way.
As you approach the south summit you can choose to climb it (easy class 4), or head directly to the higher north summit by dropping down on the east side of the ridge about 30 feet to keep class 3. There is a bit of airy face climbing to get to the notch between the two summits, but it has great holds on thin flakes.
At the notch drop a short way down on the west side for the single pitch of technical climbing to the summit. There are at least three routes possible here (all three were used the day we climbed). On the right is a short but steep open book with a crack in the center. A second choice is to climb a small buttress just to the left of the first route, with good holds, but not good protection. A third route starts lower down and further to the left of the summit, climbing a combination of cracks and faces to the ridge just north of the summit.
With a long rope, a single rappel suffices to get you back to the starting point between the two notches. A second rappel will get you safely down all the upper hazards to the easier class 2 below. Alternatively the second rappel can be dispensed with if one is careful about (and good at) downclimbing the steep class 3-4 section here.
Most parties bail after reaching the summit through the rappels described above, but the traverse can be continued north from the summit, and in this author's opinion is even better than the southern portion. There is a great deal more class 4, some easy class 5, and some of the most impressive knife-edge traversing found anywhere. One memorable edge dubbed "The Wave" is actually overhanging by some 15 feet or so from vertical, and looks like an ocean wave about to break. There are two small towers at the far north end where most progress will be stopped. A downclimb exceeding 5.6 is required, and most parties bail off the ridge at this point to the west. If doing the full traverse, return to Catherdral Lake Trailhead through the Bud Creek drainage. This is most easily done by traversing left at the end of the Echo Creek drainage, and passing over the ridge to the right of Echo Peak No. 8.
 |  |  |  |  |
Bob Burd - Aug 30, 2012 12:55 pm - Hasn't voted
Re: Three pics that may help on the approach/descent by BuddThe route you depict is the one described by Jack Daniels in the second paragraph, skirting the west side of Echo Peaks. I've added a link to your helpful topo and made the other correction as well. Thanks!