
-
 6286 Hits
-
 82.48% Score
-
 15 Votes
|
|
Route |
|---|---|
|
|
44.39749°N / 107.17472°W |
|
|
Mountaineering |
|
|
Summer |
|
|
Most of a day |
|
|
5.8 (YDS) |
|
|
2 |
|
|
III |
|
|
Approach
West Ten Sleep trailhead: Located off of Hwy 16 near Meadowlark Lake, follow the West Ten Sleep trail over Misty Moon Pass (7-8 miles in) and leave the trail to cross Paint Rock Creek, similar to the Cloud Peak approach, but instead of going up the drainage to Cloud, you take off left toward a narrow lake on the bench above Paint Rock Creek. Follow a use trail to the end of the lake. From there you start to lose the trail and cut right after dropping down the hill a few hundred feet. You will enter a small drainage that will take you into Wilderness Basin after you climb over a ridge on the left side of a prominent rock point. After you get your first view of Black Tooth, Mt. Woolsey, and The Innominate, contour your way up the Basin on grassy ledges and small valleys until you reach the first lake. Wilderness Basin
Note:
The Bald Ridge Trailhead can be taken on this route, also. It will save you 2 miles of hiking (it meets the West Tensleep TH at Lake Helen), but you will need a 4-wheel drive and make sure to pick up a wilderness permit since there aren’t any at this trailhead. To reach this trailhead, take the Battle Park Road that starts a few miles past Deer Haven Lodge and follow it for about 7 miles. Turn right on a road that immediately switchbacks up the hill and into the trees. I believe this is road 404, but I’m not sure if it is marked at the turn. The road will fork after you enter the trees, stay right. You should cross a few fences and gates before you top out on the ridge, then you need to turn left on a road that intersects 404. Follow this road up the ridge for a few more miles through some rough spots until you reach the trailhead, which is not well marked, just look for a line of boulders laid across the ridge and a cattle guard on the left. The road will keep going up the hill to the left, but this is where you park . Follow what appear to be cattle trails up the ridge and look for cairns once you cross the first drainage. Eventually the trail will become less convoluted and you will head into the trees and down the hill. You should connect with the West Ten Sleep trail at a footbridge.
The Climb
Get an alpine start for this one, you can pretty much count on rain and weather at around 2pm every day. From the last lake, aim for a semi-hidden couloir located directly below the summit domino. Climb up the right side of the couloir on slabby rocks and grassy ledges and angle left and up into some broken up class 4. Class 4 start
Eventually work your way into the large gully on the right side of the peak. Once in the gully, your next goal is a large boulder hanging off the face, leaning to the right.
 Boulder at start of first pitch
This boulder marks the start of your roped climbing. Two fun routes can be taken from either side of this boulder. Both go at easy 5.8 depending on your route-finding skills and how much you want to zig-zag.
Right Hand Route:
 Start of route on right side of boulder
The right hand route takes the obvious crack line that leads to the square notch on the ridgeline, this line is easily seen from the valley. It is 2-3 pitches high, depending on how far you feel like stretching out pitches. Two 170ft pitches would get it done. Pitch one involves a beautiful, thin dihedral crack start (5.8) that offers face holds on the right. It gets ledgy after 40ft and continues up a chossy chimney until you reach a nice belay ledge. The second pitch continues up the chossy chimney. To avoid the choss, I cut left out of the chimney and ran into a 20ft 5.9+ chicken head covered face. I more or less took it just for fun; it is a bit run out (unless you have a 0.125 tri-cam to plug into a seem) but if you stay in the chimney the run out can be avoided. After the face you mantle onto another nice belay ledge, but if you climb 30 more feet you will reach the top of the ridge. From there you scramble up class 4 to the summit platform.
Left hand route:
Very similar in quality and climbing as the right hand route. Fun sections linked by chossy chimneys. This route ends closer to the summit on some ledges coming off the top of the ridge.
Summit Domino:
 Summit Domino
The actual summit is a 30ft high boulder that leans over the north face. It looks blank and hard, but once you get on it you’ll find a small seem halfway up that you can plug 2 micros and a bomber stopper into. The stopper will be the top piece and should give you some comfort and plenty of protection while pulling the 5.10d crux move on the left hand arête.
My method of preventing this climb from being R rated was the following: After the crux move, I was standing a little over halfway up the spire on a secure foot ledge, from this position I can pulled out my 50ft sling and lassoed the top (there is a corner that you can hook). After I lassoed the top, I tied a loop in the sling, clipped my rope into it, hoisted my clip to near the top, had a member of our group tie into the sling to anchor it with his bodyweight, and then I was essentially top-roped from this point on. I finished pulling the arête moves and the final mantle onto the top (all 5.10 moves) and posed for my victory photos. Each member of our team took his/her turn at the top-roped boulder. I’m sure there are other ways of leading this domino, such as throwing the rope over the top and climbing on prussiks or just free soloing it, neither appealed to me at the time given the exposure.
 getting ready to lasso summit
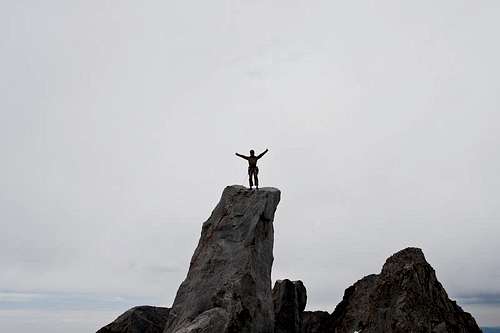 Victory!
 Shoulda been a cowboy
 our anchor
Rapping off:
At the top of the last pitch of the right hand route you’ll find a sketchy looking boulder perched on the face with a rap sling on it, don’t use this! It held our weight but I don’t know how much longer it will stay there with weathering. Above it there is a large boulder with a horn that can be slung, use that! Other rappel stations will be found on the climb up the right hand route, just keep your eyes open for them.
Gear
Gear: Full set of cams, stoppers, micros, small tri-cams are useful, 50ft of sling for domino and rappels, double-ropes for the long rappels (you might have to gear nest with a single 60m), ice axe would be handy if climbing before August. Gotta love tri-cams