
-
 538 Hits
-
 74.01% Score
-
 4 Votes
|
|
Route |
|---|---|
|
|
Trad Climbing |
|
|
Spring, Fall, Winter |
|
|
Most of a day |
|
|
5.6 (YDS) |
|
|
9 |
|
|
Overview
If you love long, moderate multi-pitch routes with big runouts, sketchy gear placements, crumbling rock, a wilderness feel, and great views, then you'll love the Great North Ridge.
This is the Solar Slab and the 3rd Flatiron of the Swell.
At 9 pitches and covering nearly 2000' (climbing distance, not vertical gain), it's the longest non-traversing route in the Eastern Reef. Depending on your comfort level, you might not rope up for all 9 pitches; my sons and I roped up for Pitches 3-7, doing them in 4 pitches, and soloed the rest.
When I say that protection is sparse and the rock isn't trustworthy, I'm not kidding, and you can check comments on the MP page to verify. For example, when I led P6, all I got was one marginal #1 cam placement about a third of the way up, and when my son led P7, all he got were two little bushes to sling. Each pitch was about a full 200'.
So come out ready for some adventure and a good deal of pucker factor in spite of the grade!
Getting There
There are 2 main ways to access the crags.
The first is from I-70. Two miles west of the exit for UT 24, turn off onto a dirt road to the right. This road leads into Black Dragon Wash, where the well-known Black Dragon pictograph panel is. Open the wire gate, reclose it after driving through, and head for an underpass. Once through it, you'll be on a dirt road that parallels the reef for about 6 miles before bending east.
Before entering the underpass, check to see if it's flooded. If it is, there is another turnoff and gate on eastbound I-70. You can get to it by crossing the highway on a service road, which technically is illegal, or by driving for quite a ways to the first exit (I believe it is 131) that allows reentry to 70 in the other direction. Of course, if you're coming from the west, this turnoff is the one you want in the first place.
The second approach is from UT 24 via a turnoff about 7 miles south of I-70 and just past MP 153. This road is said to be usually in better condition than the one from I-70, and it connects to the road that parallels the Reef.
Note: the road paralleling the Reef receives regular maintenance but does change according to conditions. I've been on it when I could have driven a regular passenger car with little trouble, and I've been on it when there have been washouts making me thankful I was in a Jeep.
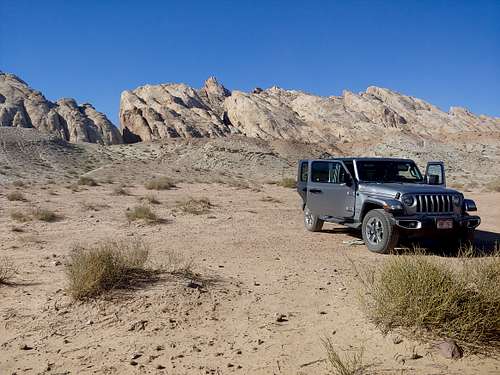
2.1 miles south of I-70 on the dirt road paralleling the Reef, there is an obvious parking area on the right. Park here.
Route Description
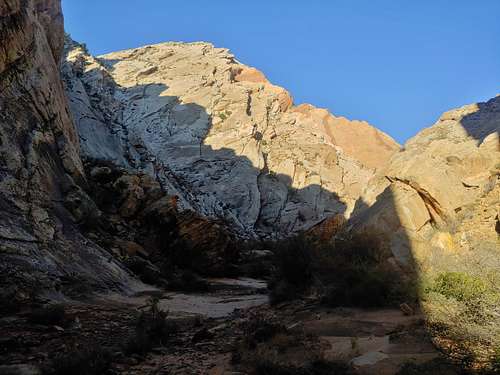
From the parking area, you can see Little Spotted Wolf Canyon. Drop into the wash close by and follow it for several minutes. I'm not sure if one of its spurs eventually reaches the mouth of the canyon; we struck out and went up and over a ridge and then followed a wash into the mouth. On the way back, we took a more direct way via the ridges.
It takes 15-20 minutes to reach the mouth of the canyon. Then just stroll into it, and within a few minutes, you'll be at the base of the route.

|

|
Exactly how you climb this route is really up to you. I studied the description Paul Ross gave on his route page linked to above, and I also noted a great description of a somewhat different path by Gregory Cooper in the comments section. With their descriptions and some photos from the page, I figured we'd figure it out.
And then we ended up doing some things I don't think either did. So yes, it's an adventure, and if you use the descriptions and photos here and on MP, you'll get there, but I just don't know if you'll find the easiest path.
So here's what we did:
P1-- 5.4. Ross talks about going up an open slab. Cooper mentions a chimney. This "chimney" is just to the left of the slab, and I thought it looked better than the slab, so I soloed it, as did my 14-year-old son, Tom. My 18-year-old son, Jack, took the slab. He found it pretty sketchy until crossing over to the chimney.
P2-- 5.4 or 3rd Class. Ross talks about a 5.4 slab, and Cooper talks about a 3rd Class scramble. We saw and took the scramble, which sometimes was brushy but did get us to a corner and slab that everyone agrees upon as P3.
P3-- 5.5. Although I felt this was the best-protected pitch, though not well-protected, I thought it was harder than 5.5, but maybe that was because of the crumbling rock beneath me. However, I did get several pieces in, but there were still runouts. Cooper points out that a flaring crack he used for the belay was more than 200' from where he started, and he mentions wishing he had a longer rope to reach a better crack a bit past it. With that in mind, I started well up the gully to the right of the slab before pulling over, and I still had to have Jack move about 50' up the gully so I could reach that better crack, which is definitely worth getting to. This crack is what I believe Ross refers to as the base of a chimney slot, so I really led parts of P3 and P4.
P4-- 5.6. I think all of us went through the same crux. As the "chimney slot" starts to reach an airy dropoff, cut left on terrible rock beneath a short wall to a corner. Along the way, there is a good crack with a good cam placement. From the corner, make some awkward moves up it; at least there is a good placement to protect this part, which Jack led.
P5-- 5.0-5.4. After the crux, all of our paths seemed to diverge, so I will stick with ours. Jack traversed way left, even though the other descriptions suggested that wasn't the right way, until he reached a gully with a large tree in it. So really, Jack combined the end of P4 and some new take on P5.
P6-- 5.6. The others describe P6 as 5.0-5.4, but I'm almost positive they did something easier and different. This was the pitch where I got one marginal cam over about 200' on poor rock. Not until I reached a "cave" area where several large boulders were jammed together did I feel safe. I belayed from behind one of those boulders.
P7-- 5.4. Jack led this and was only able to sling 2 small bushes, and he belayed off another bush that didn't inspire too much confidence.

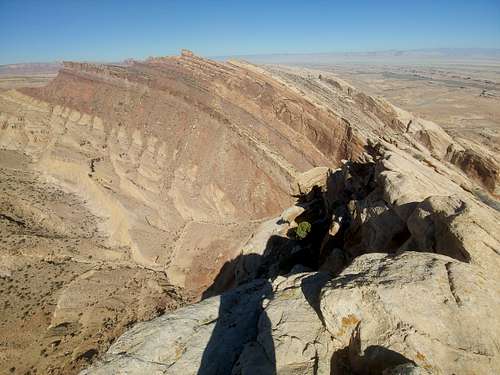
P8 and P9-- 4th-5.2. Lots of slab to the summit ridge. Our P4 initially followed a nice crack that actually promised the best pro of the entire route, but we were soloing at this point. They felt longer than 400', but I was tired and a little sketched by then.

|

|

|

|

|

|

|

|

|
To descend, follow slabs to a notch, and then follow more slabs down to the canyon floor. It feels like forever but actually only took us about 50 minutes to get from the summit back to the mouth of the canyon.
Essential Gear
70M rope, a set of cams up to BD #3, and plenty of alpine draws and double-length slings.