Using Polarisation Filters

Using Polarisation Filters

Page Type Page Type: Article

Introduction

About two years ago I stumbled into a discussion about photography on one of the SP message boards where several people recommended using polarisation filters in order to enhance the quality of the resulting image. In 2003 I started using polarizers myself and since then I rarely venture out without one. During that time I was able to shoot a number of photos which without polarizer would have been utterly unimpressive while I also did a lot of mistakes since I had to find out about the use of the filters on my own.

During that time I have also seen photos down voted because the voter thought them photoshopped (“At that elevation you don’t have a sky that blue!”) or - the other extreme – heard a member claim that the polarizer reveals the real colours while our own eyes see only a grey-shaded version of reality.

Since – as always – the truth lies somewhere in between, I thought it might be helpful to publicly muse about my own experiences as an amateur photographer while also discussing the physical principle of the filters. Don’t be afraid that it gets too technical – but also don’t look for the actual truth. That would probably involve nasty physical formula and after ten years out of the physics business I don’t claim to understand them myself anymore.

Why Use Polarizers Anyway?

So here we are and the first question generally is:

What does a polarizer do?

The answer – as anybody who has used them will tell you

They enhance colours, making the picture crisp and clear – under certain conditions.

In order not to bore you with words, let’s have a look at the following two pairs of pictures.
Große and Kleine...Gamswiesenspitzen without polarizer
Große and Kleine...Gamswiesenspitzen with polarizer

In the first pair you see the pair of Große and Kleine Gamswiesenspitze as seen from Zochenpass in the Lienz Dolomites in September 2003. I shot the first picture as part of a multi picture panorama, for which I generally don’t use filters (you’ll find the reason in the drawbacks section below). However I liked the view good enough to also shoot a second shot with polarizers in place – the shot to the right.

The effect is quite apparent – a good but somehow dull picture suddenly turns into a colourful one, the clouds in the background move much closer so that, as hgrapid put it “The clouds above seem like a sea below.” The structure of the rock is visible and it seems like a grey veil has been lifted from the picture.
Rocca Busambra main summit   unpolarised Rocca Busambra without polarizer
Rocca Busambra main summit   polarised Rocca Busambra with polarizer

The same effect is even more pointed in the second pair of shots, while the object itself might not be that impressive. While hopping along the ridge of Rocca Busambra in May 2006 I turned round after having downclimbed from the main summit to the next saddle. I first wanted to take a vertical shot, adjusted the polarizer accordingly, but then decided to settle for the horizontal alignment. While pressing the shutter I realized that now the polarizer was off and redid the shot with correct settings.

Again, the picture on the right is much more colourful and if not put side by side you would probably not imagine that these pictures show the same crest and were taken just seconds after each other. The lifted-veil-character is not as pronounced here as in the other pair, which is caused by the short distance in the second and the far distance in the first pair.

Now one last example:


Colàc (far right) in front of the Sella-, Geisler/Odle and Saslonch/Langkofel/Sassolungo Groups.


Here you see the western Dolomites as seen from the Buffaure ridge on a perfect day with decorative clouds giving just the right amount of shadow to the foreground. Also colours are intense here and there is no hint of a grey veil here. You can even see the faraway mountains quite clearly like the Geisler / Odle Group in the back centre of the panorama.

Working Principle

So – how is it done? Is it magic?

Certainly not, but it is a physical effect, which is much harder to explain than to master the use of the filters themselves. Therefore there is a short explanation below and a physical one. Let’s start with

The Short Explanation


When rotated to the correct angle, polarization filters reduce stray light by reducing reflections. Have a look at the pair below
Demo Polarisation FilterDemo without polarizer
Demonstration Polarisation FilterDemo with polarizer

To the left on the unfiltered image you can clearly see the reflection on the table which is missing almost completely on the filtered one to the right. The same happens when you take a shot in plain air. While it might appear that the air between your camera and the object you are taking a picture of is completely transparent, there are millions of tiny particles, aerosols. These aerosols might be simple water vapour or smog and dust particles – but all reflect additional light into your camera lens – an effect which you see as a grey veil on your photos.

The polarizer cuts away this additional light – and the grey veil is gone. But how?

The Physical Explanation (Unscientific)


(No mention will be made of circular polarisation though this is an important effect when using polarizers – you have to be able to think and speak in mathematical formulae to get that right ;-))

We have to start with the question: What is polarisation in the first place?
Most of you will know that you can describe light as propagating in waves. When discussing colours for instance we often speak of wavelengths or frequencies – red light has a long wavelength, blue light a short. Now have a look at the light wave below:
What is Polarisation?Light Polarisation

If you pick out one special point on the wave (like the one indicated in green) and if you look at this point from the right hand side you will see it bounce up and down, following the movement of the wave. It would always keep moving in that direction since the wave itself moves up and down along the same pane. In geek speak this wave is linearly polarized, vertically in this example.

However, the light emitted from any light source consists of gazillions of lightwaves, all of which are emitted randomly in all directions. Moreover the panes in which the waves are swinging are also distributed along all angles. When viewed from one side you would find the points of the waves swinging in all directions, every single one bouncing up and down along one line but the multitude of them distributed along all angles. The image b) in the above picture tries to give you an idea.

Now you put the polarisation filter in place and the effect is immediate: only one pane is selected while all the light swinging in another pane is suppressed. As a consequence the polarisation filter greatly reduces light intensity – you’ll have to use greater apertures or longer exposure times – but we’ll be getting back to this in the “Risks” section. If you now choose to use a second polarisation filter you will find that – as you rotate it – you’ll be able to suppress all the light. Both filters have to be at 90° angles between each other.

But how does that help in reducing stray light...


...or in lifting the grey veil?

To answer this question you have to know that every particle, even the tiniest one, while it reflects light changes the polarisation of it. Exceptions are metals which bounce back light as it hits them but our aerosols behave differently. Depending on the angle of the reflection the reflected light is more or less polarised with nil effect at 0° and 180° (light from front or back) and maximum effect near 90°.

In real life this means that if you have the sun at your back or in front – though there is still stray light, the stray light won’t be polarised. Using a polarizer won’t help a bit. However, if you have the sun to one of your sides, rotate the polarizer and you’ll get to a point where the veil has lifted – colours get much more intense (and darker) while details suddenly come to the foreground. Turning the filter will give you the impression that parts of the frame come closer or retreat farther to the back.
Polfilter Working PrinciplePolarisation Filter Working Principle

Now that we have (hopefully) understood the mechanism, let’s have a final look and try to see what really happens: the object (mountain) emits non-polarised light in full colours. On the way to your camera stray polarised light gets added so that everything gets hidden behind our veil. With the polarizer you now choose exactly one polarisation – the one which diminishes the stray light. In geek speak that is the direction ,,tilted at 90° to the polarisation pane of the stray light”. In the end you’ll get a similar picture as the one that was emitted by the object in the first place.

Polarizer vs. Photoshopping and Other Filters

Photoshopping


We have all heard that one of the great advantages of digital photography is the possibility to edit and enhance pictures afterwards. Can I achieve the same results with photoshop?

The short answer is no – at least not with the standard routines. An automatic level or curve adjustment is a move in the right direction but don’t be fooled: it takes an expert photoshopper to obtain results that mimic the effects of a polarizer. And I doubt that anyone would be able to adjust one of the pictures on top so that it resembles its counterpart on the right. You may try and convince me…

UV-Filter


A different kind of filter – the UV or UV-haze filter promises similar results as polarizers. By stripping away light at lower wavelengths (i.e. below a wavelength of 380nm = UV light) they claim to get rid of stray light without the cumbersome aspect of having to rotate the filter to obtain the best effects. However the stray light is not primarily emitted at these wavelengths – only very high up in the mountains you will obtain visible results. If you plan to climb above 4000 or 5000m a UV-filter might be all that you need.

Limitations

There are a number of conditions in which a polarizer is useless or gives unexpected results. I wouldn’t say these are drawbacks but you have to be aware of them.

Back light / Front Light


As that in the theory section the polarisation of the stray light is virtually nil at 0° and 180°. You won’t get results with polarizers under these lighting conditions. However – if the sun is very high up in the sky – polarizers can still help because now there is an angle of almost 90° again between the sun and the direction you are looking.

Portraits and Macro Shots


Close-up shots are not affected by polarizers. There is simply not enough stray light between the object / subject and the camera. However, if the background (like blue sky) is of importance or if there is an reflecting object nearby (like spectacles), you might still enhance the shot. Be aware that the filter reduced light intensity!

Flash Light Photos


Don’t do this with a polarizer! The automatic settings between flash and camera won’t recognise the filter and underexpose the shot severely.

Telephoto Pictures


The opposite is true for tele photo pictures. Here the effect can be seen though you might want to adjust the filter while looking at a wide angle an zoom in later. Depending on the amount of haze between you and the faraway object you might have trouble seeing the effect directly.
Western Sicilian HighlandsRocca Ramusa on Sicily

Haze and Smog


Too much haze or smog reduces the polarizer results greatly. Now you have multiple reflections on the aerosols and the polarisation of the stray light gets blurry. The hazier it is the less impressive the results. Polarizers are useless in fog!

As for smog – the same holds true as for simple haze. However, the smog particles are “dirty” and thus change the colour of the stray light. As a result faraway shots with polarizer can look brownish.


Overcast Skies


There is absolutely no use in a polarisation filter when the sky is overcast. All the light – direct and stray – will be polarized in all directions so that a filter won’t do any good at all.

Risks

Blurring


I has been mentioned somewhere above that polarisation filters greatly reduce the light which falls on the chip or film. In everyday application this means that you either have to open the aperture or – if that is already open all the way – you have to use longer exposure times. Especially if you are using the automatic exposure mode of your camera you might not even be aware of it. Even on a bright day a telephoto shot can get blurred if the exposure time is longer than the reverse of the focal length (f=200mm -> t<1/200s). With a polarizer which cuts off additional light you might easily fall below that threshold.
VignettingIsola Alicudi in Sicily

Vignetting


There is another effect which – though it occurs with any filter – is most pronounced with polarisation filters: vignetting. Since chip as well as film are rectangular while the whole optics is circular you might observe circular patterns in the corners of your photos. The effect is pronounced with wide angle lenses together with polarizers. As the opening angle of wide angle lenses are wide they might get obstructed by the filter, which is placed in front of the lense. Imagine it as casting a shadow into the lense. Polarizers are especially thick so that the effect is largest with these kinds of filters.

However, Brenta told me that there are special thin-mount filters which are more expensive and lack the thread in front. With these kind of filters you may be able to eliminate the vignetting effect. Due to the lacking front thread stacking of filters is not possible.

Sky GradationSky gradation in Germany's Soonwald

Sky Gradation


If you plan to use wide angle lenses together with a polarisation filter you might observe that the colour of the sky changes brightness over the width of your photo. Since polarisation is different at different angles the stray light on the left side of a wide angle photo is differently polarised than the one on the right hand. Have a look at the shot to the right and see the colour change from a very deep blue on one side (one you would never achieve at an elevation of 600m without a filter) to much lighter blue on the other. The shot was taken with a 18mm lense with an opening angle of 74°.


Panoramas


Don’t use polarizers for panorama shots! Certainly not for panoramas covering an angle of more than 90°. Since the stray light polarisation differs at different angles and since the polarizer picks out only one polarisation you are bound to get visible “steps” in your panoramas. Even if you leave aperture and exposure settings fixed the “color aspect” of the pol filtered shot changes over the width of the pano, thus switching from blueish (directly against the sun) to yellowish (at 90°). With the individual shots at different of these hues you will get “colour steps” in the pano. With patience these can be treated individually in photoshop but it is a very cumbersome process.

Conclusion

Gamskofel (Mooskofel hidden...Gamskofel in the Carnic Alps

If you can spare the 30 – 50 dollars (or Euros) that a polarisation filter costs and if you are interested in good photos – by all means buy one and start experimenting with it. No number of words can prepare you to what a polarizer can do and you should start observing its effect by simply looking through and turning it. As you do so you will see the sky turn a magnificent blue, the clouds turn a dazzling bright white and objects in the background seem to move closer to the front. The filter does not have to fit to the lense mount – if it is wider you won’t run the risk of vignetting. Be aware of limitations and risks and the filter will give your photos a new life.

External links

Similar article with additional info

Comments

Post a Comment
Viewing: 1-20 of 41
Rick B

Rick B - Jul 13, 2006 10:15 am - Voted 10/10

Circular vs. Linear

Very interesting article! But a quick check for buying polarisation filters on the internet learns me that there are two types, circular polarisers and linear. Maybe you can explain the difference between these as well?

Anyway, thanks for the article :-)

Cheers,

Rick

Gangolf Haub

Gangolf Haub - Jul 13, 2006 10:56 am - Hasn't voted

Re: Circular vs. Linear

I really forgot about it - you need to check your camera manual which kind of filter is best for you - my Minolta fo instance works only with circ pol filters since the coating of the chip itself somehow affects polarisation.

Gangolf Haub

Gangolf Haub - Jul 13, 2006 11:21 am - Hasn't voted

Re: Circular vs. Linear

Just found an article (had I known I could have used it :o)):

article

It seems that you need circ-pol in anyway since the autofocus and -exposure mechanisms might get fooled by linearly polarized light.

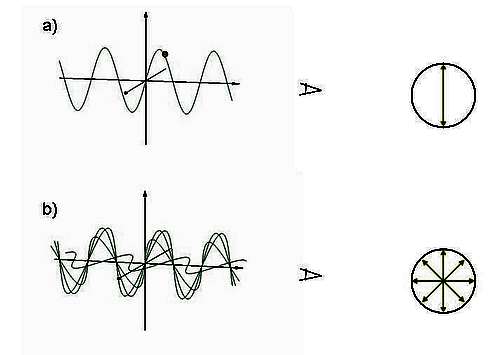
Circularly polarised light does not "swing up and down" along an axis like in the pictures above but rather moves circularly along the viewing pane. You can superimpose a sine and a cosine wave to obtain this circular "motion".

Rick B

Rick B - Jul 18, 2006 5:55 pm - Voted 10/10

Re: Circular vs. Linear

Hey just to let you know - I bought one :D

And I bet I'm not the only one who was tempted after reading this, you just did the filter companies a big favour ;-)

Gangolf Haub

Gangolf Haub - Jul 19, 2006 9:33 am - Hasn't voted

Re: Circular vs. Linear

Damn! You found me out :-)

brenta

brenta - Jul 13, 2006 2:28 pm - Voted 10/10

Thin-Mount Filters

Thanks for the interesting article.

In the discussion of vignetting, you may want to mention that it can be mitigated, or even eliminated, by buying a thin-mount filter. The drawbacks are higher cost and absence of a front thread. The latter means that you cannot stack filters, but if you are already dealing with vignetting, you probably don't want to stack filters anyway.

Gangolf Haub

Gangolf Haub - Jul 13, 2006 2:53 pm - Hasn't voted

Re: Thin-Mount Filters

Thanks - I did the changes :-)

nartreb

nartreb - Jul 13, 2006 2:52 pm - Voted 10/10

blur

"A telephoto shot on a bright day gets blurred if the exposure time is longer than the reverse of the focal length (f=200mm -> t<1/200s)."
Unless you use a tripod. But what does a "bright day" have to do with it? The rule is about camera shake being effectively magnified by a long lens. A bright day lets you shorten the exposure, sure, but the rule is unchanged. (Alternatively, a bright day lets you use a smaller aperture, which increases depth of focal field, but it's not that kind of blurring we're worried about here.)

PS the external link is broken - there's an excess <b on the end of the URL.

Gangolf Haub

Gangolf Haub - Jul 13, 2006 3:01 pm - Hasn't voted

Re: blur

You're right - of course. For me bright days are associated with unproblematic shooting. No reason to worry about exposure times if you're on automatic. It took me quite a while, I must confess, to find out why suddenly some of my telephoto shots were blurred.

And no - I don't lug tripods around with me and rather take snapshots than planned photographs. Thus it often occurs (or rather occurred) that my shots got a bit shaky ;-)

Gangolf Haub

Gangolf Haub - Jul 14, 2006 11:07 am - Hasn't voted

Re: point and shot polarizer?

Most of the pictures you see on this page (e.g. the signature pic on top or the pano have been shot by holding a filter in front of my Nikon CP 5700. It's not really "point and shoot" but as close as it gets. I went the other way - I now again rely on a (heavy) SLR, a Konica Minolta Dynax 7D but I still have to struggle with it. For me the Nikon was far easier to use with respect to the results.

brenta

brenta - Jul 14, 2006 2:46 pm - Voted 10/10

Re: point and shot polarizer?

I've never used one, but some point-and-shoot cameras, e.g., the Canon A700, can be fitted with a lens adapter on which one can mount filters. Some Nikon Coolpixes like the 8800 also have this option. My Minolta A200, not a point-and-shoot, but not a dSLR either, has a threaded lens barrel that takes 49mm filters. Then again, it exibits a bit of vignetting at low focal lengths even with a thin polarizer.

Michael Hoyt

Michael Hoyt - Jul 13, 2006 10:13 pm - Voted 10/10

Things to keep in mind

Good article on the use of polarizing filters. I’ve used them for years and have discovered (either read or heard from others) a few useful things I try to keep in mind when using one…

When shooting pictures outdoors, the areas of greatest polarization lie in an arc at a 90 degree angle to the position of the sun in the sky. An easy way to find those area is to hold your thumb and index finger at 90 degrees to each other (sort of like we did as kids when we used our hands to play cops an robbers), point at the sun with your index finger and rotate your thumb through an arc. If you’re shooting a picture at any point on or close to that arc, you can achieve a high degree of polarization by using a filter.

There are some cases in which you do not want the full polarization a filter can provide. For instance, at higher altitudes when you shoot a picture at certain angles from the sun, if you rotate the polarizing lens to cause the full amount of polarization, portions of the sky will appear almost black. That may not be the effect you’re after. In such cases rotate the filter only until you get the effect you want, but no more.

Circular polarizer filters are designed for and should be used with any camera which has through-the-lens light metering and/or auto-focus. Most modern SLR cameras, both film and digital, do both.

Most polarizing filters that I am familiar with reduce the light passing through the lens by one stop (a measure for an amount of light). If you are using a camera set to automatic and the camera has through-the-lens metering, it will compensate automatically for the loss of light. If, on the other hand, you shoot pictures in a manual mode, you must make the compensating adjustment yourself by either opening the aperture one stop (from F11 to F8 say) or slowing the shutter speed by one stop (example - 1/30th to 1/15th of a second).

The higher one goes in altitude, the more one can expect the light to be naturally polarized, that is, the less need there is to achieve polarizations by using a filter. In practice, I’ve found this to be true but still prefer to use a polarizing filter in most cases. Of course I’ve only climbed 14ers, not the really high peaks.

Besides scenic pictures with lots of sky in them, another instance where the use of a polarizing filter is helpful, is when you’re taking pictures of water or things with water on them, such as rocks or plants after a rain storm. Water is highly reflective and the use of a polarizer allows you to reduce the amount of reflection to the extent that you wish. I find this useful on bright days when the surface of a lake can look completely washed out. Using a filter allows me to remove most of the wash-out so that the lake reflects background objects, mountains for instance, and makes the final picture more interesting. This seems to be especially true on a bright overcast day when the sun is not even visible.

One last point. If you want to use flash with a polarized lens, for instance in a case where you want to enhance the background using your polarizing lens, AND light the in-shadow face of a person in the foreground with your flash, you can do it without problems, IF you’re using a camera with through-the-lens metering. The electronics of the camera will handle the compensation for loss of light perfectly. This is a technique used by pro photographers every day in such situations and works particularly well on sunny days when your foreground subjects are facing away from the sun so they don’t have to squint.

The reason it works is, that even though you’re using a flash to light up foreground shadows, the background is being lighted by the sun. Therefore, the background is not underexposed as you first might expect. That’s because sunlight is much stronger than your flash and makes the background brighter than your flash makes the foreground.

If however, you try the same thing with a not-so-well-lighted background, such as on very cloudy days or when your background is in deep shadow, the background will be underexposed. That is a situation in which you don’t want to use a polarizing lens with a flash, unless of course, the underexposed background is the very effect you want to achieve.

Thanks again for the good article. I suspect SP will see the results over time in improving pictures as the members learn the benefits of polarization.

Gangolf Haub

Gangolf Haub - Jul 14, 2006 11:04 am - Hasn't voted

Re: Things to keep in mind

Thanks for all these additions - I'm still learning :-) Like probably most of us I rely heavily on the automatic mechanisms of my camera. Thus my view might be a bit prejudiced in that direction. Very interesting about the flashlight pictures. I guess I'll have to try that some day.

Mark Doiron

Mark Doiron - Jul 20, 2006 4:48 pm - Hasn't voted

Re: Things to keep in mind

An example of flash and polarizer used simultaneously:

Courtney at the Helm

I wanted the young lady to be properly illuminated, of course, but I also wanted to "save" the dramatic clouds in the background. Interestingly the image also shows that polarizers do little to control stray reflections off of metal!

mark d.

Rick B

Rick B - Jul 14, 2006 11:14 am - Voted 10/10

How about sunglasses

.. do they cut through the gray veil as well? I don't have polarised sunglasses, but if this is true....

Gangolf Haub

Gangolf Haub - Jul 14, 2006 1:35 pm - Hasn't voted

Re: How about sunglasses

Hehe, you have to wriggle your head to tune it to the perfect angle :-)

In ernest - the coating on sunglasses is meant mainly to eliminate reflections from the glasses themselves - you would really get strange effects if you turned your head with polarizers on your nose.

allari

allari - Jul 15, 2006 2:29 am - Hasn't voted

Re: How about sunglasses

Polarised sunglasses DO work very well. They are usually set up to cut the reflections of horizontal objects, such as the sea, or the snow.
However, unfortunately they cannot be used if you have a polariser on your camera, because the effects of the 2 polarisers would combine and you would not be able to understand what will be actually recorded by the camera. Worse than that, when 2 polarisers are rotated 90 degrees from each other, you get a completely black view!

gimpilator

gimpilator - Jul 14, 2006 4:31 pm - Voted 10/10

Thanks

As far as mountaineering and photography go, I'm just a beginner. But I have to say that this article has gotten me excited. Over the last year, I have had a lot of trouble with lighting and contrast, especially on or around glaciers. I just discovered that I had a polarizing filter lying around my house. Over the next few days I'll be climbing Mount Rainier. I'm going to bring the filter along and try it out. Thanks for submitting this article.

Vid Pogachnik

Vid Pogachnik - Jul 17, 2006 7:54 pm - Voted 10/10

Very good explained!

You should teach, Gangolf! Or may be you actually do?
Cheers!

Gangolf Haub

Gangolf Haub - Jul 18, 2006 3:52 pm - Hasn't voted

Re: Very good explained!

Teach? No I don't - but it must be in my genes - both Dad and Mum were teachers - as were uncle and aunt and my grandad too. Sister is teaching at a university too.

So, Ifell out of line :-)

Viewing: 1-20 of 41