What is it?
“Cut out” photography is a way to manipulate an image with the purpose to distinguish one ore more items at the picture as if it was coming in or out of that very same photo, and a very good way to do that is to select what your object and to turn everything else in Black and white, or grayscale. A cut out photo creates a “visual assumption” that deceives the eye and some people really think the color is better and has been improved by Photoshop, but it never did. Here’s a sentence to think: What would happen to black if there was no white? Answer: Nobody would even know the existence of it, by pure lack of something to compare with.
The reason I’m writing this very small article is simple: Some folks here at summit post enjoyed very much my cut out works, but just a few. The rest of spers, I think, disapprove the photography and just don’t vote for it. I can understand that, people think that is a way for change the photo into something unnatural in photography, making it a very far far away version of what I really saw in that moment in nature. Actually my intention is, like I said, just to distinguish some detail at the photo I find more interesting than the others, something I like to look at and I’d like to share with you guys.
Who doesn’t remember the famous cut out scene at
"Schindler’s List"? The little girl walking around people getting killed at the getto. She was in red to make us see better. That’s the same reason I do it. Here’s the photo of the girl:

I never make some color stronger, never. I just turn what doesn’t matter to me in grayscale, work a little bit on the brightness and contrast for that area and that’s it. I’ll put here a very fast “how to” of the method I use for the whole process and I’ll show some work already uploaded here, original and the cut out version, so people can see nothing has been changed. Of course, I don’t know very much about Photoshop, I don’t like to edit my photos to improve them. I just know what I need to know and that’s it, period. There is a proper way to do it using layers and stuff at Photoshop, supposedly easier (and probably too hehehe), and you can find that online on Google, very fast “how to” in just a few steps. Well, I just like my own way to get it done. It involves more time and personal care with the image, but I fell really good doing it.
Ages ago my girlfriend use to have a very nice camera (Canon A430) that had the cut out mode but for just one color. It was funny to use it and no Photoshop needed what so ever, the photo could come out ready just with the camera. Not perfect but the effect was fair enough. We had so much fun using that tool!
How to:
Anyway, here’s my humble method. Hope you guys like it.
First of all, I choose the photo to work with, it must be a photo with some detail or subject I think its worth to do the job. That’s why I always use pictures with insects, flowers and roses, water drops…Open the image using Photoshop. After that, use the quick select tool and select the entire photo, all of it. Notice that there is a blinking area at the whole photo that shows you what has been selected, it has to be full!
![print 1]() Quick select tool
Quick select tool
After that what comes next is very, very simple: Press down the “alt” key (and keep it down!) so the result of the select tool stay in reverse mode. From now on the tool will deselect everything you click on (remember the alt key must be pressed). Looking at the photo, click on the parts you want to keep colored, and it has to be a very thorough process to be perfect.
![print 6]() Almost done...
Almost done...![print 7]() Now with the brightness and contrast corrected!
Now with the brightness and contrast corrected!
The third and last step is even more simple, after deselect what you want let go on the alt key, at the main menu click on “image”, “adjustments”, “black & white”. DONE!
The job is done. If you want to, you can improve a little bit the brightness/ contrast and that’s it, save the file and publish on SP. I will certainly enjoy seeing some more cut out work other than mine.
The photo of the article (before and after)
Before:
![Ecuadorian kid.]() The photo, pure as a virgin.
The photo, pure as a virgin.![Ecuadorian kid. Final cut out version.]() The photo ready to share.
The photo ready to share.Some of my own cut outs
Before and After.
![Orchid near the summit area.]() Before.
Before.![Orchid cut out]() After.
After.![Gorgeous Iguana]() Before.
Before.![Iguana cut out]() After.
After.![Quilotoa Lake (zoom in!)]() Before.
Before.![Quilotoa caldeira in CUTOUT version]() After.
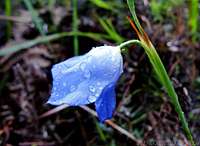
After.![Blue flower]() Before.
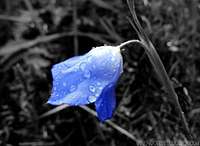
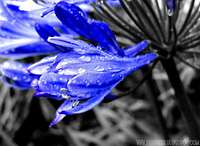
Before.![Flower cutout]() After.
After.![Praying Mantis]() Before.
Before.![Praying Mantis cutout]() After.
After.
Best wishes for all
ParofesExternal links
A brazilian website to get mountains info, including gps files to download:http://www.rumos.net.br/rumos/
My youtube channel: www.youtube.com/parofes - Now with 250+ videos online!
The biggest brazilian website about climbing and mountaineering, for which I'm a columnist:


Comments
Post a Comment