Guatemala Hiking, Guide for the Unguided

Guatemala Hiking, Guide for the Unguided

Page Type Page Type: Article
Activities Activities: Hiking

Guide for the Unguided -- Do it Yourself Hiking in Guatemala

Notice: I initially wrote this guide when I was a Peace Corps Volunteer in Guatemala during 2008 and it has not been updated since then. Feel free to add any updates to the comments section. 


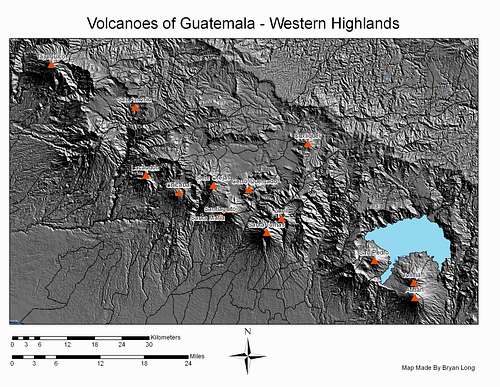
This guide is a selection of some of my favorite hikes available here in Guatemala. I have rated their difficulty, and listed the time it took me to complete each of the hikes. Keep in mind that times for the trips are listed as ascent times, don’t forget to add time for the descent. Also, the times listed are for people who are physically fit and traveling at a descent speed.


For those interested in hiking with a guide, Quetzal Trekkers in Xela (connected to Casa Argentina) is a great non-for-profit hiking company that has a variety of hikes ranging from 1 to 4 days. OX in Antigua is also another good foreign-run company that offers all-inclusive hikes up Guatemala's peaks. I recommend inquiring with these companies about safety before doing any DIY hike in Guatemala. While it is always recommended to hike in groups or with locals who know the language and terrain, I have to note that I have hiked all over Guatemala -- and have spent over 100 days outside there -- with only one serious safety issue (my group was robbed at gunpoint while descending from Acatenango in 2007). The campesinos (local farmers) are typically polite and reserved people who are helpful, especially if you speak decent Spanish. 

Volcanoes of Western Guatemala

Volcán Santa María 

Location of start of hike: Quetzaltenango (henceforth referred to by its local name: Xela)

SummitPost page on Santa Maria 


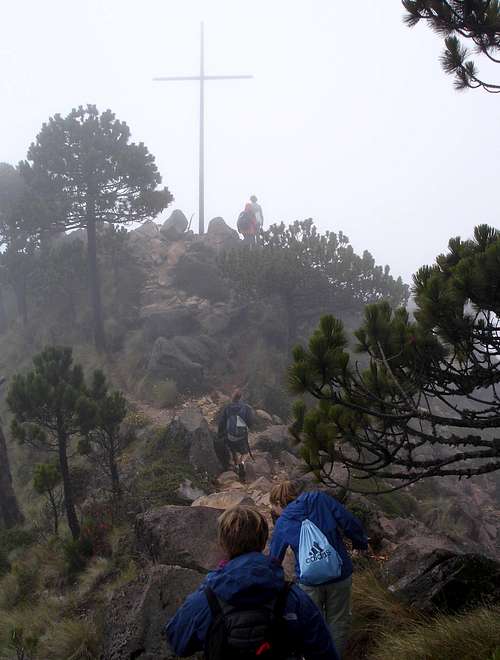
Santa María is a classic hike just outside of Xela. It can easily be done in one day from the city center. To get to the starting point of the trail, get a Q2 bus from Minerva (near el mercado municipal), Parque Calvario, or failing that a cab. In either case, your destination is the Aldea Llano del Pinal (30 minutes from Minerva). The hike is done from the drop off point in the Aldea (ask the bus driver where the trail starts). The summit time is 3-4 hours from the Aldea up a trial that continually gets steeper. The earlier you start, the better chance there is that there will be a good view from the top. Adrenaline Tours maintains a small “office” at the base of the trail (Look for the Adrenaline Tours sign on the right side of the trial as you begin your hike). As of 2008, you could use their pit toilet there free of charge. This is the last spot on the hike that has anything commercial. Several tiendas exist in Llano del Pinal to buy water before heading out on the hike.

The trail has three main parts: first to La Maseta, second to the landslide and third to the summit. Each portion takes approximately the same amount of time, but the distances get shorter as the trail is getting progressively steeper.


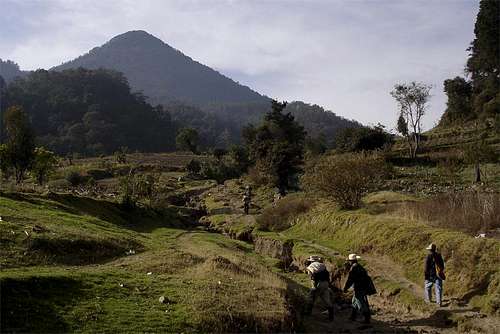
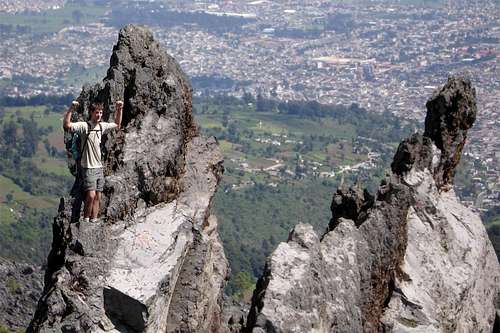
The hike begins as most volcano ascents in Guatemala, following a trail through milpa fields and past campesinos. This is the most challenging part in terms of not getting lost as there are numerous side trails. Ask the locals for the way to “la maseta”. The first landmark to look for is a large tree in the middle of an open area about 15 minutes into the hike just left of the trail. The first major turnoff is about 15 minutes after that, (or 30 minutes or so into the hike) where you will see a line of 12 or 13 agave trees on the right hand side of the trail. The agave trees look a bit out of place in the ecosystem, the tops of them almost look like large pineapple foliage. If you go straight, as the trail beckons you to do, you’ll be lost, so look to your left directly across from the agave trees for a thin footpath which climbs to a small rocky hill. Continue on this trail for another about 30 minutes, until you reach a flat grassy plain called the maseta. On a clear day, the Santa María summit is visible to the right of the maseta. Break off that trail (which continues straight) and head up a secondary trail to the right, through waist high grasses and towards the summit of Santa María. From there the trail heads up steeply towards the summit. The second spot to be careful at is a landslide (derrumbe) created by Stan in 2005. Hike across the landslide, making sure not to attempt traveling up it. Find the trail directly on the other side. Continue up through steep pine forest to the summit.
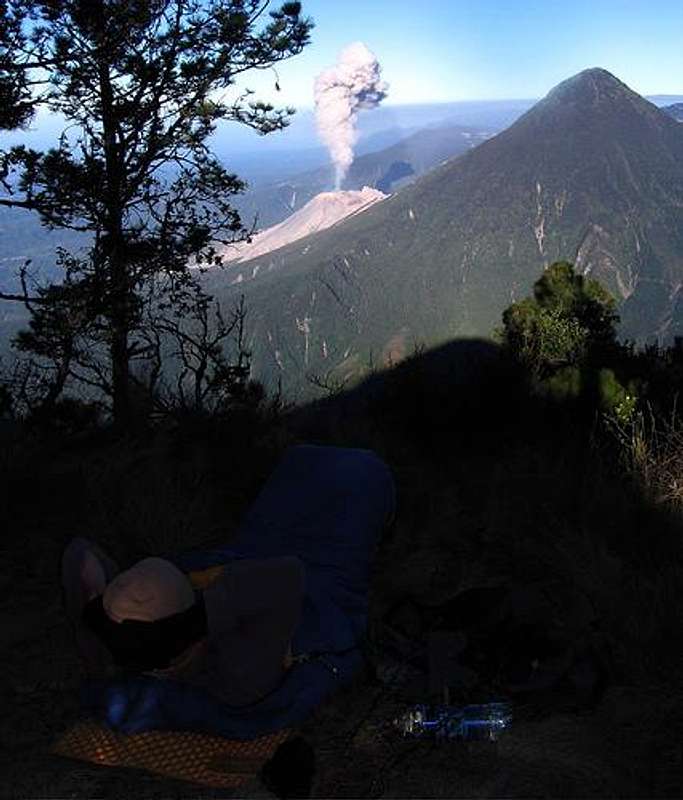
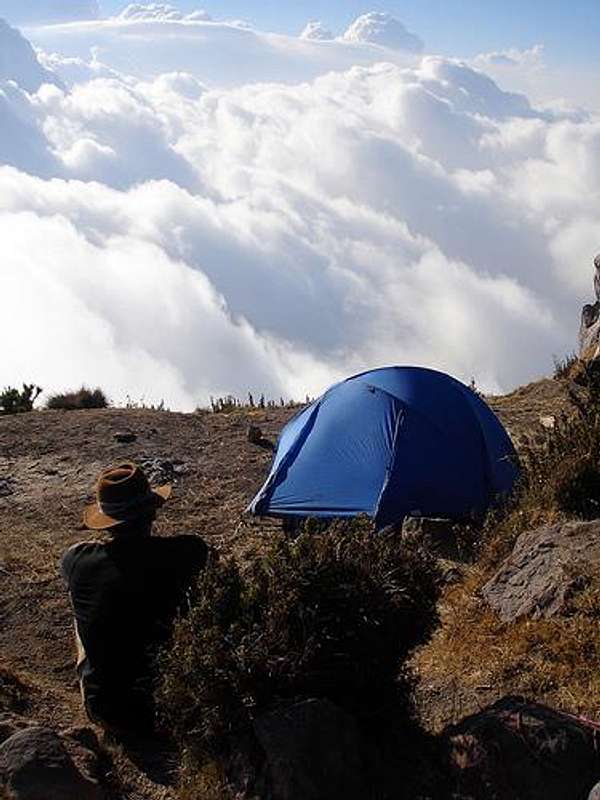
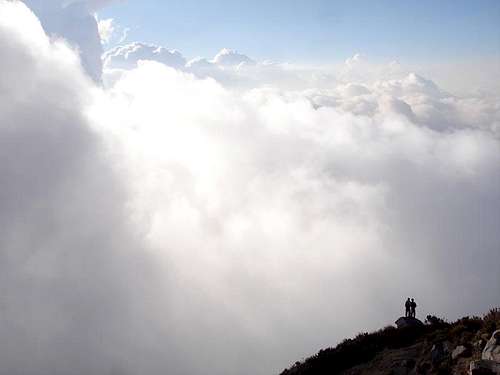
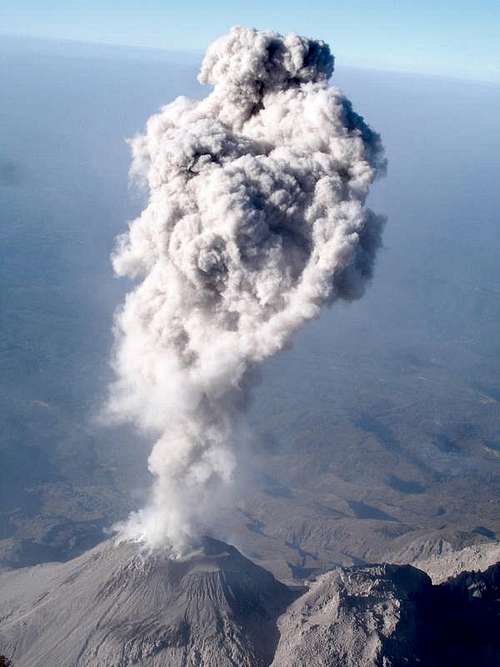
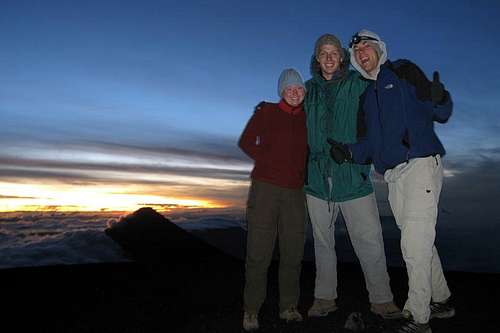
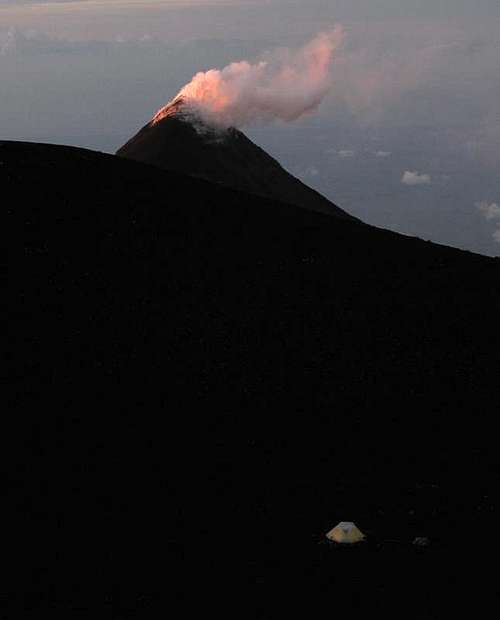
Throughout the hike great views can be had of Xela and the surrounding valley. Upon reaching the summit, the ever active Volcán Santiaguito comes into view. On one trip, we climbed an hour through falling ash from nearby Santiaguito and upon reaching the top had a 1,000 foot plume of smoke and rock burst out of the crater. Several decent camping spots exist on and directly past the summit. Mayan ceremonies are still practiced on the Volcano. Please be respectful of local ceremonies and do not take photos without asking. 


Unnamed Image
Santa María from the start of the hike to its lofty summit

Samta María From Volcán Zunil

Samta María Summit
Samta María Summit

Two climbers on Santa Maria
Above the clouds on Santa Maria
Santiaguito erupting from Santa María
Looking down on Santiaguito while she begins a full eruption. This shot was taken from the summit of Santa Maria.

Volcán Cerro Quemado

Location of start of hike: Xela


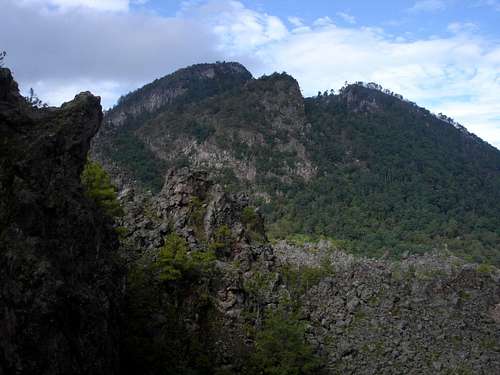
This volcano, which is just south of Xela, actually appears as a spine poking out of the left shoulder of Cerro Candelaria, and makes for a great day hike. From the summit Mayan ceremonies can be heard resonating throughout the nearby peaks.

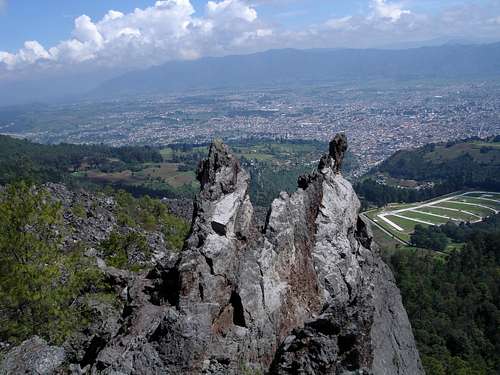
It is important to point out that this hike can be done quickly by foot (we got to the top in two hours from Xela’s Parque Central), or even quicker with public transportation. From the Parque Central, walk south (towards the Cristo Viene sign). In a few blocks you won’t be able to walk any farther South, take a left and head up hill - on the ‘highway’ towards Almolonga. As soon as you get on the Almolonga ‘highway’ you will be able to differentiate between Cerro Quemado from Cerro Candelaria - look for a rocky outcropping that looks like several craggy fingers sticking up from the ridgeline to the left of the summit of Candelaria – that’s where you are headed.

Alternatively take a bus from Xela towards Almolonga. In either case, you will be on this highway only for about one Kilometer. Then get off the highway taking a road to the right which heads toward the Cerros and also the thermal baths marked on the highway as “Baños Los Vahos” (a fairly well-known spot, and a good landmark for this hike.  The baths are created from geothermal energy from the still active Volcano and are a good stop on the return from a long hike). After heading up the road for about 200 meters, you will come to a sign that says “Baños los Vahos”; the baths are up the dirt road to the right, but you want to keep going straight (leftish).  Walk up the paved road for about 30 minutes and you will arrive at a community called Chicuá. Directly before the village and at the sign talking about unauthorized entrance into the village take a right off the road onto an obvious trail paved with stones. 15 minutes up this trail will bring you to a soccer field. From there several obvious paths lead up to the multi-summit Volcán Cerro Quemado.

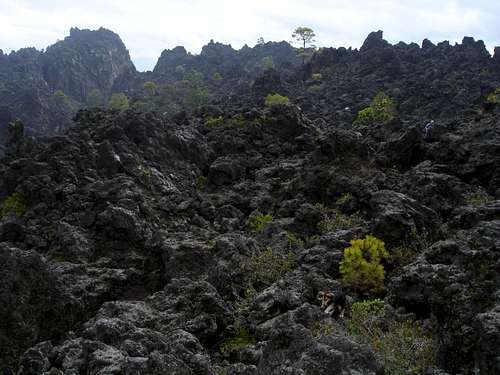
Enjoy time climbing around the craggy summit, and the great views of Xela, but beware, the volcanic rock is very unstable. From there either visit the lava hole directly to the South-East, or head back via Baños Los Vahos (read description below) for some relaxation time..

For more information contact Quetzal Trekkers in Xela


Volcán Cerro Quemado Summit Block


Volcán Cerro Quemado
Volcán Cerro Quemado with Field


Unnamed Image


Los Vahos and Cerro Candelaria

Location of start of hike: Zunil, Quetzaltenango 


There are two ways to get to Los Vahos. The first one follows the description for Volcán Cerro Quemado above, heading out of Xela on the Almolonga Highway.  

Here is the second route: from the Parque Central in Xela, walk South on 12th Avenue towards the Cristo Viene sign. When it ends, turn right and look for Plazuela de San Antonio on your left. Take the road to the right of the Plazuela, uphill. (The map on Lonely Planet is good to begin) Continue traveling uphill, then a little bit more uphill before you pass the Alquimista turnoff and eventually find yourself standing in front of the church, admiring the view of Xela. Keep following the road uphill (as it turns into a footpath) and around a few switchbacks until it straightens out for a while, passing a blue house on the right before you come to a corner of an old stone wall. Take a left, keeping the wall on your right. The path leads to a round stone house, and a Y intersection. Take the left, which eventually ends at a gravel road. A right leads to Los Vahos, left goes back down to the main Almolanga highway. Turn right heading towards Los Vahos. This makes an enjoyable, short day-hike from Xela. If you want to make a loop, start by going up towards the Cristo Viene sign and return via the Almolonga Highway.

The trail to Cerro Candelaria starts directly before you arrive at Los Vahos. There is a small field to your left and the trail leads out from there. It’s kind of hidden, so you might have to search around for it or ask at Los Vahos. Once you find the trail, keep following it up. There are trails that break off, but if you keep climbing you will reach the summit. From the trailhead, it’s two or three hours to the summit.


Cerro Candelaria
Cerro Candelaria Peak

Cerro Candelaria
Cerro Candelaria, Right on the Trail


Volcán Santo Tomas & Zunil 

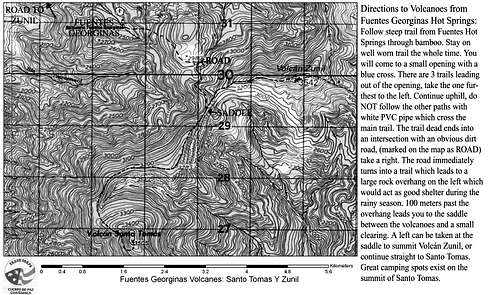
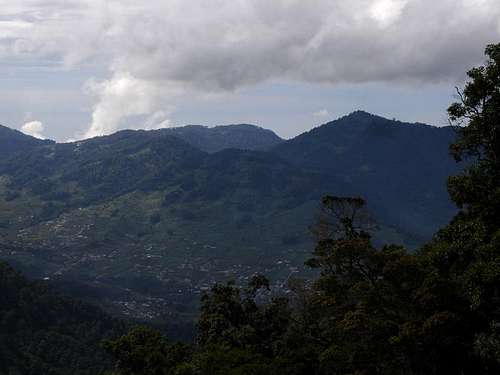
Location of start of hike: Fuentes Georginas (Accessed via Zunil), Quetzaltenango


The hot springs at Fuentes Georginas, one of Xela’s premier outdoor locations, also provides the starting point for 2 of Xela’s smaller volcanoes. The two can be combined in one long day, with great camping possibilities on the summit of Volcán Santo Tomas. Alternatively, you could climb either one of the volcanoes in one day, and return back to Fuentes for a nighttime dip in the hot springs. Either way, the volcano / hot spring combination makes for a great weekend, and the accessibility of these volcanoes makes the trip easy for people who aren’t looking for a lot of planning. Keep in mind that this hike is best done in the dry season.

To get to the volcanoes, make your way to the municipality of Zunil. From there take a pick-up (a fixed Q40 rate) to Fuentes Georginas. From the main office complex, ask the employees where the trailhead begins. You can also store extra bags at the office. To start, follow a steep trail from Fuentes Georginas up through bamboo forest, staying on a well worn but poorly maintained trail the whole time. In about an hour you will come to a flat opening with a small blue cross to the right. There are 3 trails leading out of the opening, take the one furthest to the left. Continue uphill, making sure to NOT head down intersecting trails with white PVC pipe which cross the main trail.

The trail you are on dead ends in a T-intersection with an obvious dirt road, (marked on the map as ROAD) where you will take a right. The road immediately turns into a trail which leads to a large rock overhang on the left which would act as a decent shelter during the rainy season. 100 meters past the overhang leads you to the saddle between the volcanoes. A left can be taken at the saddle to summit Volcán Zunil, or continue straight on the obvious path to Santo Tomas. No other turn offs exist on the trail to either summit.

For more information or guides, contact the Guardebosques in the Zunil Municipality.


View from the summit of Zunil


Santo Tomas and Zunil Topo Map


Volcán Chicabal

Location of start of hike:  San Martín Sacatepéquez, Quetzaltenango


SummitPost Website for Volcân Chicabal

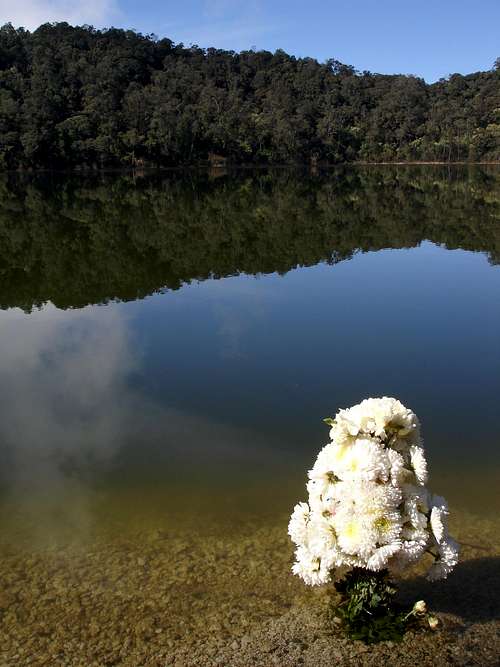
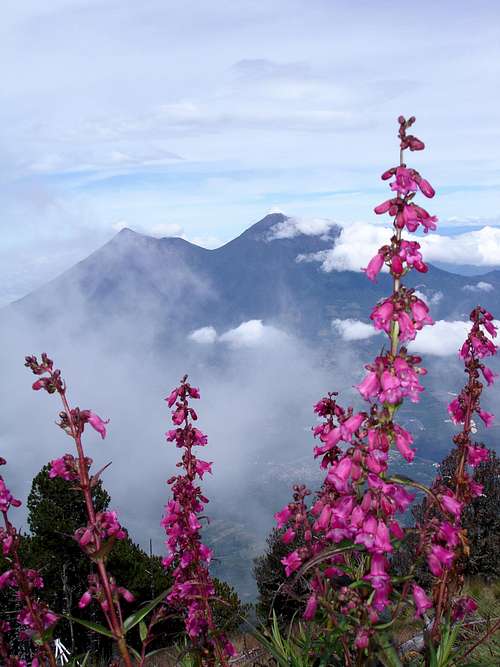
A beautiful and easily accessible Volcano in the Western Highlands outside of Xela. The volcano includes a crater lake that is sacred to the local indigenous Mam population. Sacerdotes (Mayan priests) commonly practice rituals and ceremonies on the shores of the lake, their festivals culminating annually in the Pedida Por La Lluvia 40 days after Easter. Foreigners are asked to remain off the volcano during the Mayan ceremonies. One could easily begin the day in Xela, get to the lake, and make it back to Xela later that day. Bungalows and lakeside camping sites also exist. The starting point for the volcano is accessed from the municipality of San Martin Sacatepéquez (a 40 minute Q4 micro ride from Xela or a 15 minute Q3 rise from San Juan Ostuncalco).
Several options exist to get to the Laguna Seca, the starting point for the trailhead. Micros Q4 marked Chicabal leave the center of San Martín several times daily (although the schedule is not very fixed). Alternatively, one could walk to the Laguna Seca in approximately 2hours from the center of town. If walking from the center of town, ask locals about which roads to take. Several nonsensical curving streets exist to confuse visitors.

Alternatively, take an Esmerelda micro from the center of San Martín to the entrance of the Aldea La Estancia. Take a left off the main carretera (away from the aldea of La Estancia) down a small hill and across a bridge, and then follow signs through various aldeas towards the Laguna Seca. Walking time form this route is approximately 1 ½ hours.

Volcán Chicabal is currently managed by ASAECO Update 2013: it looks like ASAECO is running guided hikes, with multi-day options. This organization is 100% locally operated. All proceeds go directly to the local, Mam-Maya community of San Martín. 

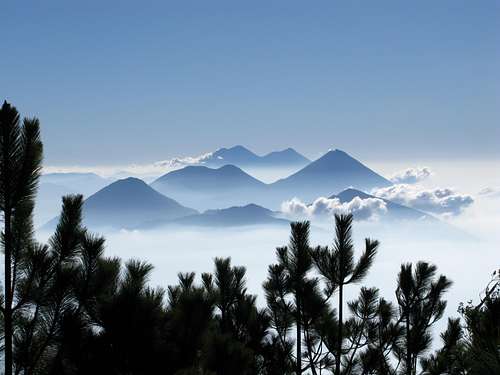
The cost to get in is Q5 for nationals and Q15 for international visitors. Snacks and water are available at the visitor’s center at the Laguna Seca. From the Laguna Seca, the hike to the summit of the crater and to two well constructed lookout points (Mirador) is about an hour up an obvious dirt trail. After about 45min, hikers will arrive at a split in the trail, left takes you to the lookout points and right will take you down to the Laguna. My preference is to go to the mirador first. From there, great views of constantly erupting Santiaguito (which destroyed San Martín when it initially erupted in 1902) and Santa Maria can be had to the east on clear days. To the west, you can see down into the Crater Lake, and out to the chain of volcanoes beyond. From there, walk down the 600 steps to the Laguna’s shore where a trail circumnavigates the lake. When you are done enjoying the Laguna, hike up to the main trail at the top of the crater. There are various trails leading up from the Laguna, the one you are looking for starts as a small landslide, where you will quickly veer to the left and continue up.

Chicabal Volcano from San Martin
The Chicabal Volcano from San Martin Sacatepequez, the town where the hike up the volcano begins


Flowers at Lake Chicabal after ceremony
Flowers are commonly placed at the shore of the lake after a ceremony

Chicabal Volcano from San Martin
Chicabal Volcano looms in the background of San Martin Sacatepequez


Volcán de Ipala 

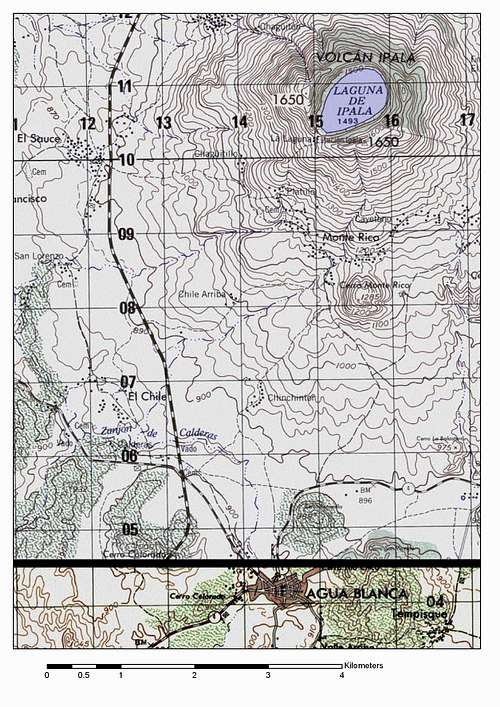
Location of start of hike: Agua Blanca, Jutiapa

SummitPost page on Ipala

A small volcano featuring a beautiful crater lake, easily accessible from eastern Guatemala. Amenities at the crater lake include basic bathrooms, picnic tables, BBQ stands, and a dock heading into the lake (bring your own tent). Visiting the volcano would be a great way to spend a weekend with a group of people interested in getting into outdoors, but with limited experience.


To access the trailhead, take a bus to Agua Blanca (a municipality in Jutiapa). From Agua Blanca make your way to the Aldea Sauce - the actual starting point for the trailhead. You can catch a pick-up to the Aldea, as pickups heading towards the Aldea and the volcano are fairly common. If you carry a lot of gear, you can actually get a ride within a 30 minute walk of the summit. If you plan on doing this, it may be the best option to pay for a halon (hitchhiking ride in the back of a  truck) fom the center of Agua Blanca.


Alternatively, you can easily walk to the volcano in about 2 hours along a dirt road heading due north out of Agua Blanca. To do this, head towards the small hill visible just outside of Agua Blanca - Cerro Monte Rico. Pass the Cerro on the left, continuing straight towards the volcano. Don’t be afraid to ask for directions along the way.


While gun-toting Micro drivers may warn you about thieves and security issues on the volcano, we encountered nothing but incredibly nice people the entire trip. We left Agua Blanca around 4:30 P.M., took a halon about half way up the road, and were able to make camp as the sun set. The volcano is developed, including houses near the summit which sell leña. ADISO (Association Para el Desarrollo Integral Sostenible de Oriente adiso@mail1.intelnet.net.gt 7924-8030) handles visitors at the lake in a very sustainable and professional manner. I believe the project is actually an old Peace Corps project.


Volcán Ipala is briefly mentioned in the Guatemala Lonely Planet, and the Rough Guide. According to the Rough Guide to Guatemala “The lake is said to contain unique species of Mojarra Fish, which apparently has six prominent spines on its back”.


For more information contact ADISO

Ipala Topo Map
Ipala Topo Map


Cooking Near Ipala
A long exposure while my climbing partner cooks some grub.


Volcán San Pedro 

Location of start of hike: San Pedro La Laguna, Sololá

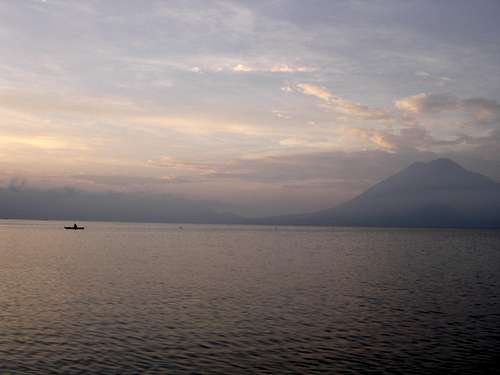
San Pedro makes for a great day hike, and is the easiest of the 3 volcanoes to summit near the lake. This peak is set beautifully on Lake Atitlán and sits just across the lake from Panajachel. The volcano is currently being supervised under an organization who is handling the tourism in quite a sustainable fashion. Because of this you are asked to hire a guide through the organization, cost Q100 per person. The guides are quite well informed, and take small groups which is always a plus. The trail is very straight forward, and safe, just continue up until you reach the summit.

To get to the starting point of the hike, take a boat from Panajachel to the quaint but touristy village of San Pedro, and then a halon to the organization’s office. Anyone on the streets will point you the way to the trailhead.  New bathrooms, guides, and information are available there at the office. The climb takes 3 - 4 hours to summit.

For more information, the local INGUAT office on the main drag in Panajachel has decent information and maps of the area. 


Unnamed Image


Volcán de Agua 

Location of the start of the hike: Santa María de Jesus (accessed via Antigua), Sacatepéquez


A common hike for Guatemalans and tourists alike, Agua makes for a long day trip outside of Antigu. As soon as you enter Antigua, you can feel the presence of this massive volcano constantly looming over the south side of the city. To summit, make your way to Santa Maria de Jesus, (visible from Antigua, as the small pueblo on the left hand side of the saddle) a 45 minute bus ride from Antigua’s terminal.


The hike starts from the center of Santa Maria de Jesus, and takes between 3-5 hours to summit. Ask around town to find the beginning of the trail. It is easy to follow the trail all the way to the summit, just look for the empty Tortrix bags and crushed Mega Cola cans. Red and blue paint also marks the rocks on most of the trail. The hike begins in cornfields, and winds its way up the volcano. One could possibly take a 4-wheel drive vehicle about 2/3 of the way up the volcano, the dirt road constantly crisscrossing the more direct hiking trail. Don’t be afraid to let the dirt road crisscross your thinner footpath on your way up. Hikers are meant to travel more or less in a straight direction, crossing the road several times before eventually joining up with the road and reaching a small concrete patch, where the road ends. This is slightly more than 1/3 of the way up the trail. Then follow the trail around its switchback to the right, and continue uphill.


A major landmark is a large gorge created during the earthquake of 1541 which opened the lake at top of the crater, (hence the name Volcán de Agua) and destroyed what was then the capital of Guatemala, Ciudad Viejo. Agua’s summit now boasts a massive crater including a soccer field and a shelter. From the Southwest side of the summit on a clear day, the coast can easily been seen. No association has yet taken charge of Agua, and it is therefore recommended to ask about safety before climbing, especially if without a guide. Several manned huts exist on the volcano’s summit, and are a decent option for emergency shelter.

Volcán Agua from AntiguaVolcán Agua from Antigua


Volcân Acatenango and Fuego from Volcân Agua's Summit


Volcán De Agua Summit


Volcán de Acatenango 

Location of the start of the hike: Acatenango , Chimaltenango


This large volcano with its two distinct peaks (Aca & Fuego) is easily visible from Antigua and the surrounding highlands. The last eruption major was in the 1920s. There are several ascent routes, and transportation from the main route makes the trip a bit more time consuming. The most common route starts from the pueblo of La Soledad which can be accessed via the center of Acatenango by a 3 P.M. bus. Alternatively, one could pay for a halon from the center of Acatenango as the long 4 hour hike to the summit is best started in the early morning hours.


To climb, head out of La Soledad, filling up on water before leaving Acatenango as no other  water source exists. The trail branches off a couple times at the beginning of the climb as it passes through milpa. Paying a guide is a reliable option. If money is tight, ask for someone to show you the way the first shelter or descanso, as after that point the trail is obvious and never has any other major branches. The trail leading out of Soledad is marked with small white signs that say Volcán, is privately maintained, and contains several small rest stops and huts on the way to the summit. From the summit great views exist of the valley and of several other volcanoes, including the country’s best view of the active Fuego Volcano. Descend via the same route to La Soledad. Alternatively, make your way towards the saddle (Mestiza) between Acatenango and Fuego to head down on the longer but obvious descent towards the town of Alotenango. The hike can be done in one long day from La Soledad, alternatively decent camping options exist in the windy summit cone. If you plan on camping, plan on the ascent taking more time as you will be carrying a heavy pack. No water sources exist on the volcano.


For more information, or help finding a guide, contact the guide company OX Guatemala

Safety Note: Always inquire locally about safety on this volcano. Foreigners have been robbed several times on this volcano.  


Sunrise on Acatenango
Sunrise atop Acatenango

Fuego Ridgeline
This is about as far as you can climb on Fuego without really putting your life at risk. This shot shows the approach ridgeline (looking down) to give people an idea of what the hike is like on the upper slopes.

Acatenango and Fuego from Atitilan
On a failed attempt to summit Volcan Atitlan, Lucas and I enjoy the view. In the distance are the Fuego and Acatenango volcanoes. The shot gives a good idea of how massive Aca and Fuego are, and how high the connecting ridgeline is.


Acatenango Summit Photo
Katherine, Dan, and I pose, frigid in the cold morning air.


Morning Mist on Acatenango
Mist quickly engulfs the hills that flank Acatenango.


Campiste on Acatenango
Tent in the crater of Acatenango. The camp site only gives partial shelter from the wind. Fuego (which woke us up about 4 times during the night with eruptions) looms in the background.


Alta Verapaz Hikes

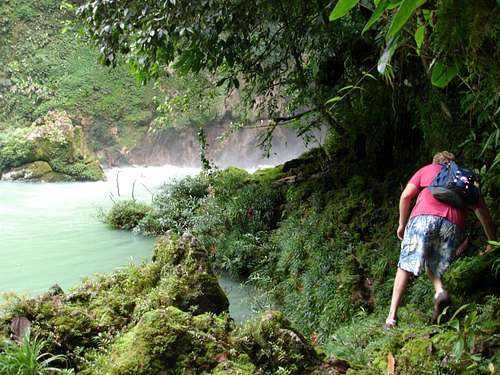
Sachichaj and Sataña Waterfalls


Both these spots are easily accessible from Coban and are more swimming holes than hikes.  Both are fed from the waters of the Río Sachichaj and are relatively close to each other.  To get there, just hop on any micro going north from Coban to Chisec.  You can pick these up at the Terminal de Norte in Coban.  Stay on for about 25-30 minutes to get there and they’ll be on your left-hand side.  Sachichaj is the first stop. Be sure to tell the ayudante that you want to be dropped off at “La Catarata.”  Sataña tends to be better-known, and I’ve been dropped off there when I wanted to go to Sachichaj, so you need to make sure you don’t pass by.  

Lush Surroundings of Alta Verapaz


Sachichaj


Getting here, you’ll see a shotty sign outside a little store.  Usually someone there will charge you 10Q and you can hike on in.  The waterfall is about a 15 minute hike down into a cañón.  At the bottom, you can just follow the river up around the bend where you’ll see the waterfall.  The water is blue, clean and pretty cold, but totally beautiful.  In March, the fall is a trickle while in May, you can’t get anywhere near it.  Before going down into the cañón there are also some ramshackle thatch picnic areas where you can eat, but the falls are amazing and you’ll probably just want to hang there.  


Sataña


About 2 km. up the road from Sachichaj you will find this fairly well developed “eco-centro.” The main attraction is a small cascade of water that forms a turquoise lagoon.  The water is blue and clear and great for swimming.  Besides the pool, the center has a lot of well-kept grassy areas, a soccer field, picnic tables, etc.  You can also find rope swings around the pool.  20Q to get in.


Holy Biodiversity Batman!


Volcán Tajumulco

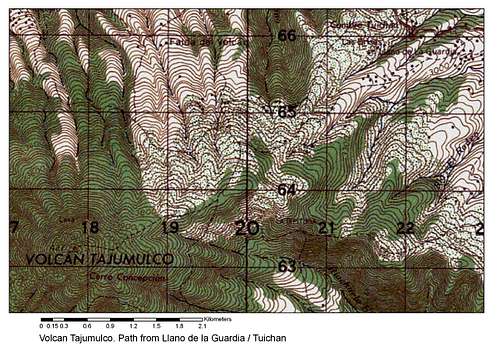
Location of the start of the hike: Llano De La Guardia, San Marcos


To summit Central America’s highest point, 2 routes exist. The typical route begins from Aldea Llano de la Guardia (Tuichan). The aldea is accessible by bus from San Marcos. From this point, it is about a 4 hour walk up to an obvious camping spot in a large wooded and protected area to the left of the main trail. The camping spot is about 30-40 minutes from the summit and is easy to spot as you break off the trail just before it becomes steep and rocky. There is another “Guatemalan” camping site directly off the trail just past the recommended spot including lamina, broken bottles, and ubiquitous human waste.


The climb to the camping spot is not steep, and is obvious, you basically just keep walking up. On Saturdays, you can follow the Quetzal Trekkers’ footprints who also make the climb, and camp in the same location. The locals on the lower slopes of the volcano will be more than happy to point you the way, and to ask for a Quetzal.


The other easier ascent route is accessed from the end of an unmarked dirt road near Canoa de Piedra / Chiaguachin outside of San Sebastian. To summit via this route, get a halon in San Sebastian (Q120-200 to drop off point) and ascend from there. The hike to the camping spot is about an hour from the drop off point, just keep heading up and to the left through a deforested pine forest. No matter where you begin the hike from, camp in the previously described spot, and make for the summit the next morning around 5 a.m. Watching the sun rise over all of Central America ranks amongst the best views and experiences that the country has to offer. At this elevation the nights are extremely cold, bring warm layers. No water sources exist, and there is a scarcity of downed wood; prepare for carrying a heavy pack. The altitude of Tajumulco (4220 meters above sea level) causes some people to have problems, but the view is worth the potential altitude sickness. It is recommended to spend the previous night above 2,400 meters to start acclimatization.


If you have any questions about the hike, contact Quetzal Trekkers in Xela.


Barefoot Towards Tajumulco


Tajumulco Topo Map
Tajumulco Topo Map


Volcanoes of Western Guatemala

Volcanoes of Western Guatemala


Clothing & Gear List


Clothing:


Layers are the key to preparing clothes for outdoor trips. It is important to change your layers before you feel the temperature difference. For example, if I am starting a hike in the morning, even though it is cold, I will take off my fleece jacket and hat just before starting the hike, knowing that I will be heating up soon. Keep away from cotton shirts and movement-restrictive clothes such as blue jeans (cotton soaks up sweat without letting the wearer breath, and can lead to hypothermia on cold nights). Specific clothing suggestions change in Guatemala based on the season and location. For example, I would never go outside in the rainy season without a waterproof jacket, and I would never try to climb a big volcano without a hat and gloves. That said, here are some more general suggestions:

Wicking shirt (polypropylene material works great for breathibility)  

Zip-off pants work great for temperature control

Waterproof Breathable jackets (Goretex or similar recommended)

Hiking socks are worth their weight in gold. I often use CoolMax brand

Sturdy shoes or hiking boots – preferably waterproof


Gear for day trips:


Gear also varies depending on the specific hike. The following is a list of recommended gear for a day-hike:

Small backpack for water, snacks, etc

Headlamp or small flashlight in case you are out in the dark (always plan for the worst)

Topographical Maps (Every Volunteer gets one for free, ask around for the location you are planning on hiking in)

High energy snacks such as peanuts and raisins, beef jerky

More water than you think. I will always stock at least two liters of water for a basic day-hike

A small first aid-kit

Sunscreen and hat (sunburns happen quickly at our latitude, and gaining altitude only furthers these effects)

A multi-tool knife such as a Leatherman

I typically bring hiking poles or cut sticks to help on steep ascents


Gear for overnight trips:


While the following are suggestions for a more hassle-free trip, don’t let not having the best gear deter you from making a trip happen. I have seen Guatemalans head into the mountains with little more than a costal filled with pan & beans and a plastic sheet. That said, being prepared can only help create a more successful trip. Remember you can always borrow gear or better yet, plan a trip with someone who has gear.

I don’t go on overnight trips without a small backpacking gas stove (can be purchased inexpensively at the CEMACO in Guatemala City on Roosevelt, right next to Hiper), pot, utensils, etc. Relying on leña to cook dinner is risky, if you are doing so always bring Ocote (natural fire-starting wood sold in tiendas).

A tent, sleeping bag, and sleeping pad depending on the weather and location. When camping at altitudes (such as climbing Tajumulco) good cold weather gear is necessary. When camping in an area such as the Peten or Alta Verepaz, protection from rain is more important.


One final note: while the following trail descriptions and maps are as accurate as possible, campesinos create new footpaths, landslides wipe out trails, and endless trails through milpa can be confusing. The following is meant to serve as a guide for the hikes, always ask locals for trail help, and use common sense. The author of this article accepts no responsibility… for anything. Enough suggestions, lets get on to some recommended hikes.


Comments

No comments posted yet.


Children

Children

Children refers to the set of objects that logically fall under a given object. For example, the Aconcagua mountain page is a child of the 'Aconcagua Group' and the 'Seven Summits.' The Aconcagua mountain itself has many routes, photos, and trip reports as children.

Parents 

Parents

Parents refers to a larger category under which an object falls. For example, theAconcagua mountain page has the 'Aconcagua Group' and the 'Seven Summits' asparents and is a parent itself to many routes, photos, and Trip Reports.

GuatemalaArticles