-
 15570 Hits
-
 90.48% Score
-
 32 Votes
|
|
Route |
|---|---|
|
|
45.91490°N / 7.04498°E |
|
|
Mountaineering |
|
|
Spring, Summer |
|
|
Half a day |
|
|
F-PD |
|
|
Class 3 |
|
|
I |
|
|
Overview
The normal (Italian) route of Mont Dolent is normally considered as the first approach (almost a test) to the main Mont Blanc group summits; due to the good position of the Bivouac, that cuts the ascent into 2 parts relatively not tiring, this route can be as well used also for an amusing trainingCan be climbed both in spring with skis (OSA : for very experienced ski-mountaneers) and in summer (better in the early summer when snow is still good)
Even if this is the easiest and safest route to a major mountain of Mont Blanc Group, you must apply the first safety rule : start very early in the morning (3 o'clock) to get back before the snow gets bad.
Difference in elevation :
Getting There
From Courmayeur follow the road of Val Ferret (bus service - open to private cars only for some hours a day).Using that road You can arrive till Arnouva (1770m) - car parking.
If you have a booking for Rifugio Elena and a 4x4 or a short car you can drive up to it, saving more than 1 hour.
On foot, you have to follow the dirt road toward Rifugio Elena and once at Prè de Bard (2060m) a path goes toward the Petit col Ferret.
Herefrom (2517m) a path to the left. toward the ridge of the punta Allobrogia, allows to cross the gorge and, crossing toward NNW goes on to the Bivouac (2810m - 24 places).
Just few metres under there is also the old bivouac (6 places).
Time required 3+ hours from Arnouva
Route Description
The normal route from Bivacco Fiorio can be divided into 3 parts :1 - from Bivacco to the glacier
cross almost horizontly (toward North) the debris slopes (easy and boring but short) till you arrive to the glacier.
2 - up to the bergschrund
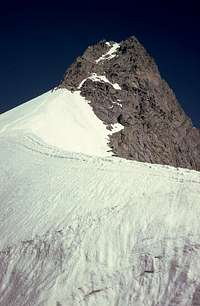
Normally the bergschrund must be passed near the rocks of a minor summit of the SSE ridge, the last one before the summital wide ridge of Mont Dolent.
To get this point you have to climb along the glacier, using the best slopes, I can suggest (see beta) 2 main routes:
This is the safest route but requires a good quality and quantity of snow (normally not later than first half of july) and is less tiring but a little longer This is as safe as the previous when the rocks above are dry (some danger of falling stones). |
3 - ending part
Once passed the bergschrund you get a short ridge (stay low on the left side) that gives access to a slope that must be crossed ascending toward left, under the rocky spur coming down from the ridge, to get the base of the final channel.
This channel is not steep, only the last 40-50 m are about 45°, and can be climbed, as for your taste, directly in the center (best solution with good snow), or staying close to the easy rocks to the right (ascending) using some good belay points (best solution when the slope is iced). |
Once got the ridge you have to pass under two big gendarmes (minor summits) on easy slopes and rocks to get the final ridge leading to the summit. |
Descent : along the same route.


