
-
 15759 Hits
-
 78.27% Score
-
 9 Votes
|
|
Route |
|---|---|
|
|
34.28890°N / 117.6458°W |
|
|
Download GPX » View Route on Map |
|
|
Hiking |
|
|
Spring, Summer, Fall, Winter |
|
|
Most of a day |
|
|
Some Class 2 |
|
|
Overview
 Backbone Trail Snaking Up the Ridge
* - four if you count the second, unavoidable climb of Pine Mountain
Getting There
 Blue Ridge Road
To Blue Ridge Road - From Los Angeles, take Highway 2 in La Canada approximately 60 miles (90 minutes) north/east to the turn out for Blue Ridge Road (3N06), about 1/2 mile past the Grassy Hollow Visitor Center. Follow directions below to optional starting points.
-From the south (San Gabriel Valley/San Bernardino/Palm Springs/San Diego), make your way to the 15 North. As you drive up the Cajon Pass, head west on State Highway 138 (Exit 131) for approximately 9 miles where the highway intersects with Highway 2 towards Wrightwood. Take the 2 through the town of Wrightwood and past the Mountain High Ski resort. A couple miles further, follow signs to Inspiration Point and make a left into a large turn out for Blue Ridge Road (3N06). Follow directions below to optional starting points.
Blue Ridge Rd to Trailhead - There are a few options from here. The road is unmaintained and extremely rough in spots, particularly as it crosses the upper sections of the Mountain High Ski Resort. High clearance, 4wd vehicles should be fine, but in a regular car the potholes and rocks in the road make it extremely difficult to get to the trailhead. It is possible but highly discouraged. As if that weren’t enough, depending on the season and fire conditions, the road may be gated closed well before the trailhead parking area and a lengthy (but flat) walk would be necessary.
The Pacific Crest Trail crisscrosses the road the entire way, so you could conceivably park your car in any turnout with room for your car to be entirely off the road, display your pass, and hike up the trail, but the three main places to park are:
1) Blue Ridge Campground (2 miles from Hwy 2, 5.5 miles from trailhead)
2) Guffy Campground (6 miles from Hwy 2, 1.5 miles from trailhead)
3) Trailhead parking area
Park at any of the two well-signed campgrounds and make your way down the road to the trailhead.
Note: If you do utilize the PCT, some cross country scrambling may be required to get to the trailhead. Either leave the trail as it crosses the road at some point before Wright Mountain and follow the road east, or when you reach the summit of Wright Mountain, scramble down to the obvious ridge between Wright and Pine Mt to the south.
Alternative Starting Point:
It is possible to get to the trail head via a trail that starts down in Wrightwood, however it adds 2.8+ miles and 2,000’ of extra gain to an already exhausting trip.
Directions to that trailhead taken from mdostby's Pine Mountain page:
TO THE ACORN TRAILHEAD: From Hwy 2 in the town of Wrightwood turn south onto Pine Street. Go aprox. 1 block to Apple Ave. Turn right. Go aprox. 2 blocks to Acorn Drive. Turn left. Follow Acorn Drive for aprox. a mile or so or until you reach a large "private road" sign on the right. You can't miss it. Do not park your car beyond the sign as it will be towed away. The trailhead is another 1/2 mile or so beyond the sign. Walk to the end of the paved road. There is a gate where a dirt road continues. Follow the dirt road until you see the signed trailhead.
Route Description
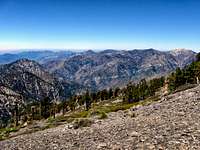
Description as of 8/7/2011: The view east to San Gorgonio and San Jacinto
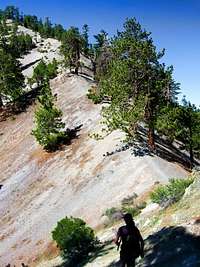
From the trail head at 8,310’, you will drop immediately down to the Wright/Pine saddle at approximately 8,150'. Have your water handy, because you’re headed straight back up to USGS Point 8555’. There’s a (very) slight relief here as the dips down for a few hundred yards or so before you begin an even steeper ascent over a crumbly, narrow Class 2 section of the ridge. It’s relatively straight forward climbing up, but keep in mind you have to descend the same way and finding solid footing down this section is tricky. The 1,000’+ drops on either side don’t make the situation any easier. Give yourself more than enough time to get back down through here in full daylight.
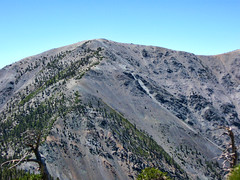
 Pine Mountain
The way down to the Pine/Dawson saddle is easy to follow, steep but manageable, and is the first place where the views of a very imposing Mt Baldy start to open up, but you’re not out of the woods yet. There are large patches of Mountain Whitethorn you have to negotiate, and your legs will pay for it if you’re wearing shorts. The path is short, however, and it’s hard to complain about the 500’ of loss after what you’ve already put behind you and considering what still lies ahead.
 Dawson Peak
Did I mention it doesn't get any easier?
From Dawson Peak down to the Dawson/Baldy saddle, you lose close to 1,000' of elevation, sinking down to approx 8,750', meaning over the next 3/4 of a mile you have more than 1,300' to gain. The view of Baldy from this point is awe-inspiring and cannot be captured in a photograph.
 The San Gabriel Mountains from the Dawson/Baldy Saddle
After a tough climb over loose rock and vast talus fields, the summit sneaks up on you and you're very likely to run into several other hikers who may as well have taken an elevator up after what you just went through. Congratulations and good luck on the way down!

Elevation Profile of the Route, starting approx 1/4 mile past Guffy Camp
Essential Gear
In summer and early fall, this is an entirely non-technical route, however that does not mean it should be taken lightly.There are no water crossings and the majority of the route is entirely exposed, so a minimum of 3 liters of water is highly recommended.
Sunscreen, hat, boots, etc.
This is a ridge hike. The drop-offs on either side are extremely large and will lead to very, very bad things should you fall. Leave yourself plenty of time to descend as there are at least two Class 2 sections that have to be taken slowly (a bit on Baldy's north face, but especially on Pine's north face).
In winter, it's an entirely different story. Ice axe, crampons, helmet, and the knowledge on how to properly use them are absolutely essential for this hike. The only month the author hasn't personally seen snow on this route is August.
Oh, and a camera comes in handy, too.
An image gallery of the hike described above is available here:
North Backbone - Pine, Dawson, and Baldy
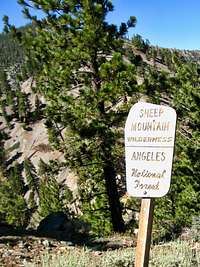
Red Tape
No permits are required to hike through the Sheep Mountain Wilderness, however an Adventure Pass is required to park your vehicle anywhere within the Angeles National Forest.Adventure Pass - Passes and Permits - Pacific Southwest