
|
|
Mountain/Rock |
|---|---|
|
|
38.71894°N / 109.29838°W |
|
|
Grand |
|
|
Aid Climbing, Big Wall |
|
|
Spring, Fall, Winter |
|
|
6060 ft / 1847 m |
|
|
 Eye of the Oracle Eye of the Oracle |
Overview
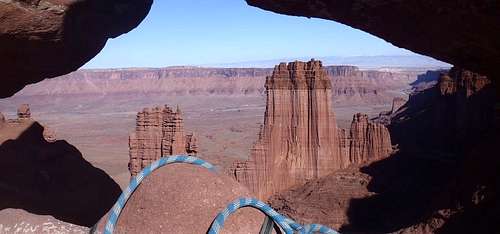
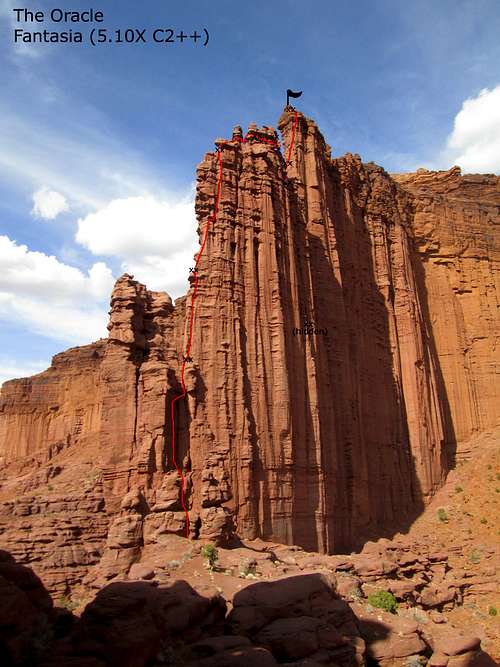
Sitting at the back end of the Fisher Towers and next to the mighty Titan, the Oracle sits neglected. The small notch between it and the upper canyon rim gives a first impression that it isn't much of a tower at all, until a closer inspection reveals that it stands a mighty 700 feet from its base. The vast wall below the summit is one of the largest and thinnest faces in the area, making the Oracle a monolith of mud and stone. Its breathtaking height combined with the fact that the "easy" route is a seldom repeated devious climb, gives the whole tower a flavor of adventure. In the 42 years since the first ascent, there have only been 3 routes established (one of which just went up in Fall 2012), and only 16 parties have graced its lofty summit. The Fisher Towers climbing legend Harvey Carter established a route over a course of 9 days, and it was the last summit of the big towers for him. He named the climb Fantasia and gave it the "modest" rating of 5.10X A2. The infamous X pitch on the route comes on the second to last pitch and scares many parties away. The Oracle is a neglected giant and offers a worthy challenge for those versed in Fisher climbing.
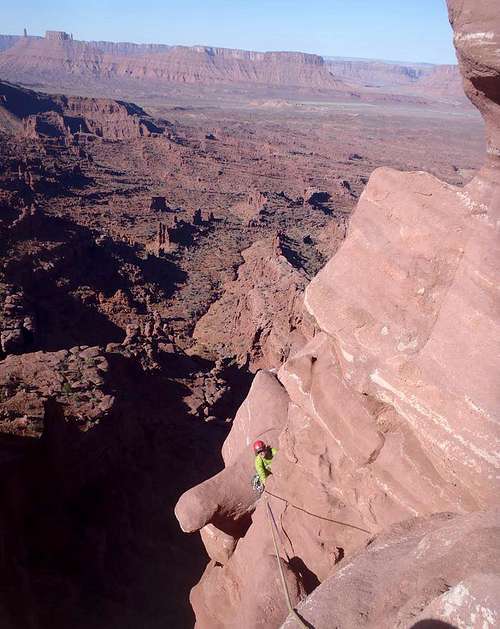 Traverse of the Gargoyles Traverse of the Gargoyles |  Looking down the final pitch. Looking down the final pitch. |
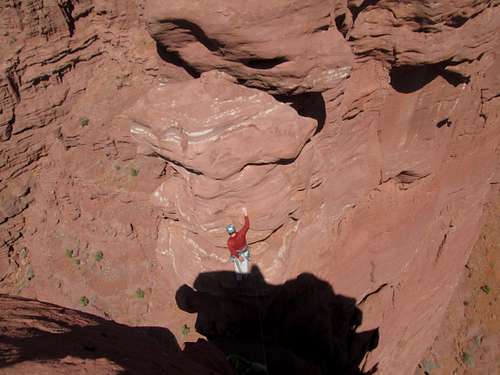 5.10X in the Fishers is no joke. 5.10X in the Fishers is no joke. | |
Getting There
The Fisher Towers lie about 20 miles east of Moab on Hwy 128 and good directions can be found on the area's main page. Getting to the base of the Oracle is pretty straight forward and an easy-to-follow trail meanders from the parking lot to the tower. Getting to a specific route can be another matter and can involve hard to follow climber's trails to various places on the tower. Follow the same approach as for the Finger of Fate and you will arrive at the base of Fantasia. To climb Beaking in Tongues or Beak to the Future, the approach will be different.

 |
Red Tape
There is currently no red tape to negotiate in the Fishers as it is BLM land. Still, there are a few things to be mindful of. Avoid trampling on the cryptobiotic soil as it is a very delicate organism and is easly destroyed by a careless footstep. Also, 2 of the 3 of the routes on Oracle involve extreme nailing but the "standard" route, Fantasia, is a clean route. I do not want to open the debate of whether or not to nail on certain routes as the conditions can change all the time, so please just be very thoughtful of whether the hammer is really needed or not to be safe, or if you're just in over your head on a particular route. Creative clean placements (tricams, hand-stacked pins, hooks, etc.) combined with a bit of bravery can go a long way in making an ascent clean versus pulling out the hammer. We didn't even take a hammer and made it work on Fantasia.
Camping
There is a small camping lot with assigned sites at the parking lot. It is on a first come first serve basis and is often full. More info can be found on the BLM site. Camping at the base of Fantasia is an option and will help you avoid shuttling loads. Please make sure to not leave any trace of your stay.
Guides and Other Info
There are not any good resources on the Oracle but there are several. Here they are... 1) Desert Rock III: Moab To Colorado National Monument by Eric Bjornstad 2) Mountain Project - http://mountainproject.com/v/the-oracle/105917583 3) My trip report on Fantasia can be found on Brianinthewild.com - http://www.brianinthewild.com/oracle---fantasia.html
Routes
As of 2013, these are the only routes to the summit of the Oracle. Fantasia - 5.10- C2++ FA: Harvey Carter - 1970 Beaking in Tongues - 5.8 A4 FA: Crusher Bartlett & Dave Levine - 1997 Beak to the Future - 5.10 A3+ FA: Paul Gagner & Jeremy Aslaksen - 2012
Have Fun Out There!
 |
 The shadow looms. The shadow looms. | 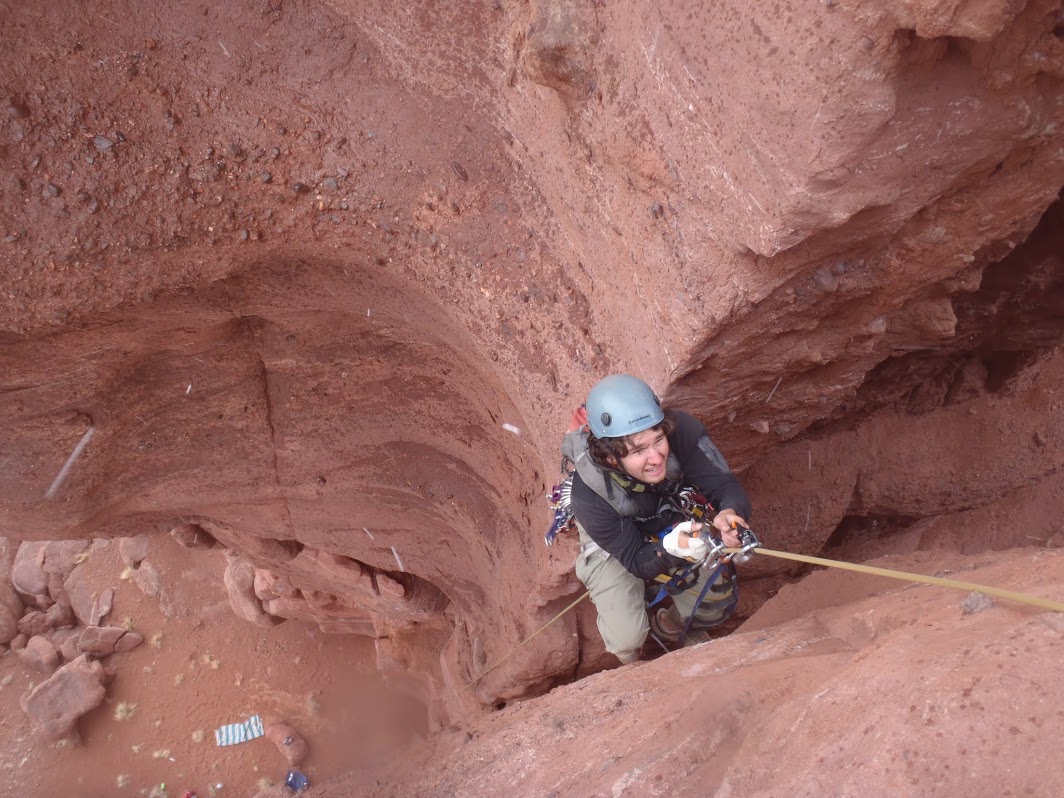 Jug, jug, jug. Jug, jug, jug. | 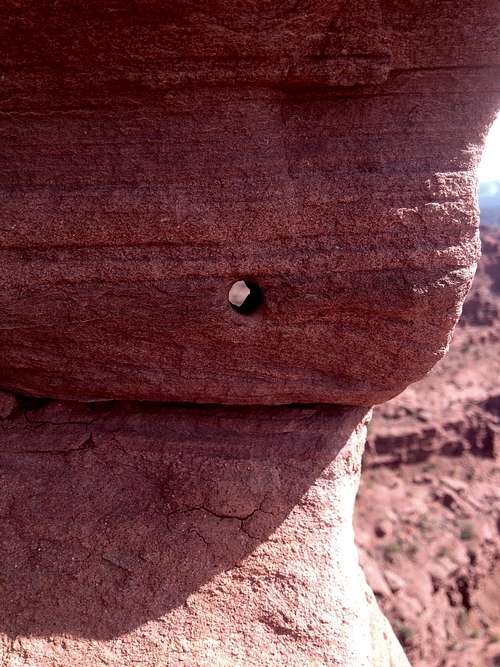 Who needs bolts? Just drill through the rock! Who needs bolts? Just drill through the rock! |
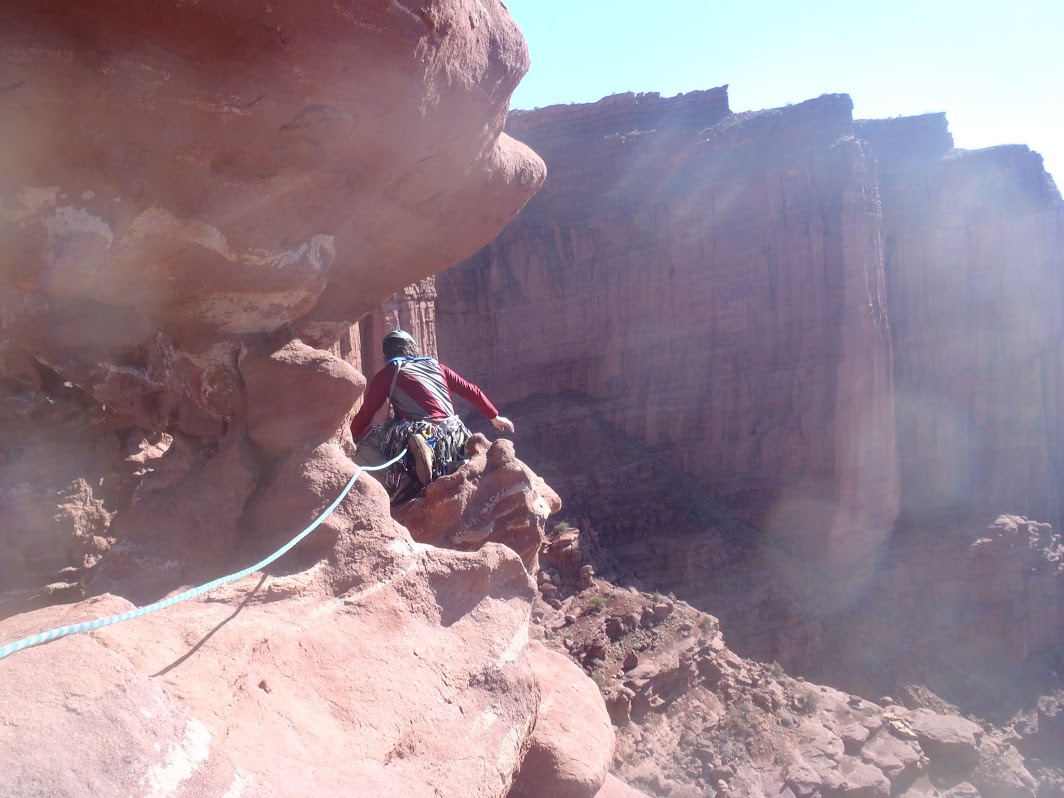 Don't fall off! Don't fall off! | 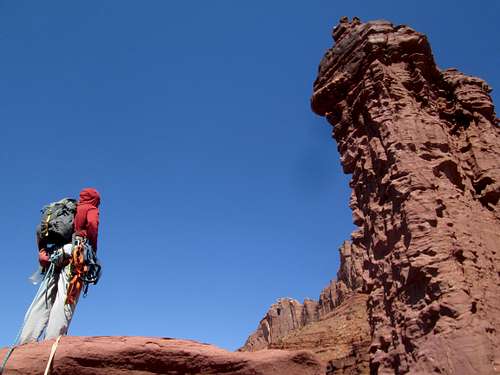 Too bad that stupid notch is in the way. Too bad that stupid notch is in the way. | 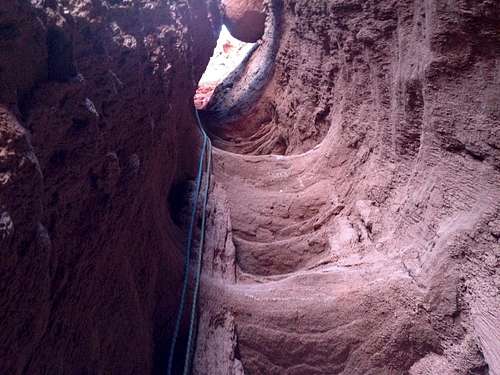 Be careful not to die on the descent. Read the beta. Be careful not to die on the descent. Read the beta. |
Fantasia 5.10- C2++
Here is my route description for Fantasia...
P1 - 5.7 C1+ - The start is obvious and it's muddy from the start. Make a few free moves up to meet the crack then aid up until it is possible to mantel onto a small, rubble covered ledge. From here, walk to the back and begin aiding up the leftmost crack. It starts small, turns a small bulge and enters a flaring offwidth. Battle upward while leapfrogging the #5 and #6 until the crack narrows and ends at a roof. Free climb directly right on small yet positive ledges, enter the mud chimney and stem up until it is possible to clip a bolt. Aid up a few bolts to a nice belay ledge. 120' P2 - 5.8 C0 - Make several tricky free moves up from the belay to reach the first bolt. Aid up the reachy bolt ladder until the bolts end, then make a poorly protected 5.8 mantel onto an awkward ledge to reach the next bolt. Several more bolts lead up then you free climb to the left to reach a comfy ledge and another good belay anchor. Note the cool thread holes drilled through the arete here. 90' P3 - 5.8 C2 - Once again, make several free moves up the arete to reach the first bolt. Aid up the bolt ladder until the bolts run out below a small ledge system. Free climb up onto the ledge, then carefully traverse right (slinging horns for pro) until you reach a bolt in a small pod. Make a few more free moves up the muddy pod, until it is possible to start aiding up the steep crack above. Follow it until it ends at a small ledge on the upper ridge. Make sure to save the large gear for the final moves to the anchor. 130' P4 - 5.8R C2 - Make a few moves of aid (fixed specter) on the north side of the ridge until it is possible to start free climbing. Carefully work up and onto the south (right) side of the ridge. The moves look very improbable and the protection is poor so use caution. Free up a small arete until it is possible to make some thin moves right to a larger ledge. Chimney up between two of the gargoyles and belay at a threaded hourglass (Eye of the Oracle). Best to belay your seconds instead of fixing the rope. 60' P5 - 5.7R - Continue traversing free climbing on the south side of the ridge across a series of small horns and ledges until you reach a bolt. Chimney up between two more gargoyles and belay at 2 more bolts. This pitch is short and could likely be combined with the next one but rope drag would be a serious issue. Best to belay your seconds instead of fixing the rope. 50' P6 - C2++ - From the bolt, tension traverse right until possible to awkwardly sling a horn. Clip the rope to the horn and continue lowering/tensioning until you can free climb into a small, mud-filled pod with a small tunnel that goes through to the other side of the ridge. Aid carefully up a steep, flaring and mud-filled crack. Offsets and tricams are key here and some C3 placements lead to a #5 and #6 then a 2 pin belay on a nice ledge. The old topo calls this C1, but it's not. 50' P6.5 - 4th class - Walk across a small exposed sidewalk and downclimb to a hidden rappel anchor. 2 spinning bolts, a wrench might make you feel better. Make a 50' rappel down into a small notch at the top of the GI chimney. 20' P7 - 5.10X - Step high and clip a good bolt. Climb carefully upward on crumbly holds to reach a stance where you can place a #4 and #5 in a small pod. From here, superman (dyno) to a hidden jug on the right and move onto another ledge. Falling is a very bad idea here. Work up left and you can clip a old bolt above you on the final ledge and carefully mantel up to another good belay ledge/anchor. 60' P8 - 5.8 C1++ - Walk across a narrow and exposed sidewalk to reach a bolt at the base of a large horn. Step high on the bolt and toss the tag line over the horn. Have your belayer anchor the tagline, and ascend it to reach the top of the horn. Carefully freeclimb up to the first bolt and bust out the etriers. Several bolts lead up to a "stopper free move" and you have the choice of busting a 5.10 move out of your aiders or stick clipping the next bolt. Continue up the reachy bolt ladder utilizing either your freakish ability to topstep, or stickclipping skills until you reach an obvious crack. Make a few gear placements up the crack and then lasso a thin horn until you are able to stickclip the first bolt on the final face. Just a couple more bolts put you on the summit plateau and another good anchor. From here it's possible to untie and carefully boulder up exposed 4th class to the airy summit. 130'
Descent:
Rap 1: From the summit anchors, make an airy double rope rappel down to the belay ledge above the 10X pitch. You have to walk back along the exposed edge to reach the anchors. Although not hard, a slip will leave you dangling on the face below so use care. Rap 2: Make a single rappel down the 10X pitch to the notch at the top of the dark and scary looking "gastrointestinal chimney". Rap 3: BE CAREFUL! This is approximately a 65M rappel and you MUST extend the anchor close to 25 feet. I would err on the longer side. Use ingenuity to thread the extended anchor and get onto rappel. We fixed an addition strand so we could rappel single strand down to the extended anchor and then get on rappel. Carefully work down the steep, dark and muddy chimney keeping a sharp eye out for the anchors. The anchor is on the side of the wall and not easy to see from above. It is immediately below a large bird's nest in the back of the GI chimney. I was able to clip one bolt of the anchor from above about a half of a foot before I came of the end of the ropes. Other route descriptions mention downclimbing, but please don't listen to them or count on that. The chimney is vertical and filled with mud and sand. In my opinion downclimbing would not be a possibility and if you fall you will die. Sorry to be dramatic, but I felt this was potentially one of the most dangerous parts of the climb. Rap 4: One more double rope rappel down the mud chimney will put you on the ground. Yay! Gear: TCUs: 00 - 4, with an extra 1 C4s: 0.4, 0.5-2(x3), 3-4(x2), 5, 6 Offset Mastercams: 0-5 Single set stoppers Single set offset stoppers (likely could be avoided) Single set tricams (red and black were only ones placed but red was crucial on P6) Stickclip!! Lots of slings (long ones crucial for lassoing), draws and screamers 2 60M ropes are required for the descent. *****Also, the first rappel down the GI Chimney requires about a 25 foot extension to reach the next belay. You will not make it without extending the rappel and downclimbing would be a grim option. As of April 2013 the extension was in good shape and we placed another cord to rap down to get on the other rappel. I would not count on it being there so come prepared. You will die if you fall off the ends of your rope here. Be careful!!!