
|
|
Route |
|---|---|
|
|
44.36291°N / 121.14687°W |
|
|
Technical Rock Climb |
|
|
Less than two hours |
|
|
5.9 |
|
|
Approach
This route is located on the NE edge of the Smith Rock Group. Head for Asterisk Pass and follow the Approach directions on the Sky Chimney route page. White Satin shares the first pitch with Sky Chimney. Upper two pitches of the route follow the crack system immediately left of Sky Chimney - i.e. crack system on left side of this photo.Long range, select east face routes overview shot:

Route Description
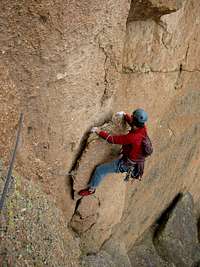
 Pitch 3
 Pitch 2
 Pitch 3
Route climbs in three pitches to a 3rd class ledge system also accessed by routes including Sky Ridge and Sky Chimney. Even though Watt's guidebook calls this route a "5.9" it is not really that hard. It's comparable in difficulty to pitch two of Pack Animal. Furthermore, in the Introduction section, Watts references this route among his recommended 5.8's in the park. Lastly, Jeff Thomas' old guidebook (Oregon Rock) has this route graded at 5.8.
Pitch 1: 5.6, 100 feet. This pitch is common with pitch one of Sky Chimney. Climb a well-bolted, wide chimney system on the left side of a hear-shaped (huge) flake. Stay in the low angle chimney till you're level with the left side of the huge ledge system (atop the flake). Belay from bolts on left side of ledge.
VARIATION: About 70 feet up the chimney, turn right and follow bolts straight up the face at about 5.7. In 20-30 feet you top out on the same ledge system as standard route.
Pitch 2: 5.7, 80 feet. Follow the dihedral on the left side of ledge for about 20 feet. Instead of staying in the dihedral all the way (as you would for Sky Chimney), move slightly left and enter a "groove". Follow groove till you reach the top of a detached flake. Hand traverse left (holding onto the top of the flake; view from above here) and enter a low angle, wide groove in a dihedral. Move up another 10-15 feet and either belay on gear or step left 5 feet and belay off of bolts.
Pitch 3: 5.8, 70 feet. Watts refers to this pitch as being 5.9; Thomas grades it at 5.8 (more realistic IMHO). This pitch is the reason to climb this route - fun stuff! Step back right into the crack/dihedral. Easy hand jams (5.7) lead you up steepening terrain. As the terrain steepens (and crack narrows below hand crack width), great footholds appear. Stay in the carck through the slight bulge section (crux, call it 5.8+). Pull onto the gravelly terrain above taking care not to drop any rocks. Staying left on slabby rock makes for cleaner going (there's a bolt there to keep the rope off the dirt and thus from launching rocks). Belay on gear where convenient.
Descent: Follow descent directions under Sky Chimney or Sky Ridge route pages. Although it is possible to walk off (class 3 to start with) to the west side, most will choose to rap (less walking to get back to your packs). Hike up and right (bearing roughly NW) for about 100 feet. Rap anchor and chains can be found on a low angle slab. Do either 3 single (60 meter - 50's might work too??) rope raps or two double rope raps to the west side base (bolts and rap chains in place). Hike right toward Asterisk Pass. Go over the pass and turn right back to the base of the route.
Essential Gear
 Pitch 2
 Pitch 2
Much like the other routes on this wall, this route too eats cams. Depending on your comfort level, take double set of cams from 0.75 - 3 inch size (+ one slightly larger). Leave nuts below. Helmets are a good idea as the rock on pitch two is a bit chunky and there's loose rock on top of the route.
More Route Photos
 Top Out
 Pitch 1
 Pitch 3
 Pitch 3