
-
 5929 Hits
-
 79.78% Score
-
 11 Votes
|
|
Route |
|---|---|
|
|
51.27036°N / 115.17874°W |
|
|
Trad Climbing |
|
|
Summer |
|
|
Most of a day |
|
|
5.10a (YDS) |
|
|
8 |
|
|
Overview/Approach
 1st Pitch- 30m- 5.7
Allow me to introduce you to Angelus Vicia or “Angel of Death” as my partner and I so fondly refer to this route. We happened upon this wild-west show by accident. Our intent that day was Silver Ghost with Bonanza as a back-up plan. However, out of three other parties at the Phantom walls that Saturday, two were on our targets. The other party was on the Wraith which I had climbed the prior week. Once you take those three routes out of the equation, the rock quality starts to deteriorate regarding the remaining routes. Thus off we were to scope out the south face of the Phantom Tower, a semi-detached section at the east end of the Phantom monolith. What we really had in mind on Phantom Tower at that point is what they call the South Face Route, the 2nd major route put up on these steep walls to the north of Devil’s Gap.


It appeared at that point to be a 5.8 mellow day out cruising up an old established route and then maybe getting a crack at Silver Ghost (5.10a) later in the day as well. My partner blew through the 1st belay and straight up an awesome, but quite dirty (rodents and loose rock) and rarely climbed “open book” corner. Why not, we were toting a hammer and pitons and have never shied away from an adventure. After 60m, he hammered in a few pitons. Once I got to the top of 30m, I could tell we were on a different route now. A quick glance at my notes revealed it was called Angelus Vicia, a 5.10a route put in by Jones, Wyvill, Pickel and Felber in 1998. With so many loose holds and chockstones in the dirty corner, I started to have my suspicions as to how many times, if ever, this route had been repeated. Although I could have easily put us back on track by descending an easy gully on the next pitch, curiosity got the best of me and I chose to continue up what became a very loose, run out and just plain scary route in the Canadian Rockies.
To reach the Phantom Crag area, proceed towards Devil’s Gap by turning left at the bottom of the “Big Hill” and follow the streambed to the top of the dike and turn left following the dike for a short distance into some trees and turn right aiming for Devil’s Gap on a well driven road. More than likely you will encounter several stream crossings as you make for the Banff National Park Boundary which is well marked. You are not allowed to drive across it. Park at the sign(s) and be prepared to wade across the stream bed to the tree line below Phantom Crag. I always take sandals with me to the Ghost for this reason. Look for a cairn marking a well trodden, but narrow and slightly hidden, trail that takes you up to the walls above to the north. Take the right fork that appears in the trail about half way up and follow it up and then turn right at the wall. Continue quite a ways crossing a gully, until below the Phantom Tower’s impressive south face. Few routes get climbed this far east on Phantom, thus the trail peters out. You are looking for a shattered corner that runs to the base of an “open book” corner, pretty much up the center of the face. There is a sizable tree at the base of this shattered corner.
Route Description
 4th Pitch- 45m- 5.10aR


1000’+/-, 8 Pitches, 5.10a
1st Pitch- 30m- 5.7/ So to clear up the above, this is the first pitch for the “South Face” route as well as the first pitch for Angelus Vicia. This first pitch is by far the easiest pitch of the day. Just follow the corner left of the tree up and then traverse right below a small roof on easy ground and continue up to a large ledge below the open book corner. We combined pitches 1 and 2, but I advise not doing that, if for nothing else, because the corner above is quite dirty and challenging and you can avoid using pitons if you can make it all the way to the top where there is a gully.
2nd Pitch- 45m- 5.9/ This is a sustained and dirty corner pitch. Although the corner is fantastic in terms of steepness and position, many of the holds and chock stones are loose. As with many 1st or 2nd pitches in the Canadian Rockies, there is no shortage of rodent waste to make the good holds that much more difficult to hang onto. As you near the top of the corner, the angle eases and this is where we placed pitons, but also removed them. If you divided the pitches as I suggest, you can top out and do a body belay in the gully above.
3rd Pitch- 30m- 5.8R/ Cross the gully and start up a short face angling left across a bolt. We removed a rusted old piton, as I could sink a .5-.75 into a small slot right below it. Look for this slot several meters above the bolt as you gain a groove that leads to a significant ledge with the 2nd fixed piece of pro on the route, another bolt you need to step up to if you want to make it part of your belay with a larger cam set to the right of it.
4th Pitch- 45m- 5.10aR/ The before mentioned bolt is positioned weird; not high enough to really protect the start of the next pitch, but higher than it should be for the belay. Clip it for a directional anyway and stem up a closed right leaning corner to the left and then make a cruxy unprotected traverse right to the left leaning corner. You can get a small piece of pro in some chossy rock here or maybe conserve your energy and just finish the run out. Once on top of this short corner, move right below a protectable steep corner and climb it to a semi-hanging bolted belay above.
5th Pitch- 45m- 5.10a/ Maybe the best pitch overall. Move left into a corner and follow it up to the crux move protected by a bolt below an overhang. Continue up a steep, but protectable, broken corner. The rock will start to deteriorate. A slight nudge with your elbow or knee will send loose rock flying down past your belayer. Look to move right out onto a comfortable belay ledge that turns the corner. A single bolt can be found to help build your anchor just around the arête.
6th Pitch- 40m- 5.8R/ The 2nd easiest pitch on the route, but perhaps scariest. This pitch sets a broad definition to “run out”. Move right along the ledge to the short corner. No real pro here or anywhere for that matter except for one piton we left fixed about midway up the pitch and a single bolt just beyond that. Trend left, keeping in mind you should not be climbing anything more difficult than 5.8 as you reach a bolt belay on a small ledge below steeper ground. This section is nice hard sticky limestone.
7th Pitch- 40m- 5.10a/ You can see one bolt above you protecting a move at the grade. There is another bolt you will see as you reach this one above the small roof. Avoid the corner to the right. You pretty much head straight up from the belay, perform a tricky stem through the roof and continue as the angle eases up above. The guide book’s topo is mistaken here. Instead of moving out left on easy run out face terrain as it insinuates looking for another corner to the left, rather stay with the corner to your right without great pro opportunity until you reach a precarious pillar. Ascend the pillar delicately and belay atop it using good small to medium cracks above along with one older fixed piton.
8th Pitch- 50m- 5.7/ Straight forward pitch. Continue up the corner/chimney above until it relents to broken ground and the broad summit of the Phantom Tower. You can build a station among the large blocks or do a sitting belay on top.
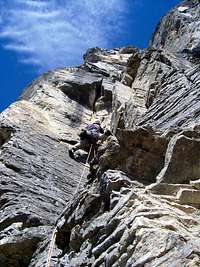
Climbing Sequence
 |
 |
 |
 |
 |
 |
 |
Descent
Use the Bonanza gully descent. Hike north skirting the Phantom Tower Gully to the left. It looks steep and exposed below the headwall above, but as you near the scree below, you should be able to make out a sheep trail that takes you to the west side of this steep gully. Continue past the top of the Wraith and start hiking to your right circumventing below a large summit block on large scree. Follow a trail as it makes its way for the center of the gully and then drop down on smaller scree as the trail angles right for the center of the gully below.Essential Gear
I recommend double ropes giving you 2 rappels instead of 3 down the somewhat exposed descent gully. Angelus Vicia is loose and run out with a few fixed pieces of pro. I recommend a single rack to 3” with double .75-3” cams. Full set of wires. Mostly shoulder length slings with a few draws. It is better to set up one pack carried by the 2nd so you do not need to return to the base as it is quite a ways off from the descent trail. Another option is to suit up and leave your packs along the trail way before you get to the base of the climb. But you will still want to biner your approach shoes for the descent.External Links
DowClimbing.Com-GhostTabvar.Org-Topos (won’t find one here as of 2008, but never know)