
-
 16330 Hits
-
 82.48% Score
-
 15 Votes
|
|
Route |
|---|---|
|
|
45.18209°N / 109.63772°W |
|
|
Hiking, Mountaineering, Ice Climbing, Scrambling |
|
|
Spring, Fall, Winter |
|
|
A long day |
|
|
WI 4 |
|
|
2 |
|
|
Overview
This route is a fantastic ice climbing route in the Beartooth Mountain alpine heading straight up from the south end of East Rosebud Lake. Having a northwest aspect, the route never sees sun in the short December and January days and offers a fun yet challenging route to reach the East Rosebud Plateau and the summit of Sylvan peak. Most people climbing the route however do not continue to the summit as the plateau is a VERY harsh place in the winter and there just isn't enough hours in a day to both climb the ice route, walk across the plateau to the summit of Sylvan Peak and then descend via Spread Creek which is a very tedious place to descend.
Although there are just 2 pitches of WI 4 ice, there can be many WI 2 pitches on the approach to the base of the route and many more above the route. If conditions are perfect, usually sometime in January, the entire drainage will be covered in good ice offering one of the longest continuous ice climbs in the country. If all the ice is in and you decide to top out on the plateau, this climb can exceed 3,000 feet of continuous ice climbing. Also, having a short approach makes this a very desired ice climb in the Beartooth Front.
So you may be wondering why there is a route called "California Ice" in Montana? The answer comes with the first ascent party when Chad Chadwick was looking to get the FA and enlisted a couple friends from California to join him. I suppose there was a deal made between the group to represent CA in the naming of the route.
Getting There
Trailhead
East Rosebud Trailhead - From the MT 308 and US 212 junction at the south end of Red Lodge, head north on US Highway 212 for 1.5 miles and turn left onto MT State Highway 78. After 19.7 miles reach Roscoe and make a sharp left onto East Rosebud Road and measure from this point. After 0.2 mile, pass by the Grizzly Bar and restaurant and continue another 2.4 miles where the road turns to gravel. At mile 3.7, make a left onto the East Rosebud Lake Road and quickly cross East Rosebud Creek on a bridge. Just after the crossing, make a right on East Rosebud Lake Road and cross a cattle guard. At mile 8.3 enter the Custer National Forest where the road becomes paved again and now becomes FS Road 2177. Pass the Jimmy Joe Campground at mile 11.9 where it turns to dirt once again. Pass the Phantom Creek trailhead at mile 13.6 and continue another 3/4 mile to the turnoff for the East Rosebud campground. Drive a short ways to the end of the campground and park at the signed trailhead which is at 6,400 feet elevation.
In the winter the road is plowed to a point about a mile before the pavement starts again where a group of houses is located. The village of Alpine surrounding East Rosebud Lake typically shuts down completely in winter with maybe only one or two families staying through the winter. Therefore, with a 4WD vehicle, you can usually get to the turnoff for Alpine which is only a half mile from the actual trailhead for the East Rosebud Trail. The final half mile seems to always drift over with strong winds coming down the valley and across the lake making it impassible. Park just to the side of the road as far as you can get which is probably about 1/4 mile from the end of the road.
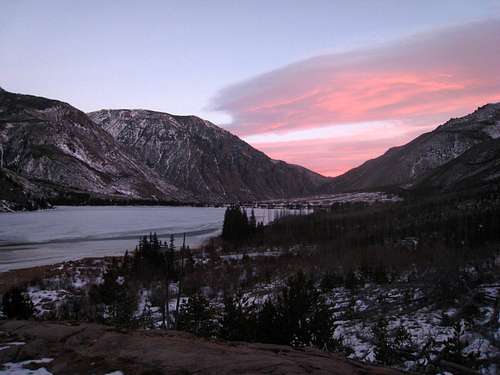
Sunrise on East Rosebud Lake
Approach
From where you park, follow the rest of the road past the campground to the trailhead and start hiking up the East Rosebud Trail. The trail winds behind all the houses along the east side of the lake and stays pretty flat. Snow tends to drift over the trail making the hike a little annoying. After about a mile the trail will head over a feature called "The Hump" where there is a section of trail blasted out of a small cliff band at the far end of the lake. It descends about 40 feet along a man-made trail to the creek. You can't miss it! After passing the hump, you can look up to the left and should see two ice flows. The lower one to the north isn't situated deep into a drainage and obvious to see. This is the Upper Rosebud Falls ice climb which is a 50 meter WI 4 climb. If you look higher and to the right (south), you will see a larger flow inset in the drainage. This is it! Continue up the mellow trail another 1/2 mile past the hump to a small creek crossing coming in from the left. It will likely be frozen. The climb begins here.
If it's obvious the entire creek is covered with ice, leave the trail and begin hiking up the bottom of the drainage with your crampons on. If it's earlier season and all the shrubs and rocks aren't yet covered with ice, cross the creek and start hiking up the steep talus slope just right of the creek. This is the route we took and is likely the way most people go. Climb up through the 1996 burn area where downed logs and unconsolidated footing make the first 500 feet very annoying. Reach the small ridge just above and south of the creek and continue steeply up the ridge until you are about 800 feet above the trail at an elevation of about 7,100 feet. Locate the first WI 3 ice step shortly before the drainage closes in with huge cliffs flanking both sides. Traverse to the creek bed and put crampons on here. This is the start of the route.
 California Ice from the trail | 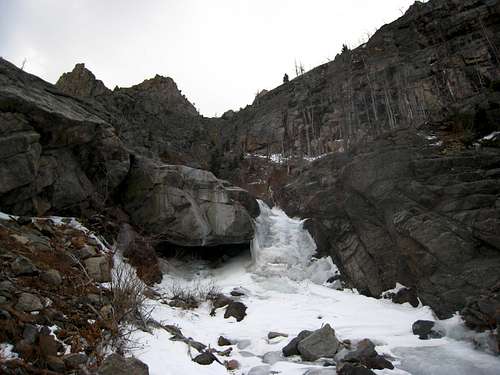 First WI 3 step on the approach | 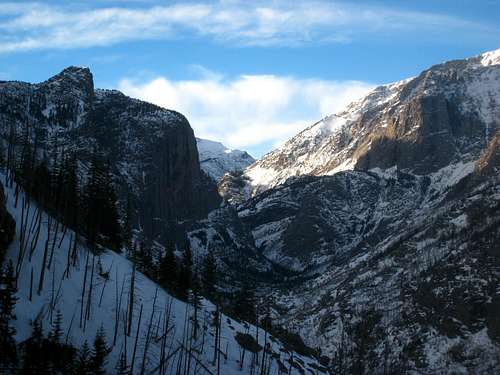 Looking up East Rosebud |
Route Description
Climb the first WI 3 step which is only about 10 feet tall. Continue up the drainage on either steep, 40 degree snow or WI 2-3 ice. When we were there in December after a cold snap it was perfect neve snow perfect for cramponing. Numerous small 3-6 foot ice steps are necessary to climb along the way. Weave your way up to the base of the obvious 100 meter ice fall 1,500 feet above the trail. Views across the East Rosebud continue to get better and better as you hike higher. At the base of the route, find a safe spot to belay off to the right side. The route is typically done with a shorter first pitch to a small ledge on the right side of the flow near a small cave and a long 60 meter pitch to another larger ledge at the top of the WI 4 flow. If it's not fat yet, the ice will likely be fairly featured and inconsistent in quality offering small true vertical spots or even overhanging bulges, all increasing the difficulty. Either way, this is a solid WI 4 climb. Be prepared for a belay anchored off ice screws for the second pitch.
Once atop the second pitch, you have three options all described below:
1. There are two pitons on the rock wall to the climbers right atop the second pitch with a good piece of cord as of December 2013. If daylight is fading, you can make a long 60 meter double rope rappel to a point about two-thirds of the way down the main flow. Make a V-thread and then rappel the final 40 meters to the base. This is what we did and it worked well.
2. You can continue up a short third pitch from the ledge atop the second pitch by climbing lower angled WI 3 ice for 20-30 meters to a large notch in the ridge at climbers right. From here you can walk off to the right through the notch, descending a short ways and making one short rappel into a steep snow gully. If the snow conditions are good, you can make quick work down this gully which curves back to skiers right back to the base of the main flow. Note this gully coming down from the climbers right upon starting the first pitch.
3. If you have plenty of daylight left and you have the energy, continue up the third pitch described in option 2 above and then continue the rest of the way to the top of the East Rosebud Plateau another 2,000 feet above the main flow topping out just above 10,000 feet elevation. Hike 3/4 mile northeast across the plateau and descend the standard route of Sylvan Peak via the North Slopes/Spread Creek Trail as described in the main Sylvan Peak page. There is no doubt this will make for an extremely long and challenging day at any time during the season. In December and January the days are just too short however the avalanche danger is much less. In the longer days of March and April the avalanche danger in the entire drainage is high so note how much snow is in the area and make any snow stability tests if needed.
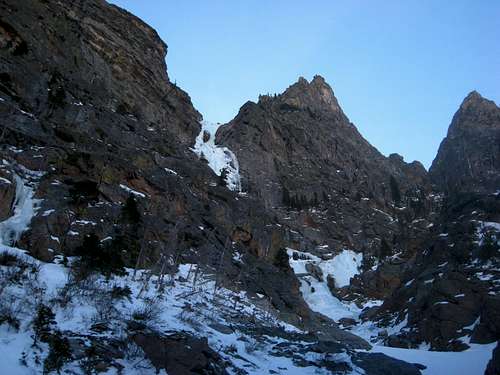 Nearing the base of the main flow | 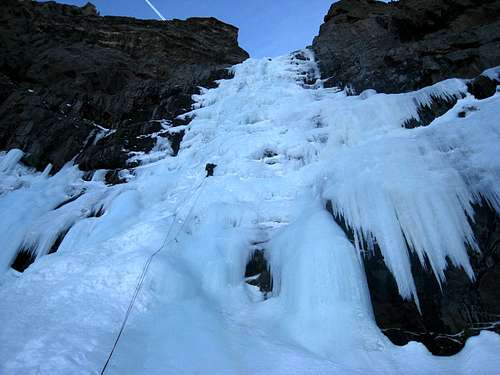 The 2 pitch WI 4 main flow | 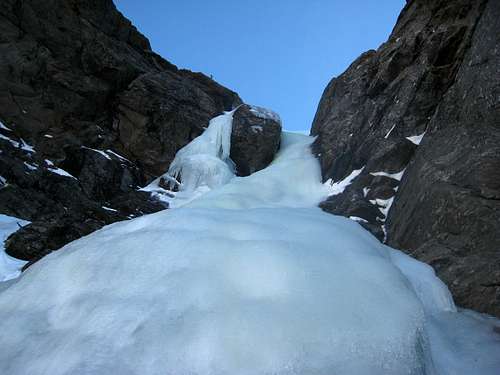 The WI 3 third pitch |
Map
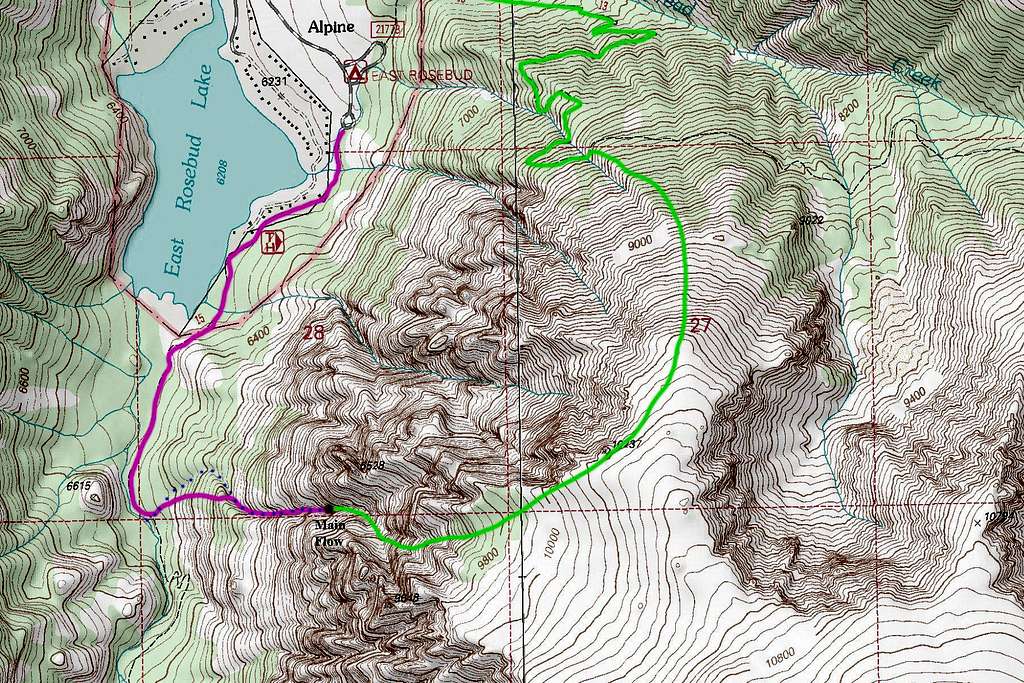
PURPLE: Approach to California Ice - Class 2+; WI 2; 40 Degree Snow
GREEN: Route above the Main Flow and descent via Spread Creek Trail - Class 3; WI 3
BLUE DOTS: Approach drainage
BLACK DOT: California Ice Main Flow - WI 4
Essential Gear
Double 60 meter ropes, ice tools, crampons, stiff mountaineering boots, set of 10-12 ice screws of all lengths, helmets, plenty of cord for anchors and possible V-threads, plenty of warm weather clothing and extra gloves!
Video Report
External Links
Description of the route on Loren Rausch's blog