
-
 5971 Hits
-
 81.18% Score
-
 13 Votes
|
|
Route |
|---|---|
|
|
48.20849°N / 121.41696°W |
|
|
Scrambling |
|
|
Summer, Fall |
|
|
Half a day |
|
|
Exposed Scramble |
|
|
Class 3 |
|
|
Overview
Well, honestly, this was a silly screwup that ended up working. We missed the cutback to the normal route to gain the final ridge to the summit and ended up corkscrewing around a narrow ledge until we cliffed out. Luckily, we found a way to climb up just below the summit. If this sounds like fun to you, then this could be your route! Or, if you do this mountain a lot, this could be a way to spice up the end of the normal route. Beware though, there is significant exposure here and places where a slip/fall would be fatal. Helmets are recommended and there is a short, very exposed step that, while may seem to be silly to take a rope up for that, might bring some peace of mind.This route basically continues on an ever-dwindling ledge from the normal route. Where the normal route cut backs sharply to the left to continue on to the summit ridge, you would continue on dead ahead. The ledge gets smaller and slightly sloping before cutting up and around a small snowfield (not sure if permanent or not but seems to be permanent) and through a shallow cave before getting back onto the ledge. The ledge then seems to end, but if you take a step over a notch with hundreds of feet of exposure and grab some shrubbery, you can regain the ledge for a bit before it peters out. From there, there is a small cleft where one can scramble directly up to the summit. It's spicy and while a scramble, I don't want to understate the exposure, because I really don't want to read about any fatality on this "route." Remember, we screwed up by taking this route and were lucky enough to find a way to make it work. Just know what you are getting into and take proper precautions.
Getting There
See the Getting There section of the main page for directions to the trailhead for the normal Northwest Route. Follow the Northwest Route through the woods, across the rockfield and up the slopes between the two halves of this peak. Continue on up to where you crest the ridge for the first time above the heathery rock steps. Shortly after you continue on south from that point, you will come to a large boulder looking out of place. The normal route cuts back left and up here. But, not you! If you are doing this route, you look straight south at the ledge you think won't work. That is where you are headed, my friend.Route Description
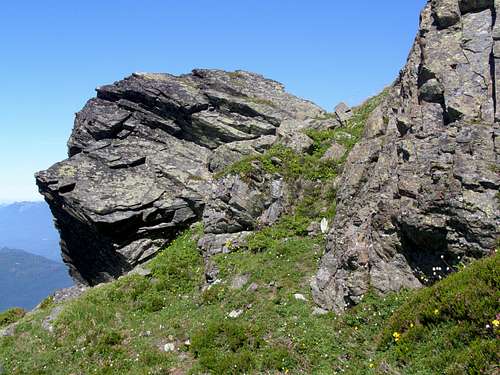
As you come up the normal Northwest Route, you will be on the ledge below heading south. Look at the photo at the rock ahead on the ledge at it turns the corner. That is where the normal route cuts up and left but you go straight.

Below is a shot at the rock as you have just passed it. The normal route cuts up grassy ledges on the right (just out of frame to the right in this photo). You will turn back around and continue on straight from this point however.
The photo below is a little further along the ledges as you can now see the snow patch you must get to and the narrow ledge to get there.

The photo below is from the point of the cave/snow patch looking back at the route you just came up.

The photo below is the same photo except I have outlined the route in light blue and the boulder where you separate from the normal Northwest Route is labeled with a magenta A (rock is just below the A).

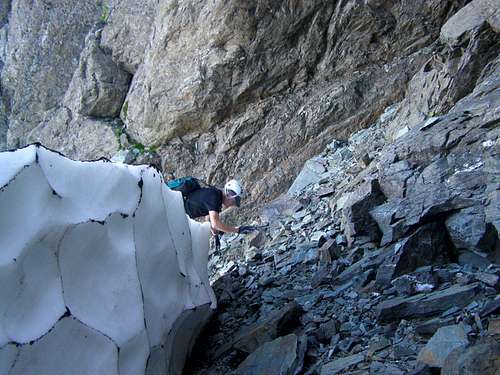
When you get to the end of where the blue line is in the photo above, you will be at the snowfield and cave. See the photo below. Ron, in yellow is climbing up to the top of the snowfield to go around it. It is loose here and a fall would send you tumbling a few hundred feet below. you may need to jump across to get above the snowfield. The "cave" is behind Nina in the light blue helmet. She has just emerged from it and it working her way back to the ledge where I am standing taking this photo.

Below photo shows what it is like getting up to the top of the snowpatch before you jump into the moat to go around the top of it>
The photo below shows (albeit it's a crappy photo but it is inside the shallow cave in morning shadows) going around the snowpatch in the cave and getting back to the ledge.

The photo below shows the snowfield from above (on the normal route). The cave is the darker area to the left of the snow patch. After you exit the cave and are around the snow patch, continue on around to the left on the grassy ledge shown.

Continue around the corner to the left from the snow patch and follow a mostly rocky ledge show in the photo below.
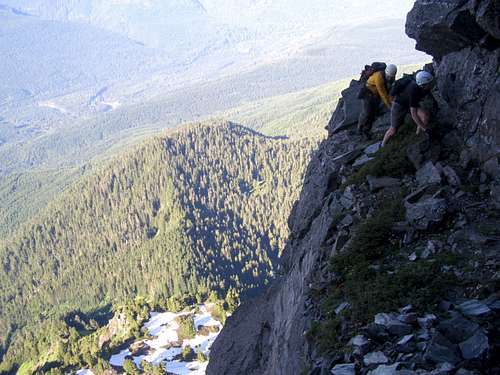
You will then continue on up the grassy ledge to a point where there is a sharp left turn. Cliffs are below and you are looking at a gap in the rock of the ledge. You will need to ignore the pucker factor here and lean over, get a good handhold on a rock and make the step over the gap. Be careful here as a fall would be fatal. Plus, there is not much secure once you get over the gap. Below is a photo looking back at this point. Grant on the right has his right foot slipping out from under him and his left foot is stuck in some bushes for whatever purchase it gives. The rocks about him are loose and there is not much to grab onto except the base of those shrubs. Get yourself up against the rock wall and move carefully along. Ron, in yellow, in about to make the step across the gap.
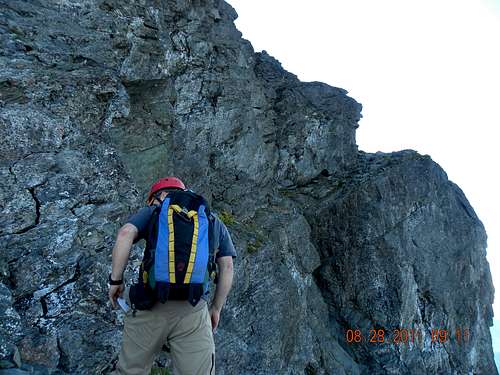
From this point, continue along the ledge until you come to the south face of the mountain. It was at this point we confirmed our screwup of the normal route. You know you are not supposed to cross around to the east side (and I am not sure if this ledge would even do that, from what I remember this ledge peters out at this point). From this point, you will look up and slightly left. There is a cleft, a shallow groove, a rocky Class 3 route up. At least we thought it was Class 3. Might be 4ish but the holds are good and the footing was solid. Climb up about 15 feet and you will exit onto safe ground and see the summit above you. The photo below shows the top of this short climb (yeah, I know, we were just trying to find a way up and didn't think to take a beta shot showing the base of this scramble/climb).

Here is another photo below taken from near the top of the short climb.

The photo below is from the summit looking down to the point where the photos above were taken.

From the summit you can see the notch of the normal route and that would be the way to descend. It's much easier to see the normal route as you are coming down and there should not be any issue finding you way back down to the boulder where you rejoin where you came up.
Essential Gear
Helmets are strongly suggest, the rock is loose and falling and if you are more than a party of 1, you will need to deal with it.Suggestion, if you bring trekking poles, leave them at the boulder where you separate from the normal Northwest Route. You won't need them after that point.