
|
|
Route |
|---|---|
|
|
40.77592°N / 110.46197°W |
|
|
Hiking |
|
|
Summer |
|
|
A few days |
|
|
Mostly class 1&2, some minor class 3 |
|
|
Overview
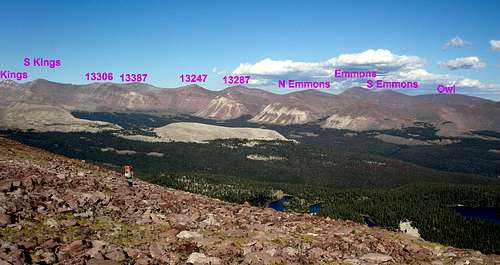
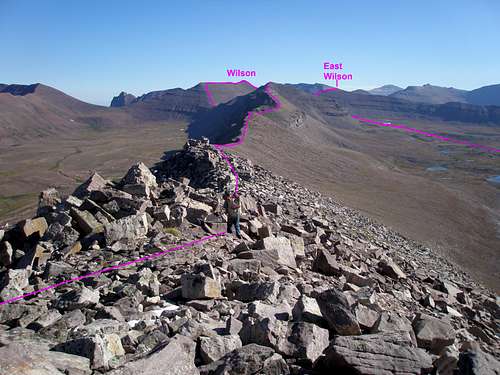
This route describes a loop trip starting at Center Park (10320) that traverses the 7 high peaks over 12000 feet along the rim of Garfield Basin. Five of the peaks lie on the ridge that lines the west side of the basin. From south to north, lowest to highest they are Swasey Knob (12124), Bluebell Lake Peak (12260), Stone Benchmark (12707), South Porcupine Mountain (12729), and Porcupine Mountain (12892). Wilson Peak (13060) lies at the north end and East Wilson Peak (12779) lies at the northeast end. Garfield Basin is located in the Uinta Mountains of Utah 4.5 miles WSW of Kings Peak, the highpoint of Utah. The Center Park trailhead is located about 30 miles north of Duchesne, Utah. The entire hike is above 10000 feet with virtually all of it above 11000, and a significant portion above 12000 feet.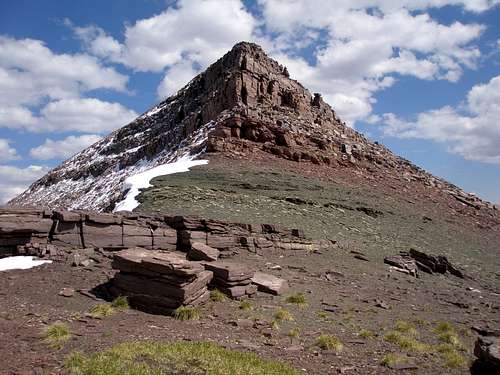 East Wilson Peak East Wilson Peak |
Except for the first 2 miles, the entire hike is very scenic. About half of the route is on a ridge and great views are in every direction. The Kings-Emmons ridge lies to the east, Cleveland, Squaw, and Explorer peaks lie to the west, and to the north lie the Lovenias and Red Castle. While not on the ridge, when you are hiking within Garfield Basin, you will encounter many beautiful lakes.
Assuming a 3 day trip, Swasey Knob and Bluebell Lake Peak are done on the first day, and a descent is made off the ridge to a base camp. On the second day you climb back up to the ridge and hit the other 5 peaks and then return to the same same camp. The 3rd day is spent hiking back to the trailhead, mostly on a trail. Even though the mileages and elevation gains on the first 2 days aren't very significant, be prepared for slow going on those days since most of the distance is off trail.
Day 1: 10.6 miles, 2.9 on trail, 7.7 off trail, elevation gain of 2900 feet
Day 2: 12 miles, 1 on trail, 11 off trail, elevation gain of 4300 feet
Day 3: 10.7 miles, 10 miles on trail, .7 off trail, elevation gain of 1600 feet
Total Mileage: 33.3
Total Elevation Gain: 8800 feet
 South Porcupine and Porcupine
The entire route is technically easy being primarily class 1 or class 2. Just north of Stone Benchmark there is just one class 3 move with no exposure. The rock on East Wilson is somewhat loose and extra care is required on that section.
Only the most hard-core peak-bagging fanatic would want to do this route in one day. If so, you wouldn't have to get off of the ridge in order to camp resulting in a total elevation gain of only 8000 feet. The total distance would also be a little shorter since you wouldn't have to make any detours to camp so the total mileage would be about 31.4 miles.
 Bluebell Lake Peak
Getting There
Access is via the Center Park Trailhead located about 30 miles north of Duchesne, Utah.Route Description
Day 1
Swasey Knob
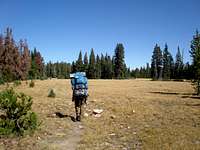 Meadows at start Meadows at start |  Hill 11193 Hill 11193 |  Hill 11842 Hill 11842 |
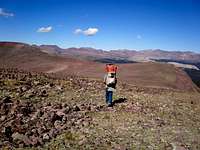
The route begins at the Center Park Trailhead located on the south slope of the Uintas about 30 miles north of Duchesne, Utah. Follow the Garfield Basin trail through a combination of nice flat meadows and gently rolling terrain on the way to the shoulder of your first objective, the 11193 benchmark. After 2.9 miles, leave the trail at N40 38.259 W110 27.603 and ascend west via a boulder field to the 11193 bump where you will find the benchmark at N40 38.636 W110 29.439. From this point you can see much of tomorrow's route looming in the distance. Four of the five peaks are clearly visible, South Porcupine, Porcupine, Wilson, and East Wilson.
 4 of 5 of tomorrow's peaks
 The symmetric ridge of 12007 The symmetric ridge of 12007 Heading toward the high point of Swasey Knob Heading toward the high point of Swasey KnobHead west then northwest along a gently sloping ridge to hill 11842 where you will find the remains of another benchmark at N40 38.686 W110 29.439. Descend a gentle slope north to the saddle with 12007. Ascend the symmetrically pointed and moderately steep ridge to point 12007. From 12007 it is another 1.1 miles along mostly flat terrain to get to Swasey Knob, 12124. Swasey Knob isn't much of a peak as its summit is wide and flat and appears simply as a rounded mound of rocks. The "x" on the map is at N40 40.466 W110 30.363 |
Bluebell Lake Peak
From Swasey Knob descend NE to the saddle with 11950 and then N to the saddle between 11950 and Bluebell Lake Peak (12260). Ascend the ridge NW to Bluebell Lake Peak. As you approach the top, to your right you will see all of Garfield Basin which you will be traveling through tomorrow. The final 200 vertical feet are moderately steep and require some hand use but are not particularly difficult unless you are carrying a heavy pack. Bluebell Lake Peak isn't much of a peak either as the top is almost completely flat. The benchmark disk is located at N40 41.467 W110 30.144 in the middle of an easy to find 2x3 foot, flat, triangle shaped rock.
 Approaching Bluebell Lake Peak Approaching Bluebell Lake Peak | 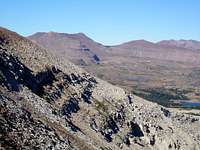 Garfield Basin Garfield Basin |  The terrain gets rougher close to the top The terrain gets rougher close to the top |
Descent to camp
Just after Bluebell Lake Peak is your last good opportunity to descend from the ridge and find a decent spot to camp for the night. The next opportunity to descend wouldn't be until 3 miles further along the ridge, just after Stone Benchmark. However, the terrain just below Stone is less than ideal for camping as it is barren and devoid of trees.
 Descending from Bluebell Lake Peak
Angle NE from Bluebell Lake Peak until you hit the ridge running east near the 12252 bump as shown on the map and head down the ridge. Looking northeast, you will have the entire Kings-Emmons ridge in view. At a convenient place, angle north and pass on the west of Drift Lake and the east of Lake 11157, making your way to Lake 11082 which is surrounded by good campsites. Park your belongings and be happy that you won't have to carry them tomorrow as you will be returning to the same camp.
 Angling toward Drift Lake
The descent is steep, but is your typical boulder field, requiring some balance, made difficult by a heavy load. Once you hit bottom, your troubles aren't over because the boulders become bigger and it is tedious to go up and over them at the end of a long day with a full pack. After you cross the open boulder field, it gets even worse, because now the boulders are interspersed with scrubby trees that you have to fight your way through. The terrain doesn't improve until very close to 11082 at which point it becomes easy sailing all through Garfield Basin.
If I had to do this over again, I might try hugging the side of the mountain at the bottom and passing to the west of lake 11157, hoping to find some smaller boulders.
 Heading to Drift Lake Heading to Drift Lake |  Rock jumble Rock jumble | 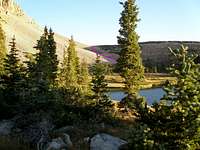 Lake 11082 Lake 11082 |
Day 2
Ascent to Stone Benchmark
 Route up Stone
Head up the ravine NW of Lake 11082 to the barren shores of beautiful blue Doll Lake. Go around the east side of Doll Lake and ascend gently to the 11756 bump. From there, it is a steep climb littered with boulders up the side of Stone. Head a little NE of the summit and then follow the summit ridge SW to the summit where you will find a benchmark at N40 44.013 W110 30.343. There are many large blocks and fissures along the ridge to the summit but they are straightforward to navigate.
 Summit ridge
The very top is almost completely flat, atop a large block with many small fissures. The final few feet is easy class 3 with no exposure, but most of the way is class 2. It is about 2.1 miles to the summit and you will gain 1500 feet of elevation.
 Approaching the ridge Approaching the ridge | 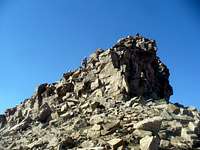 Coming off of the summit Coming off of the summit |  Some towers on the ridge Some towers on the ridge |
Alternate continue on the ridge
As mentioned above, only the most hard-core peak-bagging fanatic would want to do this route in one day. But, if you find yourself in that category, do not descend after Bluebell Lake Peak, but continue along the ridge to Stone Benchmark. Since I didn't go this way I can't describe it but all indications are that it's just like the rest of the ridge.
South Porcupine Mountain
 Looking ahead at the rest of today's route
From the summit of Stone, look along the NE ridge to see your route lying before you. First comes the minor bump 12459, then South Porcupine Mountain, Porcupine Mountain, Wilson to the back left, and East Wilson to the right. You will stay above 12000 feet for the next 5 miles, until you make your descent from East Wilson Peak. Garfield Basin will be on your right, to the NE, and you can observe that your route back to camp is primarily tundra, making cross country travel easy.
 South Porcupine Mountain
Of the seven peaks covered in this route, South Porcupine Mountain looked the most interesting on the map, a long, skinny, knife edge ridge with cliffs to the west and possibly some cliffs on the east too. From far away it wasn't clear how straightforward this one was going to be, but the closer you get, the easier it looks. It turns out to be a straightforward scramble/boulder hop along the ridge from Stone Benchmark to the summit which is the first of two sloping towers. It is 1.9 miles from Stone and you will gain 720 feet.
 The very top The very top |  Near the top Near the top |  Approaching the northern tower Approaching the northern tower |


Wilson
 Wilson's summit ridge
Although from a distance the south face of Wilson looks daunting, it is an straightforward boulder hop to the top of ridge. Once you reach the top of the ridge head east to the summit. The ridge is fun to walk on. The western side starts out as nice, wide, flat slabs and it's as easy as walking on a sidewalk although there's a thousand foot drop to one side. There is a simply stunning view of Red Castle and Red Castle Lake. Closer to the summit, the ridge turns into a boulder hop similar to the rest of the trip. It is 1.4 miles from Porcupine to Wilson and the elevation gain is 880 feet.
 Wilson's south face Wilson's south face |  Wilson's summit ridge Wilson's summit ridge | 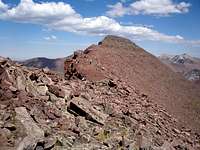 Final piece of summit ridge Final piece of summit ridge |
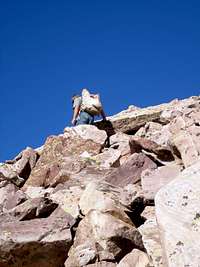
East Wilson
 On to East Wilson
From the summit of Wilson, descend to the SSE along the ridge to the saddle with East Wilson. From the saddle it is a mere 439 feet of ascent to the summit of East Wilson Peak, your last summit of the trip. The cliff bands along the ridge look intimidating, especially when viewed from Stone or the Porcupines and from a distance it wasn't clear if we'd be able to go around them. But, we had no problem, and skirted them to the west, always ascending whenever it became convenient. However, the rock in the vicinity of the cliffs is very loose and you need to be careful. It is .75 miles from Wilson to East Wilson.
 Skirting the cliffs Skirting the cliffs Almost there Almost thereTo descend, it is probably easiest to not go all the way back to the saddle, but to just go straight down the southwest side at a convenient place, ideally one where you can see the bottom so that you know you can avoid the minor cliff bands lower down. The side consists mostly of soft shaley dirt on which it is easy to make fast downwards progress. Towards the bottom, there are some very short cliff bands that you'll need to find chutes through. You need to be careful through the chutes as you will encounter loose rock in addition to the dirt. The SSE ridge of East Wilson looked interesting and doable. If you still have the energy, you could most likely descend that way to Tungsten Pass and then follow the trail back to Center Park. |
Getting back to camp
After descending to the bottom of the basin, the shortest way back is to cross over the Highline Trail and go cross country in a southerly direction until the trail back to Center Park is reached at N40 44.051 W110 27.856. Note that the trail is mismarked on the map and we expected to hit it .25 miles before we did. Head south on the trail until you reach Five Point Lake. Turn off the trail just before the lake and head west until just past this lake and then angle WSW back to your camp. You will have views of all of today's peaks, plus yesterday's Bluebell Lake Peak. Swasey Knob is not very distinctive, so even if you can see it, you won't notice it.
Alternatively, one could go SE on the Highline Trail and then turn right/west onto the trail to Center Park at the junction, but this way is almost a mile longer and has more uphill to it. From high above, we could see that Garfield Basin consists mostly of easy walking, open tundra, so we chose the short cut.
Note that the map shows the trail going to Lake 11244, but it doesn't. The ruins shown on the map are mismarked too. They are actually at N40 43.901 W110 27.879. According to Davis and Veranth in the hiking guide "High Uinta Trails", the small stone structure is the remains of a building called the Salt House that was used by sheepherders to store salt for their sheep.
 Easy sailing in Garfield Basin Easy sailing in Garfield Basin | 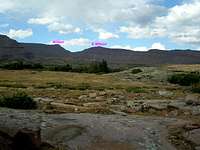 Looking back at Wilson and E Wilson Looking back at Wilson and E Wilson | 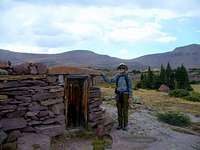 The ruins The ruins |
Day 3
Hiking back to the trailhead
Head .7 miles southeast to join the trail at N40 42.557 W110 28.680, a little less than .1 miles west of where it's shown on the map. Follow the trail 10 miles back to the trailhead. The elevation gain for the day is 1600 feet. Note that the trail in this section deviates quite a bit from what's shown on the USGS 7.5 min map in places. The red line on the map below accurately shows the trail.
Map
Note that the trail portion of the route is indicated by a red line on the map and the offtrail portion is indicated by a blue line.
 Garfield Basin Rim Loop