
|
|
Route |
|---|---|
|
|
38.79940°N / 120.135°W |
|
|
Technical Rock Climb |
|
|
Half a day |
|
|
5.8 |
|
|
Overview
Haystack Crack is an intimidating climb, looking up from the ground, as there is a huge, 4-foot roof guarding progress on the 2nd pitch. I can remember the first time I went up this climb, trying to jockey for the 1st lead so I didn't have to lead that roof. We Roshambo'd for it, and of course I got the lead on pitch 2. It really wasn't that hard, but it gave a good rush when I did pull over the roof and got my feet underneath, and I was eager to plug in some pro.
This route was first climbed in 1965 by Ken Edsburg, TM Herbert, and Jerry Sublette.
 |
Approach
Haystack Crack is on the East Wall, so following the directions from the main page, proceed up the last use trail adjacent to the Hogsback and then to the base of the wall. Contour the base to the right (south-southwest) for a short distance, until you see a 4' roof looming over your head, turn left, go up
Route Description
Pitch One begins with a short section of face climbing on dikes, then the route joins a right-leaning flake system with ample pro, and continues past an old soft-iron fixed pin. Continue past the pin, following the same flake system, to a very large, flat, and comfortable ledge. If so inclined, you can escape here to the left, but the best part of the route is still ahead.
Alternate first pitch recommendation from Eric O:
"The next route to climber's right, "Preparation H", makes a great alternative first pitch for Haystack. This is handy if you're ready to pass a slower party on the first pitch. But even if you have the area all to yourself, Prep H is a nice alternative. I even prefer it over the official first pitch. For most of its length it's not particularly better or worse than Haystack, but the final 20 (?) feet finishes up with a super fun, perfect hand crack diagonalling up and left to meet with Haystack at the first belay ledge."
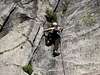
Pitch Two climbs a large, right-facing dihedral for a ways, until you bump your head on the 4-foot roof that makes the route famous. The pro under the roof is excellent, with a crack in the corner of the dihedral that willingly takes pro, and even a crack up under the back of the roof, though if you use this, you need a real long sling to prevent serious rope drag. The roof itself, though intimidating, goes at good solid 5.8. As you layback the edge of the roof, you can peer upward and over the edge to scout out your next placement, but you can't let go at this point, you're nearly horizontal. The best bet is to swing your left leg up over the edge of the dihedral, rock over onto that, and then reach for the solid jam just above the roof. Now is a good time to slot that next piece of pro.
A short way above this is a small stance with another fixed pin.
Pitch Three continues to follow the right-facing dihedral, but the angle lays back, and the jams become secure. Follow the dihedral until it begins to run out, and belay on a small ledge. From here you can escape to the left, or continue upwards on 3rd-class terrain.
From the top of the East Wall, descend eastward into the forest and catch the use trail that skirts around the northeast end of the wall and dumps you out on the Pony Express Trail near where you left it to approach the East Wall.
 |
Essential Gear
Standard trad rack with pro to 2", lots of long slings, comfy edging shoes, and some walk-off footwear.