
|
|
Route |
|---|---|
|
|
38.79940°N / 120.135°W |
|
|
Technical Rock Climb |
|
|
Half a day |
|
|
5.9 |
|
|
Approach
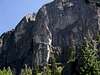
Traveler Buttress is on the Main Wall of Lovers Leap, just to the east of Corrugation Corner. From the parking lot / camping area, take the Old Pony Express Trail from the east end of the campground. After a few minutes, you will see a climbers path on the right heading towards the Lower Buttress. Take this trail to the base of the buttress, and then turn left and follow the base of the rock. The trail climbs around the Lower Buttress on some talus, and then heads up towards the Main Wall.
Just before the wall, the trail splits. Head left to get onto Tombstone Ledge - the route begins just before some jagged pointy spires at the base of the wall. To bypass the first pitch, and for other climbs such as Corrugation Corner, turn right and hike uphill until able to traverse back left on the Main Ledge.
Optional climbing linkup: Eliminate some of the approach by climbing a route on Lower Buttress rather than hiking around it. Surrealistic Pillar (5.7) and The Groove (5.8) are both popular routes that can be linked with Travelers Buttress or Corrugation Corner for a 6-8 pitch day.
 |
Route Description
Traveler Buttress is one of the best climbs at Lovers Leap, being recognized as a "50 Classic Climb" by Roper and Steck (who also happened to be involved in the first ascents of this route). The route is classic for many of the same reasons as its popular neighbor, Corrugation Corner - dramatic exposure on aretes and faces, steep moderate crack climbing, and enjoyable but slightly runout dike hiking high on the upper wall. Adding some spice is the crux - a 20 foot 5.9 offwidth as well as a tricky 5.8 move on the first pitch. This route has a bit of everything for the climber, and every pitch is high quality.
Pitch 1 - 5.8: Start from Tombstone Ledge below some large flakes and cracks. A short bouldering move puts you on the first flake - follow this crack up until able to traverse several feet right to another crack. Follow cracks and flakes upwards to a small ledge. This lower section is steep 5.7 and is very enjoyable and easy to protect with medium cams and stoppers. The upper section involves a short, flaring 5.8 crack before scrambling above it onto the Main Ledge.
Note - it is possible to bypass the first pitch (for some, it has a nasty reputation) by following the trail onto the Main Ledge. I don't recommend doing this - the first pitch was fantastic and not very difficult (except for the 5.8 move which can be aided if necessary with a 3" cam).
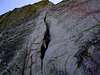
Pitch 2 - 5.9: There is no doubt where this pitch goes. Climb the 5.9 offwidth, right side in, using small edges inside the crack as handholds. There is a finger crack to the left of the offwidth which can be used for pro - climbing that crack itself is a 5.10b,R outing. Once above the offwidth, both cracks can be climbed and used for pro. The upper part of this pitch is a stellar hand crack, leading to a short traverse under an overhang and the belay ledge. There are two bolts and a piton at this ledge, as well as numerous cracks for placing anchor pro.
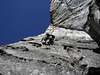
Pitch 3 - 5.8: This is the exposure pitch. From the belay, climb up the knobby face below a large roof until able to gain the arete on the left. There is a piton on the upper section, just to the right of the arete, as well as a piton underneath the roof. Thin pro is useful at this upper section of the arete. Look down and to the left to appreciate the dramatic exposure before making the move around the arete and onto the face on the left. Traverse left 15 feet and mantle over a block (or traverse lower and climb the crack) to the belay. There are two pitons here which can be backed up with small cams for this slightly-hanging belay (small ledge to stand on). Alternately, this short pitch can be extended, but it may be difficult to find good pro placements for anchors.
Pitch 4 - 5.5: This is the easy pitch. Climb straight up, stepping from dike to dike. The climbing is easy but runout, although there are cracks and knobs that can be slung. Getting to the summit from here is more than 60m - it can be broken into two pitches or simulclimbed. There is also an opportunity to walk off just below the summit.
Descent: From the summit, follow a faint trail to get on the main ridge, or hike upwards to the highest point on the peak. There is an obvious hiking trail that descends to the east, finally putting you back on the Old Pony Express trail.
 |  |  |  |  |
Essential Gear
1-2 sets of cams and nuts. Large cams (4", 5") very useful for the crux offwidth section! The first two pitches of this climb really suck up gear, especially nuts and medium cams. Either 50m or 60m ropes should work fine.
Miscellaneous Info
If you have information about this route that doesn't pertain to any of the other sections, please add it here.