
|
|
Route |
|---|---|
|
|
38.79940°N / 120.135°W |
|
|
Technical rock climb |
|
|
Less than two hours |
|
|
5.6 |
|
|
Approach
This climb is one of the best rock climbs on the Hogsback, rivaling the better short routes on the true Lovers Leap formation in quality. It consists of interesting route finding on steep, exposed ground, with exceptional granite. You’ll have an expansive view of the American River canyon the whole way up, & hear the American River far below, before its noise is eventually drowned out by the hordes of obnoxious unmuffled Harleys that frequent this stretch of road en route to Lake Tahoe (at least on a busy summer weekend). Its name likely comes from its deceptive length. Looking up at it, it only looks like a pitch or so in length, but in reality is slightly over 2 (60-m rope) pitches in length.
To get to the base of Deception, The N face of The Hogsback must be accessed.
For reference, check out this topographic map with access route superimposed put up by David Kiene.
To get here, take the Pony Express (Lovers Leap access from the parking lot) trail, heading towards the E wall. Keeping your eyes on the L-hand side of the trail, you’ll eventually see a trail that runs into the main one approximately perpendicularly. This will take you to the obvious saddle between the Hogsback & the smaller dome directly to the east of it. This is also where you should aim when descending the Hogsback to get back to the main trail. From here the remainder of the approach involves master routefinding, scrambling, & some bushwhacking. What you’ll want to do is eventually get to the base of the wall, where the climb begins.
Circumnavigate the thick brush that blocks access to the N face of the Hogsback, shortly after crossing the saddle, by whatever means you can. For us, this involved a short 3rd/4th-class friction downclimbing section, then scrambling up some talus slopes through brush to eventually gain a climber’s trail that hugs the base of the formation. I’m guessing there are other ways to do this as well.
Once gaining the base of the cliff, go past the obvious Knapsack Crack (with large ledge/tree landmark approximately 150’ up from the base). From here, walk for a short distance, then take some short steep talus to a bush/tree that marks the base of the route.
 |
Route Description
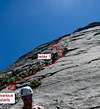
Pitch 1: The route starts by ascending the easy, shallow, R-facing dihedral up (one can also take the unprotected face immediately to the R of it, having to cut over at some point to regain the dihedral). This is lower 5th class, & cracks between the layers of granite forming the dihedral make for easy gear placements. The first pitch ends where a small roof can be seen intersecting the crack/dihedral to the right. On the other (L-hand) side of the crack from the roof is a comfortable ledge that makes a good belay station.
Pitch 2: From here you’ll aim for an obvious crack system up and left ways from where you are, that must be gained. Either continue on the ledge & work your way up (I’m guessing this will work- this is not the way we went) or take the thin cracks that go up directly above the ledge (5.6), working your way over (L) after getting to the top of them (this is quite enjoyable). There are some bomber placements in this initial thin crack system for small cams or nuts (longer runners would be advised to avoid rope drag further up). Work your way onto the buttress/dihedral to your left. Once gained, this is the psychological crux of the route, as the pro’ placements are run out. Work your way up, using face climbing and the fairly abundant dikes for upward progress (5.5/6). Make sure you and your belayer are communicating the amount of rope you have left. If you are using a 60-m rope, you will approach the end of the climb (~20 ft or so to go), at which point you’ll suddenly run out of rope. There are a few small, uncomfortable ledges that can be used for a less than ideal belay at this point.
Pitch 2.1: By now the difficulties have subsided, & the top is a (frustratingly) short distance away. One can take a variety of options to gain the top of the climb (the easiest seems to be traversing a short distance to the left of the arête, then taking some easy face climbing to the top).
Enjoy the stellar view of Lovers Leap, then descend by taking the path of least resistance to the saddle below.
 |  |  |  |
Essential Gear
* 60 meter rope (or longer, if possible!)
* Cam's: Camalot sizes .1 (micro) through 2 (or equivalent); bring doubles through size .75
* 1 set of nuts
* runners: 3-4 singles, 2-3 doubles should suffice
* 10-12 quickdraws
* cordelettes for anchors
* extra 'biners
Miscellaneous Info
If you have information about this route that doesn't pertain to any of the other sections, please add it here.
 |