
-
 9241 Hits
-
 71.06% Score
-
 1 Votes
|
|
Route |
|---|---|
|
|
40.61940°N / 111.7874°W |
|
|
Sport,Trad - Single/Multipitch |
|
|
Less than two hours |
|
|
5.4-5.12d |
|
|
Approach
Drive 2.85 miles up from the neon sign. You can either park on one of the pullouts on the right side of the road, or park in the Storm Mountain picnic ground ($4.00) on the left side of the road. The entrance says that it costs $2 to use the area for any reason, but I'm not sure if this applies to climbers rather than just picnickers. The host has never said anything as I've walked by, and I've never seen climbers paying fees.
East Face: Cross the bridge and follow the pathways left. Continue off the paths following some climbers trails to the base of the cliffs. From here, the routes can be accessed by just traveling along the cliffs.
North Face Left:Same as East Face approach, but head slightly right before leaving the asphalt.
North Face Right:Follow the asphalt pathways to the right until you see an open amphitheater. The climbs are located on the cliffs above the seating.
 |  |  |
Route Description
These are popular climbing areas due to their shady bottoms and proximity to the Storm Mountain picnic ground. The Wasatch Mountain Club often climbs here on Thursdays, and in the past these climbs were accompanied by the club's infamous beer and burger social. For $1 climbers could help themselves. Alas, this is no more. The island has some good sport routes offering face climbs, and a collection of moderate crack climbs.
Another nice thing about climbing here is that if a route is taken, one only needs to walk a couple of minutes to look for free routes on the cliffs across the field to the north, such as Static Wall & Reservoir Alcove.
Another thing to consider is the noise from the river below - it can be nearly impossible to communicate with your partner on a climb. 2-way radios would be reccommended to avoid this problem.
| |||||||||||||||||||||||||||||||||||||||||||||||||||||||||||||||||||||||||||||||||||||||||||||||||||||||||||||||||||

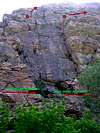
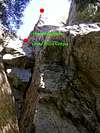
Layback Crack - 5.5
A fun 2.5 pitch climb. To reach it, go left on the pathways beyond the bridge. They end at a picnic table beside the creek. Climb up on some ledges and traverse over to a spot at the base of a dihedral large enough to belay from. The climb starts here. The crack going up the left face of the dihedral is the 5.9 Le Creme De Shorts, which can be top-roped after climbing the first pitch of Layback Crack. If you climb around to the left of the dihedral, this is the high water route for reaching two other good 5.5 climbs - 'Nice Little Crack' and 'Storm Mountain Stupor'.
Note: This climb is right above the Big Cottonwood Canyon Stream. As such, the noise of the rapids drowns out any communication between climber and belayer. 2-way radios would be recommended for communicating on this climb.
Pitch #1: Climb straight up the dihedral. The crack takes gear well, and the rock forces you to layback on the crack while smearing on the wall. At the top of the dihedral, work your way left. At the top one needs to do a few mantle moves to reach the belay ledge, which has bolted chains.
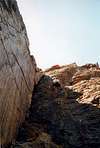
Pitch #2: This pitch is easy, but rope drag and runouts are a bit of an issue. While I'm not sure if this is the proper way, I climbed this pitch by leaving the crack, winding my way to the left of some horns, and then traversing back to the crack beneath a roof, straightening out the rope here. The roof is the first place that takes good pro (some 25 ft above the belay station, via class 3 scrambling). Surmount the rood (5.4), and climb around a large flake, reaching another nice belay ledge with bolted chains on the left.
Pitch #2.5:This pitch is straightforward and only about 20 ft. Just climb up and to the right through a gap (cl. 3-4). Once at the top, you can clamber over some large boulders by some scrub oaks and do a braced body belay between the rocks.
Descent: Walk off to the north west. Follow a climbers trail around the cliffs, looping back to the east, reaching the ampitheater.

Six Appeal - 5.6
One of the most popular routes on the island - a straightforward sport route with loads of edging, crimping, and smearing. Best of all, you're climbing right beside beautiful Goodro's Wall!
To get to this route, follow the pathways beyond the bridge a little to the left, but soon cut cross country on climbers trails to reach the rock wall. Follow the wall around until you can see Goodro's Wall (it really stands out). Climb up the short chimney beneath it to reach a large belay ledge and start climbing!
Epic Wall - 5.5
This multipitch climb ascends the mossy slabs to the right of Six Appeal. The climb is rather easy, broken, and mossy, but still an allright climb for practicing lead trad.
Pitch #1: Climb up the slab, heading toward the outside corner on the right. This bypasses the moss and has the most opportunities for pro. Placements are a little hard to find, but the climbing is easy, with a face climbing crux beneath a roof. My experience on the route differed slightly from the topo. Instead of climbing to the right of the roof, clip a piton in the roof and traverse around to the left. This brings you to a nice tree with some slings. You can belay from here, or sling it (taking care to flip your rope over the roof!) and keep going.
Pitch #2: From here the terrain is much more broken, and the climbing is much easier. The route is straightforward, just head straight up and around a large block/spire on the left to the top!
Six Pence - 5.6
A well protected climb with easy climbing with plenty of edging and smears. There's one small crux about 3/4 of the way up, but apart from that, its mostly 5.5. The one downside of this route is the anchor - its not in a very friendly location.
To reach the route, follow the pathways beyond the bridge a little to the right, but soon cut cross country on climbers trails to reach the rock wall. Follow the trail around until you find a large chimney/chute. The climb ascends the slanted rocky face to the left of this chimney.
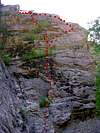
The Flake - 5.5
At the amphitheater, head towards a pine tree on the left side, behind the seats. This climb ascends the chimney behind this tree.
The first pitch is fun, although a littel anti-climatic as you really don't have to climb over an imposing roof via a crack. The belay ledges above are filled with scree, which is well position to pelt your belayer with rocks as your rope knocks bits off. The final pitch makes this route, with steep and exposed climbing up a crack an on an arete. Pro is more difficult to place on the upper pitch, and the conclusion of the pitch is an exposed mantle if you refrain from clipping the anchor bolts of Padded Cell.
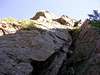
Pitch #1: Climb up a crack (5.5), and then zig back to broken rock on your right, and zag forward to bypass the roof to reach the belay ledges. The higher ledge seems a bit nicer, and you're better positioned for the next pitch. If you traverse out from here, you will reach the start of Padded Cell (5.12a or 5.12c)
Pitch #2: Ascend up and right into a narrow chimney/crack (5.5), where you must either use moves on the face or jambs in the crack. The rock is clean and smooth, and a little difficult to protect. This pitch takes you out from the 'protection' of the rock walls, allowing you to feel the full exposure of the upper pitch. Near the top is a large, flat ledge (its hard to miss). If you walk out on this block, you can clip the Padded Cell anchors, and then double-back to the arete for the final mantle move (5.5).
Descent: Scramble south and then circle back around (west-north-east) to the amphitheater via a climbers trail.
 |
Essential Gear
For sport routes, some slings and 6 or 7 quickdraws is plenty. For the multipitch, a full rack of pro can be useful, as a variety of sizes and techniques are needed.
Other Info
If you have additional info for routes described or have done a route not described in depth, please put the info here and I'll integrate it into the page!