
-
 7789 Hits
-
 81.18% Score
-
 13 Votes
|
|
Route |
|---|---|
|
|
36.08020°N / 115.48578°W |
|
|
Trad Climbing |
|
|
Spring, Fall, Winter |
|
|
Most of a day |
|
|
5.8 (YDS) |
|
|
10 |
|
|
III |
|
|
Overview/Approach
 3rd Pitch- 80’- 5.8
Another trad special at Red Rocks, Hot Flash is a fairly new route in First Creek Canyon put in by Larry DeAngelo along with the Uriostes and Bill Hotz in 2006. It was Crazy Larry’s positive remarks about Hot Flash at Mountain Project that caught my attention. After climbing it however, I was not that impressed with the line. I did need a long mellow day with a new partner and Hot Flash did fit the bill for that, offering little in the way of crux climbing by Red Rocks 5.8 standards. Most all the belays were quite comfortable and the route easy to navigate.
 5th Pitch- 100’- 5.7
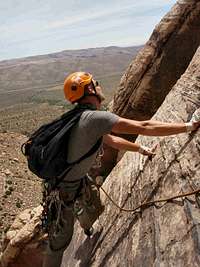
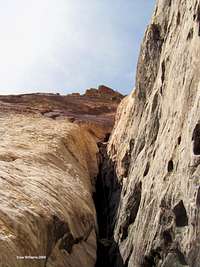
Hot Flash is fairly easy to locate by following the long diagonal ramp in the north facing wall of Indecision Peak from Lotta Balls Wall to its apex further in, below the peaks summit. Hot Flash basically takes you to the top of this ramp from the right side. Continue past Lotta Balls Wall on your left as well as First Creek Slabs. Stay in the wash until you sort of round a buttress that makes up the right side of First Creek Slabs, only 10-15 minutes from Lotta Balls Wall. Then ascend the bushy and talus slope on the left up to the base of some water worn slabs. You end up scrambling back left over some decent rock to reach the base of a right facing corner/flake which makes up the first pitch. You actually start to the right of the flake (photo).
A few bolts have been added at the belays by overzealous bolt kit owners, but we actually never used any of them and the few fixed stations are not needed. The descent has been described by others on the net as a bad experience, but in reality there is not much to it. It is mostly comprised of a walk off down the ramp and then a few quick raps back to the east side of First Creek Slabs. The most aesthetic climbing on Hot Flash is the continuous varnished crack of pitches 5-6.
Route Description
1280’+/-, 10 Pitches, 5.8
1st Pitch- 100’- 5.8/ An easy pitch for the grade in my opinion. Not that easy to protect, but the climbing was fast and furious anyway. Move right of the corner and start up a small flake and then work in cracks as you follow the corner back left, placing a large piece or two in the corner itself. The belay is located on top of the large flake (corner) with a small tree or two. Rappel tat is on a tree (2008) but it is a better position to set your belay up on a different tree with a long sling.
2nd Pitch- 140’- 5.8/ This pitch is more to grade than the first. Move right and up on the slab above without pro until you can reach a crack. Follow the nice crack for 20’, then traverse right (again) 10’ or so below a small roof using under cling holds to reach another crack. Follow this crack as it steepens through an overhang and belay below a larger roof on a small ledge where you can build a belay.
3rd Pitch- 80’- 5.8/ A fun pitch. Traverse left and low on the slab where there are more features for your feet (versus high) and climb diagonally up left until you can gain the crack to the left. Follow this feature into the corner of the roof which protects well as you take the roof to the right and mantle up onto low angled ground. Practically walk back right into a large chimney and set up belay here with large gear.
4th Pitch- 180’- 5.6R/ This can be a hard pitch to follow per the beta we had. Not that hard to explain in my opinion though. Climb the easy chimney until it bends right. Take off left below a bulge on face climbing. Continue to traverse left as you climb diagonally up left on suspect rock with few if any placements. Eventually you find a decent crack. Follow the crack up to a comfortable belay ledge below the nice varnished wall above.
5th Pitch- 100’- 5.7/ Pitches 5 and 6 are comprised of the best rock on the route. Traverse right into a beautiful varnished splitter crack reminiscent of the last pitch of Birdland. The wall above gives the appearance that you can do it in one push. But the original route designers thought it best split up by stopping in less than 100’, and traversing right about 15’ on obvious easy ground into a large crack, thus comfortable belay. There was a fixed station here in 2008 that was not done properly and thus we did not use it nor need it.
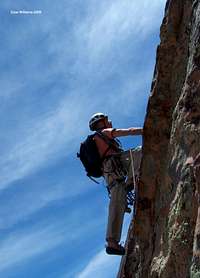
6th - 7th Pitch- 230’- 5.8/ By far the best pitch of climbing on Hot Flash. Handren has a photo of it in his guide book, “Red Rocks, A Climbers Guide” and as before mentioned it reminds me of the last section of the last pitch of Birdland. Move back left from which you came and re enter the crack. Climb up placing mostly wires until just under the roof above. Follow the line of least resistance to the left and into cracks that lead easily through the overhang. With a 70m rope, you can stretch this pitch out to a large bushy ledge avoiding a separate belay for the 7th pitch of 4th class scrambling. Set up belay on a tree.
8th Pitch- 180’- 5.5R/ Stay out of the corner above as it is quite mossy. Face climb to the right of the corner on your way to some trees above, almost completely solo unless you want to move further right over the arête where there appears, from above, to be some protection to place. Set up belay on a tree.
9th Pitch- 100’- 5.5/ Continue up easy ground to the base of the loose corner above.
10th Pitch- 100’- 5.7/ Head up the corner on not such good rock, but easy climbing. This last pitch lands you on a large flat spot just west of the tower summit.
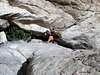
Climbing Sequence II
 |
 |
 |
 |
Climbing Sequence
 |
 |
 |
 |
Descent

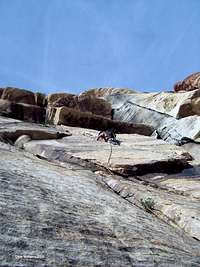
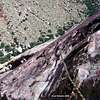
Move east towards the saddle which serves as the top of the long before mentioned ramp. Hike down through some brush looking out for cairns that spot a left turn and exit off the ramp. If anything, go beyond the cairns just a bit before starting to down climb to avoid steeper ground. As you start to enter the water worn rock area, there is a rappel ring slung on a block down the center of the wall (2008). Take this single rope rappel and continue down climbing which includes some steep sections. It is less steep to skiers left. Eventually you come to a pine tree that you can make two single rope raps from (with an intermittent tree skiers right) or one double rope rap to the ground (photo).
Essential Gear
I recommend a single 70m, but you can do the route with a single 60. Double 60m ropes will save you one rap. Single Rack to 4”. Full set of wires. Several double length runners and at least 10 shoulder length runners and/or draws. This route is fairly well shaded being on a north face. You cannot easily return to the base, so I advise carrying small packs in. There are no chimneys to deal with on this route.External Links
Over 300 routes detailed from first hand successful accounts by me or others at Red Rock Canyon. GET OFF THE TOURIST ROUTES and explore!Red Rock Canyon National Conservation Area, BLM
Red Rock Canyon Interpretive Association
Best True Technical Clothing and Accessories in the Outdoor Industry, Hands Down....the Legit Climbers Gear at Real Prices
Scarpa has surpassed La Sportiva in terms of quality, function, value and actually stand by their warranties
Osprey Backpacks, Not a Second Choice
Great Outdoors Depot