
-
 3411 Hits
-
 75.81% Score
-
 6 Votes
|
|
Route |
|---|---|
|
|
37.21187°N / 112.94752°W |
|
|
Trad Climbing |
|
|
Spring, Summer, Fall |
|
|
Most of a day |
|
|
5.11 (YDS) |
|
|
6 |
|
|
Overview/Approach

Feast of Snakes first caught my attention when I climbed a neighboring route, Gypsy’s Curse, several times in 2010. I was told most folks only climb the first one or two pitches of Feast of Snakes due to the burly nature of the 5.11 off width on the third pitch as well as the dirty and loose aspect of the remainder of the route. Whilst it is true that the 5.11 off width section is full on, it is short lived covering just a few meters. The fourth pitch was quite a good corner/varying crack pitch making the route worthy to climb in its entirety. As to how dirty the route can be, we climbed it in a practical wind storm and sand blew up from below during the entire climb making it difficult to say how pleasant or unpleasant the route might be on a calm day. There is a ton of sand covered moss on most of the face features as the entire route is infrequently traveled and well shaded. However, the climbing line, as is typical for Tunnel wall, follows intermittent crack systems relying little on any facial features.

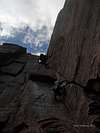
 3rd Pitch- 15m- 5.11
Bryan Bird and Eric Draper established Feast of Snakes. Most of the routes on this section of Tunnel wall include at least one “Indian Creek” like quality 5.10-5.11 pitch. For Feast of Snakes, that would be its first pitch. The first pitch starts off and stays mostly fingers and is quite sustained at the grade (5.10+) with a few hand jam opportunities including using a crack out right when possible. The second pitch is quite fantastical in that it burrows up and under a huge chock stone. It is quite dirty, but fun terrain just the same. The third pitch is by far the crux of the route. You start out traversing left under a huge roof and under cling and lay back your way into a precarious stacked hand pull and knee jam. A C4 #4 or #5 protects these crux moves at the pinch of the roof. A short distance later you move left to a fixed belay. The fourth pitch is actually quite good. It starts out mostly hands with the crux portion showing up during the second half where a 4” crack runs for about 30’ before you reach the fixed belay on a decent ledge. We combined the final two pitches to the top of the wall, a full 50m, mostly following chimney like ground at an easier grade than the previous pitches to a fixed belay on the right wall just below the top.
Take the Zion Park road up towards the tunnel. Park on the right side at a shaded pullout on the 2nd to last switchback (vehicle facing east). Walk east up to the switchback retaining wall and pick up a trail on the south end of that wall. Follow the trail across a wash and stay with it as it circumvents east around the tunnel wall above about 50yds below it. Stay with the beaten path until you turn a huge buttress on tunnel wall (Another Road Side Attraction). Then catch some spin off trails that angle up and left to a shaded alcove where there are some fantastic obvious wide routes in dark rock (Picking on the Fat Kid and Cornback Rattler). Feast of Snakes starts in the thin corner to the right of these two routes and just left of Gypsy’s Curse.
Route Description (s)
500’+, 6 Pitches, 5.111st Pitch- 30m- 5.10+/ Start off in the finger crack/corner below the large chock stone above, Feast of Snakes being the right most of three routes in an alcove left of Gypsy’s Curse. After several meters you can get a nice hand jam or two in the crack on the right wall. After that brief respite the pitch gets fairly sustained as you finger jam and stem your way up a full 100’ to a fixed belay and ledge on the left.
2nd Pitch- 20m- 5.8/ Continue up the loose and dirty chimney to below the chock stone, burrow underneath against the main wall and mantel up to a comfortable platform. A #1 C4 protects in the floor for a belay. It is best to stop here versus continue to a better crack to build a belay (up and right) to give the leader a better starting angle for the off width above.
3rd Pitch- 15m- 5.11/ Climb up easy ground right and make a face traverse left into the corner below the roof. Under cling the roof while transitioning into hard lay back moves to swing your left knee into the crack and gain a hand stack above the roof. A C4 #4 or #5 protects this move at the pinch of the roof. Make several other hard moves as the crack narrows and eventually move left to a comfortable ledge and fixed belay. You can actually rap a full 200’ from here to reach the ground on descent.
4th Pitch- 40m- 5.9/ This pitch offers several sections of good corner/crack climbing separated by easier ground. You can place plenty of gear, including several #4’s at a sustained section through the second half of the pitch as well as a C4 #6 in a small upper off width section near the belay. The fixed belay is at a decent ledge up and right.
5th-6th Pitches- 55m- 5.9/ We combined these last two pitches and it makes sense to do so for a full 50m. Climb up the large crack/small chimney above past a slung chock stone (2011). Either continue up into the chimney on the right or stay left in the cracks and grooves. The belay is below the top of the wall on the right.
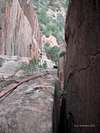
Climbing Sequence
 |
 |
 |
 |
Descent
Take a full double rope rap back to the top of pitch four. When pulling our ropes, we got one well stuck in that slung chock stone. My suspicions as to why it was slung in the first place. We kept a leader on belay whilst retrieving the rope and then rapping the chock stone back to the fixed belay. The second rap is back to the top of the third pitch. Then one final full 200’ clean rap straight down the blank wall reaches the ground.Essential Gear
Double 60m ropes. Bryan’s guidebook calls for double .3-6”. We never placed more than one #5 or #6 C4. A set of offset nuts is always handy on Tunnel Wall. A combination of draws and slings. Definitely wear helmets at Tunnel Wall. In June, we wore long sleeve wind type shirts to protect against the off width and were quite comfortable despite it being a typical warm June day. Like all Tunnel Wall routes, be prepared for it to be cooler than you might think. These are true north facing routes. The rap/belay anchors were in decent shape in 2011.External Links
- The Many Free Routes in Zion National Park
- Oscar’s Café, the only place for climbers to truly fill their appetite (free range chicken, beef and Hank’s Tanker) and meet one of the finer climbers and individuals I know on the face of the earth, Zach Lee, someone who has established many of his own local FA’s in the area.
- Zion National Park
trail conditions or closures, wildlife notices/closures, weather conditions, camping permits, canyon water levels, etc.
- Best True Technical Clothing and Accessories in the Outdoor Industry, Hands Down....the Legit Climbers Gear at Real Prices
- Scarpa, has surpassed La Sportiva in terms of quality, function, value and actually stand by their warranties
- Osprey Backpacks, Not a Second Choice
- Great Outdoors Depot