
-
 17356 Hits
-
 91.45% Score
-
 35 Votes
|
|
Route |
|---|---|
|
|
36.09360°N / 115.4836°W |
|
|
Trad Climbing |
|
|
Spring, Summer, Fall |
|
|
A long day |
|
|
5.11d (YDS) |
|
|
24 |
|
|
V |
|
|
Overview/Approach
 10th Pitch- 75’- 5.11d or 5.9+, C1
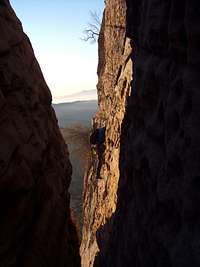
Resolution Arête was put in by Phil Broscovak and Geoff Conley in 1981 and went free by Paul Van Betten and Richard Harrison in 1984. If you are looking for a long alpine style adventure at Red Rocks, this is no doubt one of your, if not your best, choices. Mount Wilson is the highest peak at Red Rocks and via its outstanding wall features on its northeastern flank, offers up the most significant climbing lines in the park. Aeolian Wall makes up the northeast corner of the mountain and is a 2000’+ steep walled feature bordered on its left by a turreted ridgeline which is in fact Resolution Arête. Reading Phil Broscovak’s explanation of the naming of “Resolution” is quite the story (below), the kind that climbing rags need to publish more of, a situation we can all learn from and many of us have been in at one time or another.


Grades are all over the place for Resolution Arête due to its crux pitch which can be freed or aided. Handren, who’s “Red Rocks, A Climbers Guide” is the current best selling guide book for Red Rocks, has Resolution Arête at “2500’, 5.11d or 5.10d, C1, 24 Pitches”. Rockclimbing.com has it at 5.12a or 5.11a, C1. Reality is that the crux pitch is made up of sandstone, go figure, and thus who knows how the crux roof moves compared from the 80’s to now. In regards to the 24 pitches, we accomplished the route in approximately 14 pitches with a 70m rope before we simul-climbed another couple rope lengths and then removed the rope altogether. Modern climbing technique, conditioning, knowhow and experience can make this climb a day trip versus the original V rating. That said, the route still does not get climbed that often. There is no fixed gear for belays, rappels or otherwise. The route is committing, with only two exit strategies available via other routes on Mount Wilson. The rock is quite dirty, loose and precarious as any less traveled route can be at Red Rocks. There are plenty of bivy opportunities, but no water en-route. Even in spring, the route can be somewhat chilly when it loses the eastern sun.
The approach is actually entertaining, particularly in comparison to Lady Wilson’s Cleavage. Some true 4th class scrambling makes it interesting and the actual start of the route offers a spectacular setting up on a high shoulder ledge. The first pitch is full on 5.9 and lets you know immediately how much you will be hating your pack from that point forward. The 5th pitch offers perhaps the most serious route finding of the day on run out terrain but at a reasonable grade, 5.8. The 8th pitch, offers an enjoyable 5.10 roof pull. The 9th pitch is an enjoyable 5.9 pitch that has relatively new (2009) belay gear jammed and left behind for a solid belay below the crux roof. The crux pitch, 10th (5.11d or 5.9+, C1), is nothing in comparison to the 11th pitch , 5.10d, which offers difficult protection for its crux move. The 14th pitch is the most aesthetic of the day, a pumpy and exposed 5.9+ hand traverse. From there, the climbing is rather non-descript with a few more decent pitches left. The route eventually drops you just 50’ below the true summit of Mount Wilson!
Park at the old Oak Creek camp ground trailhead off of Hwy 159. Follow the Oak Creek road bed all the way to the col between the Wilson Pimple and Mount Wilson. Descend slightly and look for a trail off to your left that runs through the old camp spot. The trail continues through the camp and meanders its way up the hill side towards Mount Wilson. There are plenty of cairns, but they could be difficult to follow in the dark. As you break through a short rock band on the right side of a gully, turn left and follow the trail for a short distance looking to gain an angled trail that circumvents the tall red pillar to its left. Continue circumventing left at the base of the cliff above, passing up the first gully and taking the next one, right before a main drainage. Scramble up the gully a short distance to its end. Turn left and start the 4th class ascent of this cliff. Be careful of the large boulders you are jugging on here as they are based in sand. Eventually you crawl through a small cave to the other end and climb up and above a huge chock stone. Continue to the short ridge above, turn right and descend into a much larger treed and bushy gully that leads upward.
Follow this broad gully up hill. There were plentiful cairns in 2009. Stay left when in question as you scramble and bushwhack your way up to a large pine tree and gully coming in from the left. Turn left and follow a ledge to the left of the gully. This ledge terminates at the start of Resolution Arête, a chimney that drops down. The approach takes 2 hrs+/-.
Route Description


1st Pitch- 200’- 5.9+/ Drop into the chimney slightly as you traverse left on good rock, but run out, to access the crack out onto the wall. This crack protects well with medium to large gear. At about 35m you will pass an old sheared off bolt, the only evidence of fixed pro on the entire route. You can continue up the crack through a small bulge to the end of your rope below a corner. (photo)
2nd Pitch- 100’- 5.8/ Climb up the corner and turn right to continue up the dihedral on easier ground to big ledge on top of the first pillar of the route.
3rd-4th Pitches- 230’- 5.9+/ A 70m rope allows you to combine these two pitches. Some commonly used beta out there specifies that you can combine these two with a 60m rope, but that information is clearly wrong unless you are going to simul-climb and the leader and follower would be at hard moves for the respective grades while doing so. Face climb off of the ledge a few feet before getting back to the dihedral and placing gear. Make some hard 5.9 moves to easier ground above which leads into a chimney. Stem the chimney using face moves at about 5.8 until you reach another large ledge above. (photo)
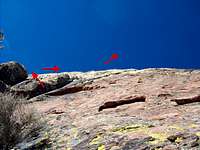
5th Pitch- 200’- 5.8R/ This is the most difficult pitch (with beta all over the place) in terms of route finding and just so happens to be the most run out of the day as well. For me, it can be said much simpler than what I have read to date. FOLLOW the white corner/flake above, moving to the better corner/crack to the left. Then follow it up until it terminates onto a sloping ledge. Traverse hard right following varnished foot edges, until you can start climbing up at a rightward angle on decent varnish with some decent pro in intermittent cracks. Constantly angle up and right aiming for a shoulder you cannot see. Once at the shoulder which is a full 200’ at this point, you won’t have much if any gear placement. Since I had a 70m rope, I continued up to a boulder I could sling. Rope drag will be huge on this pitch. Either run one rope only until you make the traverse back right, of if on a single, use double length slings on that corner you followed to the sloping ledge. I would be wary of some beta that suggests climbing the face above on white run out mossy sandstone. Makes no sense when the corner can at least protect you to the sloping ledge. (photo)
6th Pitch- 30’- 5th/ A junk pitch used to move the belay. You don’t gain any elevation here. Climb up and right to a tree, then down climb an easy crack to the notch over to your right. Avoid going all the way up the large notch above. You will be circumventing a long ledge system to the right of your belay.
7th Pitch- 300’- 4th/ We un roped and scrambled over to an obvious notch in the horizon, to the south. The last few meters involved some easy 5th. Once up and over the notch, scramble down to the left and set up belay right before a slung (2009) large bush under the next pitch, a crack in the left wall that leads to a small-medium roof. (photo)
8th Pitch- 160’- 5.10a/ Climb the crack, easy for the grade until you reach the roof. Make a fun move to turn the roof and belay on a small, but decent ledge up above. Handren’s notes would have you avoiding this roof, but this is some of the best climbing en route. (photo)
9th Pitch- 100’- 5.9/ This pitch has some ledges, but protects well. Move up and right, but avoid getting sucked too far right. You can see the roof crux of the entire route straight above. Follow the dihedral system back left and straight up to just below the roof. Good nut and cam placements along the way. There were recently jammed cams in both left and right bomber cracks. Both about the same age. How you stick two cams in two different cracks on the same belay is a mystery. Somebody was not to thrilled when their partner showed up above without two number 1’s! Set up a semi hanging belay if you want to use these bomber cracks. There is a better stance a meter or two down, but a subpar vertical crack to establish a station in. (photo)
10th Pitch- 75’- 5.11d or 5.9+, C1/ Climb up and place a 4” and then either aid or free the roof crack as you move right, starting out with a 1” and .5” and placing a .75” at the corner before you actually turn the roof by swinging out onto a face and up the crack above. We combined the 10th and 11th pitches, but I do not suggest you do this as the rope can get entangled with any cam placed at the end of the roof. I think we got lucky in this regard. Follow the crack to a belay stance. (photo)
11th Pitch- 70’- 5.10d/ This is a harder pitch than the supposed crux below in my opinion as it is much harder to protect. Continue up the quite difficult crack to easier ground out left, then climb the remaining easy face to a large ledge above Sherwood Forest. There is a bolt on top of this ledge, I have no idea why. You can rap from here into Sherwood Forest and escape the route by rapping Dogma if you can find its top rap station (5 raps with a 70m rope), but I am not sure that is what this bolt was intended for and did not look for an actual rap anchor. There was no rap tat on this bolt.
12th-13th Pitches- 300’- 5.8/ We simul-climbed these pitches. Move up and right and climb the easy ground to reach a sloping ledge directly above the belay ledge that creates a corner with good pro. Awkwardly climb this angled corner and as it turns right, begin face climbing out left following a broad arête up and down to a notch which is a good place to set up a belay for the next pitch. (photo)
14th Pitch- 100’- 5.9+/ Follow the hand crack out left on the big wall into the base of a chimney. This pitch is spectacularly exposed and pumpy. Despite being a fairly aggressive traverse, you can protect it fairly well with medium to large gear and the rock quality being what it is, you probably should. (photo)
15th Pitch- 160’- 5.7/ Move up the chimney about 30’ and exit left. Follow easy ground up and right through some bushes and up another short chimney to belay on a large ledge. This is your 2nd exit option, but requires quite a few double rope rappels down Inti Watana. The climbing from this point forward is quite tame.
16th Pitch- 150’- 5.9/ The beta on the next two pitches is conflicting. Handren talks of a completely different approach to this part of the route than what we and others have used which I thought was fairly straight forward. Climb up the easy left slanting crack/chimney in front of you to its end and then swing out on face moves left to reach another small ledge. The next move is a dramatic 5.9 heel hook (decking opportunity), but is the only 5.9 move on the pitch. Hook your right heel and jug on up the left face. Continue up and over onto another significant ledge and belay close to the next wall. (photo)
17th Pitch- 80’- 5.8/ Traverse along a narrow ledge left while avoiding placing gear until below the 2nd (wider) of two cracks. Climb a bit before you place a 3” to avoid bad rope drag. Continue up the off width crack with plenty of facial features to assist until you pass through a tree and onto a large ledge system. A 4” protects higher on this pitch. Traverse right over to a tree and belay off of it.
18th Pitch- 120’/ Walk left on an exposed, but flat, ledge to the base of a gully. (photo)
19th Pitch- 120’- 5.8/ Climb up the left (right facing) slightly off width corner crack. It is easy at first and easier at the end, but in the middle it is a little tougher than it looks. The top third is somewhat run out (5” or more). You come to the base of chimney with a crack running out left through a roof. Belay in the base of the chimney.
20th Pitch- 90’- 5.8/ Follow that left crack up and through the loose yellow roof and belay on top at tree and big ledge.
21st+ Pitches- 400’+/- 5th/ We simul-climbed at this point, but would have been comfortable soloing as well. Move left down about 30’ to another tree. Climb up through a groove and follow a corner to the right, continue up at a slightly right angle until eventually you reach a large ledge system. There is a chock stone chimney to your left and a crack-chimney to your right. We took the right option, but that required a hard move to get in that chimney and then we had to climb run out 5.8 face edges for about 30’ before we landed the broad area in which you can un rope. I imagine that chock stone chimney to the left is quite a bit easier. Continue up another 200’ or so to a notch left and right below the true summit of Mount Wilson. Another short scramble, maybe 50’, leads to the summit where there is a register (2009).
Climbing Sequence
 |
 |
 |
 |
 |
Climbing Sequence II
 |
 |
 |
 |
 |
 |
Descent
You have two exit rappel options on the route. Sherwood Forest via Dogma and a 70m rope after the 11th pitch and Inti Watana with double ropes after the 15th pitch. After you reach the summit of Mount Wilson you also have two options, the complete walk off via First Creek, which is the scramblers ascent route of Mount Wilson, or the descent down Oak Creek Canyon which does require some rappelling. The most common descent off of the summit appears to be the First Creek descent and the one we used as we had not done it to date. I think it is also quite common because many are descending in the dark and it is easier to just put away the harnesses and the rope(s).In the light the descent can’t be much of an issue. In the dark, keep right as you descend the ridge from the summit of Mount Wilson. Hike about one mile west towards the limestone saddle between First Creek and Oak Creek Canyons and turn left down First Creek. Follow cairns from that point. The only time it cliffs out, you scramble left behind a huge boulder and descend back into the drainage. Follow the drainage all the way out via much boulder hoping and key holing. In the dark, it can take six hours, in the light three hours.
I have the Oak Creek descent featured on the Lady Wilson’s Cleavage page.
Essential Gear
If you intend on combining several of the pitches, you will appreciate having a decent rack plus you are building most stations (some trees). But then every ounce counts on a big route as well. We took a 70m with the intent on combining as much as possible. With that plan in mind, I recommend single from .3” to 4”, doubles from .5” to 3”. Also two smaller C3’s and a handful of wires. Leave the draws at home. Two double length slings will be helpful for the roof sections. We took nine shoulder length slings which was adequate.The route gets quite shaded early in the day during April. 2.5 quarts of liquid per person was enough for us for the entire day, approach, climb and descent. Although there is water on the descent, it is quite algae laden in April. I had a hat and jacket on at many of the belays once we lost the eastern sun. Go with as small a pack as possible as you will face several chimney sections. I would not short yourself on the approach shoes. You will cover quite a bit of scrambling ground on the ascent and descent. Cell phone worked from the summit of Mount Wilson, no worries in 2009.
External Links
- Red Rock Canyon National Conservation Area, BLM
- Red Rock Canyon Interpretive Association
- DowClimbing.Com Red Rocks
FA Comments
“The name "Resolution Arête" did not come up because Geoff "resolved" to go back to it after his first attempt with Newberry cashed out. Though that was a motivating factor to be sure, the way it really went was like this...The first day of the climb ended with us rapping to Sherwood Forest and collecting cactus stalks for a New Years Eve fire side bivouac. In the morning after ascending our fixed lines the first substantial pitch of climbing was a delicate face traverse left and up into a gravely chimney slot with minimal protection potential. [Note: this is pitch 13 in our route description] I watched Geoff lead this poorly protected face like it was a walk in the park and then he disappeared into the chimney. Now back then the Madman was a manly man, he was really large and powerful, (not like the scrawny wimp he's become, umm, He's not gonna read this is he?) and known as an animal on hard cracks, off widths and the like. I on the other hand was a scrawny face climbing specialist and I assumed that if 'ole' monstro could reef on those tiny little layback flakes then it should be a breeze for me. Much to my chagrin, when I got to the crux I unexpectedly popped a flake and went flinging into the overhanging void with a wild pendulum. I came to rest dangling 300'+ above Sherwood Forest, unable to connect with the rock and hearing Madmans' emphatic plea to "GET OFF THE ROPE NOW!" He had also had assumed I would fly across that pitch and when he didn't find any good anchors at the stance in the chimney he just put me on a hip belay backed up by some really crappy wired stoppers behind a dubious flake. The jolt of my fall hit so suddenly that Geoff was ripped off his stance and dragged down the chimney several feet. Two of the three anchors blew out completely and the two of us were literally saved from a fast trip to Nottingham by the Madman’s' shear brute force self arrest and the one remaining marginal stopper. How Geoff ever managed to keep it together wedged like that while I struggled to swing into the overhanging face and unweight the rope is beyond me. It certainly is a testament to his power and drive that he not only saved both our lives but never once thought about going down. We finished the first ascent of the route that day and being that it was new years we needless to say made several resolutions, not the least of which is that; "even if the anchors are marginal at best, put in as many as you can!". And of course there was reference to the well known quote from the old TV. sitcom "The Odd Couple" about the dangers of assuming(*). We had talked about all sorts of names the night before at the bivy but at the end of that second day the name "resolution arête" just sort of made sense. Well thanks for letting me set the record straight! Good anchors to ya.”
Philo
(*) "Never ASSUME, because when you ASSUME, you make an ASS of U and ME."
PEACE philo