
-
 6538 Hits
-
 75.81% Score
-
 6 Votes
|
|
Route |
|---|---|
|
|
37.20914°N / 112.96812°W |
|
|
Trad Climbing |
|
|
Spring, Summer, Fall, Winter |
|
|
Half a day |
|
|
5.11 (YDS) |
|
|
4 |
|
|
Overview/Approach
 1st Pitch- 30m- 5.11
Smash Mouth (5.11+) is perhaps the best pure splitter in Zion National Park. Take Back the Rainbow and Smash Mouth run up the left side of the steep lower western face on Bridge Mountain. Take Back the Rainbow eventually catches a right leaning ramp above the lower face that ends in a spectacular flaring chimney pitch that leads to the top of the wall at the col between Bridge Mountain and its sub peak. There is a delicate arch that can be seen from town with squinty eyes that lies just to the south of where Take Back the Rainbow tops out. Smash Mouth starts just to the right of Rainbow and runs up a short 5.11 crack before moving right and continuing up a 5.9+ corner to a belay ledge below a few bolts. After traversing up and right a bit on the second pitch, you will be into the continuous 5.11 obvious finger splitter which runs to right below the huge roof above. Bird and Greer established the route in 2006 and it sounds like one of them got hit in the face with a hammer, thus the name. Bryan Bird and Eric Draper freed Smash Mouth in 2008.


For me the first 5.11 short face with a ledge under it and the last meter or two at the top of the route (5.11+) were the cruxes of the climb. The true challenge is nailing the sequence one to two meters below the top of the route to maintain a clean run at Smash Mouth, and it is a bit tricky. That first 5.11 crack pitch is somewhat unnerving because of the ledge below and this section of the wall is also dirty/sandy. I advise moving the first belay up to that ledge as it is easy ground to there. The second pitch has the only fixed pro (outside of one bolt below the very top) and is the easiest pitch as it gets you started in the finger crack above. The third pitch requires mostly .3-.4 C4’s and C3’s with some 1” stuff at the top. The fourth pitch was my favorite of the day, giving you a few rest stances and a few small hand jams with intricate moves in between with the crux of the entire route at the end. Smash Mouth is extremely well protected with gear and has modern fixed belays/raps (2011). Only the last pitch belay was hanging.
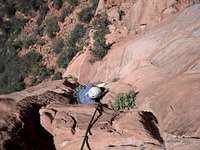
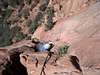
Park as you would for the Headache, Ashtar and/or the Confluence crag, at the last bend before the tunnel on the west end. Follow up the climber’s trail that heads west for the Confluence cragging area. Continue below the Confluence routes circumventing Bridge Mountain’s sub peak. Take Back the Rainbow is directly below the col of Bridge Mountain and its sub peak. The Smash Mouth splitter directly to the right of it is impossible to miss and normally chalked up as it is becoming a Zion (free) classic.
Route Description (s)
300’+/-, 4 Pitches, 5.11+1st Pitch- 30m- 5.11/ Smash Mouth starts up the same corner as Take Back the Rainbow. I advise soloing up to the first ledge and belaying the first pitch of Smash Mouth from there. Move right and continue up the finger splitter on the short wall in front of you. The crux is approximately half way up, kind of a reach to get a dirty hand jam on a sandy mostly featureless wall. Could be the 2nd hardest move of the entire climb. Continue with a few easier hands to the top. Move right into the 5.9+ hand corner. Pull the fun bulge/roof above to reach the fixed belay with a decent stance.
2nd Pitch- 20m- 5.10/ This is a pleasant and fun pitch to enter the finger splitter above. Move up and right following several bolts (four) via edges and a few dramatic moves for the grade. Enter the crack above and belay on a stance at the fixed station.
3rd Pitch- 20m- 5.11/ If not for the last meter or so of the fourth pitch, this third pitch would be the crux pitch of the route. This part of the splitter is sustained with few rests. Start out thin, C3 thin. Follow the crack as it bends left and up mostly placing C4 .4’s. About half way up you can start placing a few .5’s and then 1’s help finish it off. The last third creates a sort of double lip that takes C4 .75's 1’s and allows for a small hand jam here and there for a bit of rest. The finish is awkward as you face climb out right to the hanging fixed belay.
4th Pitch- 20m- 5.11+/ The splitter is basically the same size for this pitch as the previous one, but with more rests and a few more hand jam opportunities. The gear opportunities are somewhat larger, more C4 .75’s and 1’s. The moves are always there, but the last sequence before the fixed station up and left is complex. There is a lone fixed bolt to protect this last move as you are moving left of the crack to reach the anchor. I worked to get both feet facing south on a small feature left of the crack before getting the height I needed to pull through. Very interesting sequential move I thought.
Climbing Sequence
 |
 |
 |
 |
Descent
Rap the route to the ground with a single 60m.Essential Gear
The guide book calls for a much larger rack then we found necessary. Take a full set or equivalent of C3’s; double C4 .3s; triple .4s; double .5s and .75s; triple 1’s; double 2’s and a single 3. We placed no nuts, but a set could come in handy and would be easy to place. Hand full of draws and a few slings. The wall gets a heavy dose of afternoon sun. This is a good winter objective, but is high enough and gets full morning shade, so doable in the hotter months as well.Single 60m rope.
External Links
- The Many Free Routes in Zion National Park
- Oscar’s Café, the only place for climbers to truly fill their appetite (free range chicken, beef and Hank’s Tanker) and meet one of the finer climbers and individuals I know on the face of the earth, Zach Lee, someone who has established many of his own local FA’s in the area.
- Zion National Park
trail conditions or closures, wildlife notices/closures, weather conditions, camping permits, canyon water levels, etc.
- Best True Technical Clothing and Accessories in the Outdoor Industry, Hands Down....the Legit Climbers Gear at Real Prices
- Scarpa, has surpassed La Sportiva in terms of quality, function, value and actually stand by their warranties
- Osprey Backpacks, Not a Second Choice
- Great Outdoors Depot