
-
 5130 Hits
-
 74.92% Score
-
 5 Votes
|
|
Route |
|---|---|
|
|
37.20914°N / 112.96812°W |
|
|
Trad Climbing |
|
|
Spring, Summer, Fall, Winter |
|
|
Most of a day |
|
|
5.10 (YDS) |
|
|
8 |
|
|
Overview/Approach
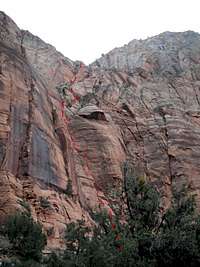
Take Back the Rainbow is an alpine style rock route that offers a great scouting trip of its brethren to the right, perhaps the best pure splitter in Zion National Park, Smash Mouth (5.11+). Take Back the Rainbow and Smash Mouth run up the left side of the steep lower western face on Bridge Mountain. Take Back the Rainbow eventually catches a right leaning ramp above the lower face that ends in a spectacular flaring chimney pitch that leads to the top of the wall at the col between Bridge Mountain and its sub peak. There is a delicate arch that can be seen from town with squinty eyes that lies just to the south of where Take Back the Rainbow tops out. Bryan Bird established the route in late 2005.
 2nd Pitch- 30m- 5.10
The first pitch runs up an obvious right facing corner system to a ledge in a pod below a roof that forms the first crux pitch of the route. Pull the fairly tame roof into what appeared from below to be a wide crack. However, the sustained crack in this pitch is mostly fingers once you get in it. Ascend the steep flake crack system placing mostly finger sized pro to a very comfy ledge with a fixed belay (2011). The third pitch runs up a ramp corner system to the left and pulls what the guide book refers to as the “tongue”, a uniquely shaped rock feature. The next two pitches are mostly 4th/5th class hobbling back up and right to the base of a right facing corner/chimney The sixth pitch involves a short fun and physical 5.10 crux move off the deck to get into a chimney which leads to another short chimney. Climb this second chimney to get to the base of a long right leaning vegetated ramp. Follow it for a full pitch to a tree belay at the base of the last pitch which is somewhat of a vexing flaring chimney. As the guide book states “the final pitch has a left and right option, both of which have given subsequent parties fits.” I led the right option and what I believe Bryan meant to imply was that this chimney can be wet. It was quite wet in May making the start of it the crux of the entire climb. Once through the slippery vertical portion, the rest of it goes much dryer and represents a typical Zion flaring chimney that can protect with a few fours and/or a five and/or six inch piece.
Park as you would for the Headache, Ashtar and/or the Confluence crag, at the last bend before the tunnel on the west end. Follow up the climber’s trail that heads west for the Confluence cragging area. Continue below the Confluence routes circumventing Bridge Mountain’s sub peak. Take Back the Rainbow is directly below the col of Bridge Mountain and its sub peak. The Smash Mouth splitter directly to the right of it is impossible to miss and normally chalked up as it is becoming a Zion (free) classic.
Route Description (s)

800’+/-, 8 Pitches, 5.10
1st Pitch- 35m- 5.8/ Follow up the multiple corner system to a belay in the pod below the roof of the good looking second pitch (flake/corner above).
2nd Pitch- 30m- 5.10/ This is the most sustained pitch of the day. Pull the roof and run your gear as far right as possible. Long sling it so your belayer can easily flip the rope to the outside. I damn near got pulled off at the crux way above because the rope got caught in a 3” cam even though I placed it wide and out to the right. Follow the flake/crack up to the top where a fixed belay/rap chain (2011) awaits on a large ledge. The crack is deceiving from below. It looks much wider than it really is. I placed mostly small cams with a few odd medium pieces. The crux was about 2/3rds up where you have to face climb for a move or two as the crack shallows out.
3rd Pitch- 30m- 5.9/ Run up the easy corner to your left and then continue until below the obvious looking “tongue” feature on the rightward ramp. Pull the tongue and belay.
4th-5th Pitches- 70m- 5th/ These two pitches are just moving the belay in the middle of the route. Continue out right through the brush and downed trees and up a slab (5th) to a slung (2011) tree on your left. From there, continue up and right up a loose gully and cut back left at the top to the base of a short chimney with a fist crack at the base of it. This feature is directly below the large vegetated, left to right, ramp you can see above.
6th Pitch- 25m- 5.10/ The start of this pitch has a fun physical crux move to gain the upper hand crack and subsequent chimney. I got my body opposed (horizontal), feet to the right wall, hands to the left until I could mount a sandy block. From there, easy hands lead into the chimney. Continue to another cleaner chimney and use traditional chimney (5.9) technique to gain it to the top and belay at the base of the ramp above.
7th Pitch- 40m- 5.7/ Run up the easy ramp to a slung tree at the base of a significant twin chimney.
8th Pitch- 30m- 5.9/ This pitch can easily be the crux of the route depending on conditions. I led it when it was wet which made for a burly and slick experience. There are two variations. I traversed right from the tree and began in the main chimney that leads to the top. If wet, it no doubt would work better to start in the left drier chimney and traverse right into the main one above the wet portion. The base of the main chimney serves as a drainage and was quite wet and slick in May. I ran it out until a 4” protected well at the top of the straight up and down wet portion, my back against the slick right wall. Then the angle eases up a bit and the rock is much drier. Continue up the tall flared chimney to the top. I only placed one more bomber 4” and a ticked out 3” near the top. A 5” and/or 6” could be placed, but the chimney is mostly flaring. At the top is a huge tree in which to belay.
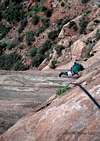
Climbing Sequence
 |
 |
 |
 |
 |
 |
 |
Descent

Move a few meters to climbers left to several small trees on the lip of the wall. In 2011, all rap anchors were in decent shape. A single 60m rope gets you down. Rap from the top trees 100’ to the previous tree belay. Rap from this tree 60’ to another tree. Then 70’ to yet another tree. From here walk back down skiers right to the slung tree in the middle of the fourth and fifth pitches. Rap from this tree walking out right to below the large roof to enter the fixed chain raps of Smash Mouth. Then four single 60m rope raps to the ground.
Essential Gear
Double to 4”. I did use both 4’s on that last pitch, but probably never used both 3’s. If you are not comfortable running out flaring chimney’s, bring a big bro or two and/or a 5” and/or 6”. All that gear will be helpful on the flaring pitch depending on your comfort zone. I only placed two 4”’s and one 3” on it. I don’t remember placing anything smaller than .4”. Neither of us placed any nuts. Helmets, typical Zion rock. Single 60m rope. Extra cordelette as there are quite a few tree raps although all were in decent shape in 2011. Mix of shoulder length slings and draws. Route gets shade until noon in May.External Links
trail conditions or closures, wildlife notices/closures, weather conditions, camping permits, canyon water levels, etc.