
|
|
Route |
|---|---|
|
|
48.16230°N / 121.6178°W |
|
|
Technical Rock Climb |
|
|
Most of a day |
|
|
III+ 5.10b (or 5.10d with Superfly Variation) |
|
|
Approach
Follow the directions on the main page under Getting There. From the trailhead, follow the Eightmile Creek Trail as you would for Silent Running. About 100 yards before the trail hits the foot of the buttress (and the start of Silent Running), look for a steep climbers' trail (class 2+) on the left side. Follow the climbers' trail uphill (over some small slabs) and into the brush. 75 yards from main trail, you should arrive at the base of the buttress. Turn right and follow a faint boot path as it traverses the foot of the buttress. Another 75 yards should bring you to an open area at the base of low angle slabs just right of the prominent, brushy gully that cuts the face of Three O'Clock Rock. Total Soul starts on easy slabs (2 bolts clearly visible) just right of this gully. Alternatively, you could probably stay on the main trail to the base of Silent Running, and then cut back left following the base of the slabs.
Route Description
Total Soul is an 8-pitch delight which not only features great and well-protected (on more serious sections, 5.8+ and up) climbing on solid rock but also the opportunity to top out on the summit of Three O'Clock Rock. All pitches on the route (except perhaps the first) are over 120 feet in length (some are probably as long as ~160 feet) and most are quite sustained. All bolts on the route (including belay stations) look new and beefy (we did not encounter one manky bolt!). With the exception of pitches 7 and 8 (topmost; though 7 has bolts), all belay stations are equipped with rap rings. This makes Total Soul a pretty low-committment route: you can easily bail from any pitch without having to leave gear behind. Though this is the first route we have done in this area (so not really sure how it compares to other routes here), the climbing felt quite varied and included (in addition to the mandatory "slab dancing") nubbin pulling on steep faces and even a couple of finger jams (funky lie backs off of arete edges optional). Listed pitch ratings follow what the topo (link below) provided; Nelson and Potterfield guidebook ratings given when different from topo below (as 5.X N&P).
Some terminology I've chosen to use below:
overlap - a mini-roof in the slabby face formed by one slab of granite "resting" on top of another
roof - same as above just bigger
friction climbing a.k.a. slab dancing - face climbing w/o looking for or utilizing face features (you know, the calf burning flavor)
nubbin pulling - face climbing taking advantage of nubbins and other face features (still calf burning but less so)
Pitch 1: 5.6, 100+ feet. Start up the low angle slab (5.6) and friction climb past 3 bolts. Move straight up the low angle flakes/dihedrals until you reach a small ledge (bolts + rap ring).
Pitch 2: 5.9, 160 feet. Low on this pitch you pick up a 3 inch dike which you will follow for the next 2.5 - 3 pitches. The dike is little more than a 2-3 inch band of lighter colored (different texture) rock but it clearly points the way (much of the time it's useless to you as it's flush with surrounding rock and is in fact slicker than the surrounding rock). From belay, move up and slightly right aiming for the small arch 25 feet above belay formed by a 3-inch thick flake. Perfect gear under the flake. Step up onto the flake and climb past 2 bolts (5.9 slab) aiming for a higher step directly above. Pull over the step (5.8+ or so) and climb the easier slab above (~5.7) past more bolts. Belay on a narrow stance (bolts + rap ring) just right of a right facing dihedral.
Pitch 3: 5.7, 120 feet (5.8 N&P). Move left and exit dihedral onto the face. Friction climb straight up (easy going with plenty of features higher up) past numerous bolts. Belay at a narrow stance (bolts + rap ring).
Pitch 4: 5.9, 150 feet (5.9+ N&P). From belay climb straight up following the white dike up the steepening face. Clip the bolt and higher supplement above with cams in cracks and pin scars in the dike. Fun climbing with finger jams, nubbin pulls and even an occasional friction move or two. Above the route follows bolts (straight up) on the face just left of the right facing dihedral. Move left onto that slab (5.9) and enjoy some 5.9 friction and nubbins above. Hanging belay (bolts +rap ring).
Pitch 5: 5.10b, 140 feet. Move up 15 feet to reach a "v-notch" in the overlap above. Note the "batman bush" on the right (topo below calls it that; hint, hint!). Pull onto slab atop the overlap. Here the route has two options: follow bolts right for the 5.10d Superfly Variation or move up towards the roof and traverse left (20 feet) for the 5.10b Antifly Pitch. We did the latter and it's described here. After traversing left, pull the roof/overlap (5.8-ish) and follow bolts (well-bolted). The going starts with one or two 5.10b steep friction moves followed by ~5.9+ small nubbin pulling (face climbing) which eventually brings you to a paper-thin granite flake. Above flake, move right ~15 feet (ramp) and mantle right onto a short 5.9-ish slab (1 more bolt here; Superfly rejoins the pitch here). Fifteen feet higher the pitch ends on a large comfy ledge (bolts + rap ring).
Pitch 6: 5.10b, 120 feet. This crux pitch (IMHO) climbs essentially straight up starting on the ledge just right of your belay and passes over 3 overlaps. Pulling these roofs or overlaps is relatively easy - it's some of the friction moves in-between that gave me pause. Start up by following flake to face moves (5.8-ish, bolts). Pull the first overlap and move up via more friction (more bolts). The friction section (~15 feet, 2 bolts) between 2nd and 3rd overlaps is the crux: steep 5.10b pure friction climbing (if needed, just see where the lichen is gone for a clue as to how to tackle this). After the 2nd bolt, you can protect the overlap move with your Blue Alien (fixed cam on 7/17/05). Pull last overlap (5.9+ or so) and follow more bolts to a hanging belay (bolts + rap ring).
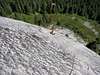
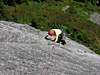
Pitch 7: 5.8, 160+ feet (5.9 N&P). The topo (below) rates this pitch 5.8. I was either tired or thought that a 5.9 rating (at least 5.8+) was more fair here (to be consistent with ratings lower on the route). Whatever you want to call it, it wasn't trivial IMHO. Traverse up and left to a bolt below a roof (friction, 5.8-ish). Continue traversing left under the overlap till you come to some features (and relatively lichen-free path up) that will allow you to pull the overlap. Above follow sparse bolts up and left passing small dihedrals and minor overlaps. It was here that I was happy to have 2 Hybrid Aliens for the grooves. Pretty thought-provoking 5.8 and a little runout (photo here). Belay on a good ledge (bolts; NO rap ring).
Pitch 8: 5.10b, 120 feet. Move left on the slabby ledge to reach the steep headwall with dense bolting on it. Move up the headwall (starts at 5.9 with small knobs). Crux is probably between 2nd and 4th bolts and involves steep friction moves (and/or tiny nubbin pulling). Follow bolts up and right and eventually exit into the blueberry bushes. Belay from trees.
Descent:
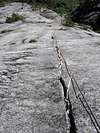
Majority of parties will rap the route. For a vague description of a possible walk off (no first hand info.) see Volume II of Nelson and Potterfield guidebooks. Two ropes mandatory for rapping the route (used two 60m ropes; 50's will PROBABLY work too but that's untested). From the bushes where you finish your last pitch, walk right about 80 feet - note the obvious "Rappel" pointer sign on the tree (photo here). Though you could probably do the first rap as a single rope, we just set up for double ropes right away.
Rappel 1: Rap from the 10-inch thick evergreen with rap slings/rings on it straight down thru. the brush. Look for another rap set up on the left. There SHOULD be a bolted rap anchor on a wall on your left as you're about to rap onto the open slabs - I missed it; if not, use one of the trees. This is probably the only rappel that has some chance of sangging your ropes (lower ones are just smooth slabs).
Rappel 2: Rap straight down to bolts/rap ring atop pitch 6 of route.
Rappels 3-9: Rap the route to the base.
 |  |  |  |  |
Essential Gear
Standard Paraphernalia:
TWO ropes mandatory if you're going to rap the route (though Nelson and Potterfield guidebook make reference to a walk off option). Helmets don't hurt - the rock is clean but there's always loose crap on ledges ready to knock down your IQ a couple points...Quick draws (about 10 or 12 should be conservative) including a good number of double length ones (some pitches meander a bit).
Traditional Pro:
Blue Alien (single; 0.375 inch cam)
Green, Yellow, Red Aliens (double esp. the reds; 0.5-1 inch cams)
#0.75 Camalot (double; 1.25 inch cam)
#1 Camalot (double is nice though probably not essential; 1.75 inch cam)
#2-#3 Camalots (single; 2-3 inch cams)
Yellow-Red and Green-Yellow Hybrid Aliens were very nice esp. on the flaring crack of pitch 7 (possibly in some pin scars down lower as well).
Cam sizes based on supertopo's size charts.
Did not use any nuts but you could bring a handful of small to mid-sized ones to play with.
Route Topo
Total Soul Topo courtesy of Darrington Rock Climbing Online Guide. This is an excellent topo. Dead-on accurate at the time we climbed this route (only thing we brought with us).
 |
Web Links
(1) Nice TR from ericandlucie.com.
More coming when I find them...
More Route Photos
 |  |  |  |  |
More Route Photos
 |  |  |  |