
|
|
Mountain/Rock |
|---|---|
|
|
36.05787°N / 115.47308°W |
|
|
5796 ft / 1767 m |
|
|
Introduction
Traditionally, Sandstone Peak was the hardest Red Rock summit to reach via non-technical route. Indeed, the peak is typically climbed less than once per year, even though it is scarcely 2 miles from a major road. Routes used in the past involved either trespass or a very long approach from the west. This entry describes a legal, relatively fast approach to the summit of Sandstone (and that of nearby Fork Peak).Why is it so difficult to reach the peak? Well, there are problems with 1) rugged terrain, and 2) access rights.
1) The terrain issue.
It is often easy to scramble up Red Rock peaks, simply by climbing to the limestone western ridge, then crossing east on a gentler limestone-sandstone bridge. There is, after all, a sandstone bridge between Monument and Sandstone Peak. Alas, the bridge proves rather difficult, and this section shows you why.First, here is a view of the southeastern side of Sandstone Peak from route 159 (the view looks to the WNW).
 Sandstone Peak, with the Rough Western Ridge
The main peak is labeled “ss” for Sandstone; to the left is the ridge, with the labels G2, G1 (G for gendarme) and Fork. The drop from the top of G2, to the pass before G1, is at least 200 feet. Furthermore, it isn’t easy to traverse around this gap, because the steep smooth sides of G2 drop for at least another 200 feet below the pass. If you could get over G2, you would still have to climb and descend G1, then ascend the near-vertical cliffs of Fork Peak.
Yes, but what about the west side of the ridge? The view below was taken from point V on the map below, and shows these obstacles from the western side. The bases of the gendarmes are much the same on this side, as on the east.
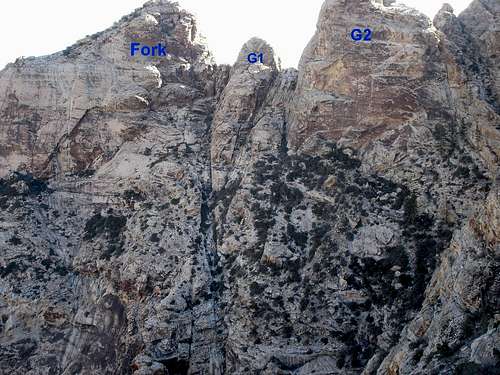 The Gendarmes as Seen from the Back (West) Side of Sandstone
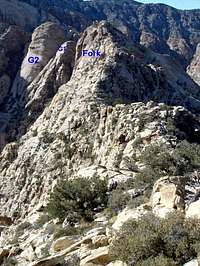
And finally, here is a view from the NW (from locally-named “Far” Peak), just to drive the point home. Also labeled on this view is “N” for Notch – the key to the “easy” route described below.
 View of Sandstone Peak from NW
2) Access.
There is a patchwork of private land near Bonnie Springs, and the entrance to Sandstone Canyon crosses restricted-access Nevada State Parks land. Mule deer graze in the lower canyon, and it is quite reasonable to restrict access so hunters won't shoot them all. In addition, parts of the area were used for cattle grazing until recent times, and there are still fences across much of the area. The grazing rights are probably expired.Getting There
For the best approach, park at Spring Mountain Ranch (SMR) and take their trail system into the canyon. The Spring Mountain Ranch is reached by travelling west on route 159, for 4.9 miles past the turnoff to the Red Rock scenic loop. If you have any doubts about these simple directions, print out the map from the SMR website. The parking fee is $5 (2009), and you are limited by the hours the ranch is open, typically 8AM to 5PM in the winter, but about 8AM to 7PM by spring. Visit the SMR web site and call (702) 875-4141 for the latest hours. I warn you that the level of expertise on the other end of the phone varies a lot; sometimes the phone is staffed by volunteers, who are quite aghast at the idea that people would want to go up the canyon. The knowledgeable folks will just make sure that you understand the time limits. There have been a lot of SAR operations up that canyon, and many rock climbers have parked at the lot and returned well after closing, so the State Park folks are a little cautious.There is another approach that involves parking on BLM land on the road to Bonnie Springs, followed by cross-country travel to the canyon, finally over State Park land. The last crossing is the rub; as you are walking through park land, there are “No Trespassing” signs on the right; one never need cross between them, but technically, you can’t be on that land unless you have paid the $5 fee.
There is also a narrow passage to the SE ridge, which travels entirely on BLM land. I have never tried that ridge; it would probably be very interesting, but possibly technical.
The Hike
The round trip is 6 miles, with an accumulated elevation gain of 2700' if you hit both peaks. Here is a map of the hike: Overview map for access to Sandstone Peak.Waypoints are given at the end of this section.
Park as far W (uphill) in the SMR parking lot as you can. Signs will direct you to the trails; basically take the trails that head W and uphill, eventually cutting left. The SMR trail system merges with a road for a time, climbs a hill, then becomes vaguer and vaguer, until it merges with animal trails. Generally, the rules are: head west and keep on the N side of Sandstone Canyon as long as possible. At one point, a spring on the left – in the main canyon wash – is posted with “No Trespassing”; simply keep to the right (N) bank and avoid the small, fenced-in area.
Eventually you are forced down into the wash, by brush and the lack of footing on the N bank. This is the first, of many times, that a GPS may lose lock on this hike; the canyon walls (and the wall N of the notch, described later) limit the number of satellites the GPS can “see”, and provide confusing reflected signals. (This is a good time to note the steep cliffs on the S side of Sandstone Canyon; you want to resist the urge to take a “shortcut” down these cliffs, which look benign from above.)
Once in Sandstone Canyon wash, continue ~0.7 mile roughly WSW until you come to an obvious large fork. Take the left (SW) branch. The climbing becomes slightly interesting:
 Bouldering up the 2nd wash.
…there is always a class 2 or mild class 3 way around obstructions, and you may find yourself choosing class 3 just to avoid brush.
(At this point I apologize for the quality of the photos. However, the reality is: this tends to be a very dark hike; you have a choice of getting pictures of the route in deep shadows, or getting brightly-lit pretty images that are no use for route-finding.)
After ~0.2 miles in this SW branch, another wash branches off to the left, roughly SE. You can see the wash before you actually intersect it, and at this prescient point have a decision to make: either head up the steep banks on the left side, before the wash, or travel up this new wash for a ways till you reach a significant dryfall, and cut left before the fall. Either approach works, but the map above assumes you choose to climb the bank onto the ridge, so the instructions below assume you head up the bank.
Climb onto the SE (left) bank -- the first stretch is rather featureless rock, after some dense brush – and head roughly SE, then E, always looking for relatively brush-free sections. You are trying to aim between crags (up and to the left), and cliffs in the gully (down and to the right). Depending on your exact path, you will hit another cliff band, which can be bypassed to the left (at this point, there is a “gully” that principally consists of a cliff on the left (N) side). There are a few 40 degree slabs to clamber past; you can always trade brush for slabs.
Soon the brush abates somewhat, and there are steep and loose “surfboards” leading up and left.
Look into the steep wash below and to the S, for the feature marked ‘R’ in the images below:
 Out of Brush, onto Slabs Out of Brush, onto Slabs |  Gully below Notch Gully below Notch |
This distinctive rock, with the rectangular gap on the downhill side, can be seen on much of the route; it is a useful landmark should you get confused. The approximate location of this rock is marked with an R in the map above.
Now turn back E and uphill. You are aiming to reach the “N” (for notch) on the map above; the notch looks like this from below (telephoto, looking E).
 View East to Notch.
The steep cliffs to Fork Mountain are on the right of the notch, then there is a gully in the middle, then slabby rock to the left. The slabby rock is most comfortable if you have sticky-rubber soles; else you may wish to go into the gully. The best route trades off between the gully and slabs. The slabs are rarely more than 40 degrees (off horizontal), but are often covered with slick desert varnish (dark brown), and the potential fall/bounce distance is large.
 DB on Steep Slabs just below Notch DB on Steep Slabs just below Notch | 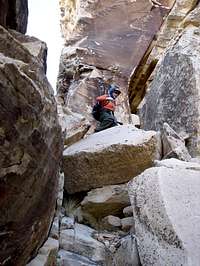 Boulders in Notch Boulders in Notch |  View W through Notch View W through Notch |
Once at the notch, clamber up by the pine tree, up the boulders and emerge into the sunlight on the east side. Hang a nearly immediate right. Hug the wall on the right (there is a steep slope to left) as long as you can. The least brushy route continues up a bowl to the right, and ends up on the N flank of Fork Peak; enter the bowl when the grade becomes comfortable, and continue to the ridge. (As you are heading up this section, make sure that you turn around several times and memorize the features of the notch; you really want to be able to find the notch on the way back.)
At the ridge, you can either cut right to Fork (hey, you might as well), or descend slightly and continue to Sandstone.
 Sandstone from Fork Sandstone from Fork |  Gendarmes from Fork Peak Gendarmes from Fork Peak |
Nothing need be harder than class 2 at this point, but avoidance of class 3 downclimbs will take you off the ridge at times.
Note that the GPS trace on the map shows two routes near the top; the western route is the one described above. On the way back from Sandstone, you can cut directly across two bowls, but the eastern bowl is brushy.
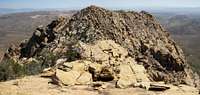
When you reach the low point between Fork and Sandstone, continue up the obvious class 2 ridge to the small, blocky summit. The most direct route involves class 3 clambers, with a few significant jumps across cracks, but as before, a few extra paces always disclose a class 2 route.
The top has good views of Spring Mountain Ranch, Bonnie Springs, and most of the other Red Rock summits.
 View West from near Sandstone Summit View West from near Sandstone Summit |  View NE from Summit View NE from Summit |
Waypoints
(Relative to WGS84):These points are not exact, as they were pulled off the track with mapping software. However, you will not a get a good satellite lock in most parts of the canyon, anyway.
36.073568, -115.443545, "SMR-turn159"
36.070353, -115.458443, "Park"
36.069337, -115.459395, "TrailHead"
36.069692, -115.460366, "Trail1"
36.064928, -115.467031, "trail2-Left"
36.064618, -115.466815, "trail3"
36.063266, -115.469639, "Trail4-right"
36.062736, -115.473291, "trail5"
36.062467, -115.473430, "trail6-wash"
36.060939, -115.480898, "hike1-L"
36.059031, -115.482533, "hike2-L"
36.058193, -115.481839, "hike3"
36.057640, -115.478053, "hike4-Notch"
36.057447, -115.477446, "hike5-enter-bowl"
36.056209, -115.478528, "Fork", "Fork"
36.057870, -115.473078, "Sand", "Sand"
This map shows the location of the waypoints.
Gear
For Red Rock scrambles, I always bring 50’ of 5/8” (2800 lb static) tubular webbing tied to a locking carabiner, and one 20’ pre-tied (water knot) loop of the same strength webbing. I find this system allows me to throw the loop over a large anchor, and clip on the other piece for a hand line, should someone need protection in a hurry. Sticky rubber soles are good on the slabs, but the varnish makes anything slippery. As always, bring plenty of water.This route is normally used in the winter or early spring, and gets very little sun; indeed, it can be quite cold. Yet the low section, down by the SMR, can get very warm. Casual attire with that "layered look" preferred.
And finally: you may wish to put DEET on exposed body parts, and and/or use permethrin-treated clothes. Parts of this route are brushy, and ticks are often abundant. Alternatively, have your partner check you for ticks immediately after the hike.