
|
|
Route |
|---|---|
|
|
44.36680°N / 121.13631°W |
|
|
Technical Rock Climb |
|
|
Less than two hours |
|
|
5.10a |
|
|
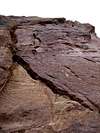
Approach
Follow directions on the main Red Wall page to reach the base of the formation. Paper Tiger climbs the the rust-red colored face on the left side of pitch one ramp of Super Slab. It's the shady face on the right side of this photo. Look for a semi-detached block (~40 feet tall; host to Dances With Clams sport route). Paper Tiger starts out on the right side of this block.
Route Description
The route climbs the 300 foot buttress in two long (for Smith) pitches. In the years we've been coming to Smith, we've only seen one other party on this route. The old Jeff Thomas guidebook (Oregon Rock) describes a slightly different start to this route (which bypasses the loose wide crack on the right side of the huge block as described below). Thomas also breaks up this route into 4 pitches (the bolted belay atop his third pitch is no longer there). The route is a pretty fun outing though it does have some runouts (on 5.7-5.8 terrain) and quite a bit of loose rock especially on pitch two. However, rock quality through the cruxes is good (as is the pro).
Pitch 1: 5.10a, 140 feet. Climb the right side of the huge block at the base. The rock is loose. There's a wide crack (OW) in the dihedral. The going is only mid-5th class. 30 feet from the ground step left into a slot behind the block. Step back right onto the main face into a pod directly below a slightly overhaning bulge with a thin crack through it. Climb through the bulge (this is not the crux according to the guidebook but it sure felt like it). Above, the crack opens to great hands and you start traversing right and up directly under a roof system 70 feet above the ground. There's a passage through the roofs on their right side. Climb up through it past 2 (or 3) new bolts (5.10a but felt easier than the bulge below). The fixed piton mentioned on Watts topo is off to your right (should you desire to keep this adventure "old school"). Above, follow low 5th class ledges/faces up and back left to a bolted belay on a good ledge. Watch for loose crap on the ledge!
Pitch 2: 5.9, 160 feet. From belay ledge, step left and climb the runout and a bit loose face (don't kill anyone below!) up (5.7). The rock gets pretty loose on these lower 50 feet of the second pitch. Pass a small ledge with a small bush off to your right and keep going up. Pass small roofs on the left and reach a crack system (more of a flaring groove in the beginning). Follow the crack system up and through a bulge (5.9) just below a large ledge near the top. Above the ledge, pull 2 more mid 5-th moves up a steep groove and reach the top of the buttress. Belay bolts are off to your left (no rap rings).
Descent: Either rap the route with two ropes (need to provide your own sling/rap ring on the belay bolts) or follow the descent options given for Super Slab. Note that rap bolts for Super Slab at the top of buttress are 20 feet to your right.
 |  |  |  |  |
Essential Gear
Helmets. A set of nuts. Double set of cams from green Alien to #3 Camalot. Several larger pieces (up to #5 Friend) were useful esp. on opening OW crack (short and pretty easy but loose enough so that you'll want a piece or two in there).
Route Overview Photo
 |
More Route Photos
 |