
|
|
Route |
|---|---|
|
|
39.98970°N / 105.29366°W |
|
|
Trad Climbing |
|
|
Spring, Summer, Fall, Winter |
|
|
Half a day |
|
|
5.7 (YDS) |
|
|
4 |
|
|
II |
|
|
Overview
On a day when the Third Flatiron is swarming with climbers, you can still have an excellent route to yourself on the Second. Freeway is one of the best Class 4 scrambles around Boulder, while the South Ridge, described here, numbers among the best east face routes.There is no denying that the Second Flatiron is less stately than its two neighbors--the First and the Third. The selection of routes is also more limited, but the strange formation aptly called the Pullman Car, which tops the Second Flatiron, lends it character and offers good climbing. The other major feature of the Second Flatiron is the South Block, more massive, but a few feet lower than the true summit.
First ascended by Layton Kor in 1959, the South Ridge climbs the left edge of the South Block's east face. Most of it is the usual slab climbing that is typical of east face routes in the Flatirons. After the first pitch, however, the route overcomes a pronounced two-tiered overhang that cuts across the South Block. The crux (5.7) consists of the first tier of the overhang, while the second tier is avoided on the left by a brief excursion to the south face.
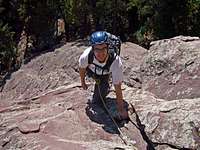 Peter at the end of the second pitch.
The route proper ends on the summit of the South Block, from which one can easily scramble to the gully that separates the South Block from the Pullman Car. One can then walk off to the west, or tackle the south face of the Pullman Car. Rossiter calls the latter finish, which is common to the Free for All route, Southside route. It is the logical complement to the South Ridge, unless one is pressed for time, or chased by foul weather.
If one decides to bail, one can avoid the difficulties after the first pitch by moving to the south face and continuing with the South Sneak route, which is rated Class 3-4 by Gerry Roach, but, according to various other reports, is low Class 5. Once past the overhang, the easiest escape is via the summit of the South Block.
Getting There
From the Chautauqua parking lot take the Chautauqua Trail to its intersection with the Bluebell-Baird Trail (0.6 mi). Continue past the intersection on the trail that provides climbing access to the first three Flatirons. The trail soon forks. Take the left branch, which is marked as leading to the Third Flatiron, but first goes along the base of the Second. Soon after crossing a talus slope, the trail widens and deposits you at the lowest point of the Second Flatiron. That is where Freeway starts. Leave the trail and contour the base of the rock heading left and up for several hundred feet until you are at the foot of a slab under the unmistakeable overhang at the left end of the east face of the South Block.Route Description
The South Ridge route can be climbed in four pitches with a 60 m rope. The total length is between 600 and 700 feet.P1: Climb the slab to a stance below the overhang (5.2).
 First pitch and overhang.
P2: Climb towards a large flake protruding from the overhang. There is a fixed pin in this flake. Pull yourself up on this flake (5.7) and traverse left to where it's easy to gain the sloping shelf above the first tier of the overhead. Belay on this shelf. This crux pitch is short (about 100 feet).
P3: Go around the second tier of the overhang on water polished sandstone; regain the ridge by traversing right as soon as it is easy. Continue up the ridge to a comfortable stance after close to a full rope length (5.4).
P4: Continue along the ridge to the summit on the South Block on easier terrain (Class 4). Pass by a small natural arch.
 Natural arch along fourth pitch.
P5: (optional) On the summit of the South Block unrope and cross into the gully to the north. In front of you is the steep but featured south face of the Pullman Car, which can be climbed along most of its length with moderate difficulties (5.4). Gain the east face of the Pullman Car and continue to its summit on easy slabs.
Descent
From the summit of the South Block, scramble northwest to the wooded gully that separates the South Block from the Pullman Car. From there, you can descend on either side of the Second Flatiron, though it's easier to go around the Pullman Car and join the First Flatiron trail, which borders the west side of the Second and descends to the Bluebell-Baird Trail.From the summit of the Pullman Car, there are two common options. One is to climb down the West Face route to reach the First Flatiron trail. This is the fastest option, but involves a rather tricky Class 4 downclimb. The second option is to rappel from slings at the south end of the summit of the Pullman Car. The number and health of those slings obviously vary in time: Be prepared to back them up.
The rappel is short (less than 100 feet) and deposits you near the top of the gully south of the Pullman Car. From there, the most expedient descent involves climbing up a short slot (Class 3) to a notch west of the main summit and directly above the trail.