
|
|
Route |
|---|---|
|
|
39.98388°N / 105.29228°W |
|
|
Trad Climbing, Scrambling |
|
|
Spring, Summer, Fall, Winter |
|
|
Half a day |
|
|
Class 4 |
|
|
3 |
|
|
I |
|
|
Overview
Want to free solo a natural arch--a delicate one--without being reviled by climbing community and general public? Want to have this arch all to yourself and yet reach it in only a few minutes from civilization? Then the Hammerhead is for you.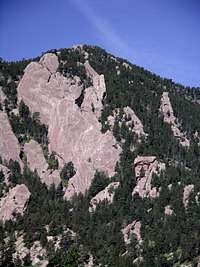 View from the NCAR road
 Royal Arch
The approach is less than a mile from the Bluebell Shelter, the climb is among the best at its grade, and the bushwhacking on the way down is, by Flatiron standards, short and mellow. All in all, an excellent way to spend half a day.
Getting There
The approach is from the Royal Arch Trail. From Chautauqua, follow the signs for Royal Arch to Sentinel Pass. Descend south of the pass for a short distance until, on your left, a trail branches toward Woods Quarry. Stay on the Royal Arch Trail and, from this fork, measure about 100 feet. Look sharp for a very faint climber's trail to your right. Spying through the trees, you should see the base of the Hammerhead some 50 feet ahead, and, if the angle is favorable, the overhanging summit block that gives its name to the structure.Route Description
The route is comprised of two distinct sections. Underneath the arch
The east ridge ends at a small summit, separated from the summit block by a notch. The summit block is intimidating, and the direct finish on its north face looks a very stiff 5.7. Fortunately, there is a much easier option on the west face.
 View from the northwest corner
They say you are supposed to yodel while pulling on the jugs, but I forgot about it, and still did OK.
Descent
Two options are available to descend from the summit block. The first is to downclimb the jug ladder and the ledge. The Hammerhead from Royal Arch
Once back to the northwest corner of the base of the summit block, head down staying to the north of the Hammerhead. Your objective is to reach the Royal Arch Trail from the north at Sentinel Pass. Therefore, after the first 100 feet or so, do not keep too close to the rock, so that you can go around Two Move Rock and the Sentinel Boulders on easy terrain.
Essential Gear
A short rope (30 m) is enough for the optional rappel. A 60 m strand or longer is recommended if you rope up. The usual disclaimer about Flatiron scrambles applies: The technical difficulties are low if you stay on course, but it's easy for the inexperienced to get off route and get stuck. The rock is mostly solid, but will sometimes flake if you apply pressure to it. A fall would likely have serious consequences. Therefore, while accomplished climbers would normally go unroped on Yodeling Moves, this is not a good beginner scramble. If you decide to bring a rope, a light rack will suffice.External Links
Mountain Project's Hammerhead page.Rossiter and Roach's guidebooks cover this route. Roach gives it the coveted "classic" label.