
|
|
Route |
|---|---|
|
|
31.94860°N / 109.9658°W |
|
|
Technical Rock Climb |
|
|
Most of a day |
|
|
III 5.8 |
|
|
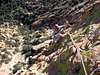
Approach
Follow the directions on the main page under Getting There to reach the foot of the east face of the Dome.
The route reaches the summit of the Dome via the east face in about 6 pitches of fun climbing. Note that this route has a high adventure quality to it (compared to say Moby Dick or especially Warpaint) as there's no bolts on this route (though you will see some bolts on neighboring routes). All belays - including two mostly hanging ones - are on gear. Additionally, there are significant runouts (not enough to warrant an R rating but enough to give you pause) - you need to pull several 5.8-ish face moves with pro way below your feet (and a nasty fall potential......those helpful chickenheads would mess you up!). Be solid at the grade before leading this one.
 |
Route Description
This is a great route! Green refers to it as "the best 5.8 in the state" in his guidebook.
Pitch 1: 5.6 (according to Kerry) - 5.7 (according to Green), 150 feet. Pitch climbs low angle rock immediately left of a large, right-facing dihedral you see from base. Going is somewhat dirty and runout. Move up and slightly left via the low angle rock aiming for the natural small rock bridge with rap slings around it. Move up and work back right (note two bolts above that head up a high angle groove) toward the right. Belay off gear on a small ledge.
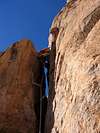
Pitch 2: 5.8, 100 feet. Move up following a right-leaning ramp with intermittent cracks. Going steepens near top of pitch. Note two bolt belay anchor on another route off to your right. Climb up another 15-20 feet higher. Belay on gear atop a small stance at the mouth of a short chimney.
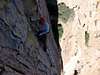
Pitch 3: 5.8, 110 feet. Move up the chimney (5.7+, no pro once inside). Climb face directly above chimney (crux of pitch?) – bit runout and scary. Work your way right toward the arête on right. Climb up the high angle terrain using the nice, positive chickenheads (for holds and pro). Belay when you find the most positive and solid chickenhead about 20 feet below the huge roof looming above. Mostly hanging belay on chickenheads and (limited) gear. A somewhat serious lead at the grade.
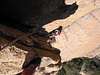
Pitch 4: 5.8, 90 feet. Move up and traverse rightwards (nicely exposed) beneath the huge roof. Pick the easiest line. Again use chickenheads for pro and holds. The roof fizzles out as you near the edge of the face. Move up (crux of pitch and route?) with limited gear some distance below your feet. Belay just above on chickenheads and some gear (mostly hanging). A somewhat serious lead at the grade.
Pitch 5: 5.8, 120+ feet. Traverse left and slightly down on chickenheads (you’re moving back left above the huge roof now) beneath another smaller roof above. The roof above again fizzles out. Move up onto the steep face left of the roof and work up and slightly right. Belay when rope drag stops you (the more you can push it, the less of a hanging belay it’s going to be) on chickenheads.
Pitch 6: 5.7, 80 feet. Move up a flaring groove in low angle terrain when chickenheads run out. Short handcrack brings you to the summit. Two fat bolts provide belay anchor.
Descent:
Bob Kerry’s guidebook offers an excellent topo for the descent. The description is involved but becomes obvious once you realize that the final raps shadow the lower half of route just left on the same face (when viewed from base of climb).
From the belay bolts, move left (west) along the summit ridge. Find another set of fat bolts at the west edge of summit ridge. Rap down (single rope) into the narrow gully. Scramble 100+ feet down the gully (class 2-3) till you see slings on a tree. Do another single rope rap. You should see many cairns following ledges left (left as you’re looking down) out of the main gully system. Hike these ledges following cairns through a minor saddle and scramble down a steep class 3 gully. You’ll see another tree with slings at bottom of gully. Rap (single rope) to the next tree with slings. Rap again (single rope) from the tree to the natural, small rock bridge mentioned above in pitch 1 description. Last rap from this bridge brings you to the ground and your packs.
 |  |  |  |  |
Essential Gear
Many small to medium sized nuts.
Extra slings (doubles and triples) for tying off chickenheads.
Single purple and blue Aliens.
Double cams from green Aliens to #3 Camalots.
#3.5 Camalot was used but is probably optional.
Route Topo
 |  |
More Route Photos
 |  |  |  |  |