
|
|
Route |
|---|---|
|
|
39.04712°N / 106.9589°W |
|
|
Hiking, Mountaineering, Mixed, Scrambling |
|
|
Summer, Fall |
|
|
A long day |
|
|
5.2 (YDS) |
|
|
III |
|
|
Overview
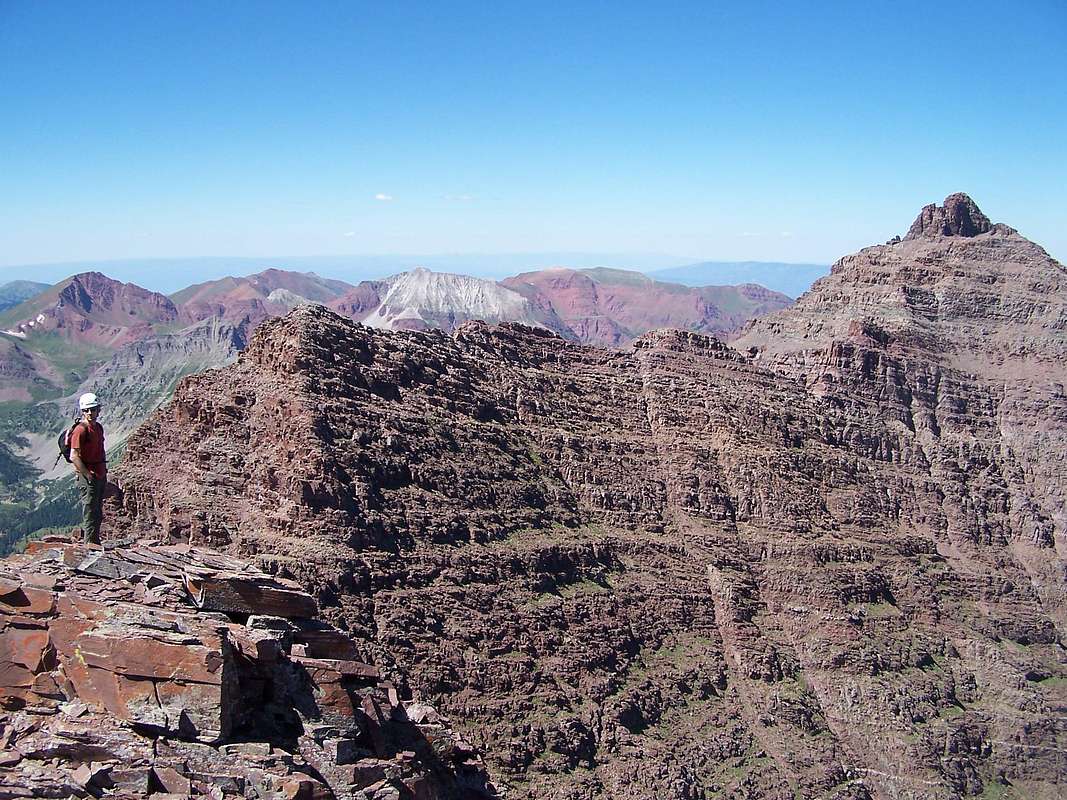
Myself and the northern half of the ridge traverse
If you enjoy ridge climbing, distance and loose rock, then this ridge is definitely for you! In the span of roughly two miles, this craggy ridgeline takes in four distinct peaks with the option of a fifth unnamed and unranked point. The peaks that are located on this ridge are: Pyramid Peak (14,018’), Thunder Pyramid (13,932’), “Lightning Pyramid” (13,722’) and “Len Shoemaker Peak” (13,631’). The fifth point lies in the center of the ridge near Thunder Pyramid and is 13,812’. Although in all fairness, it looks like a massive crumbling morter shell.
Most of the scrambling will be 3rd and 4th class with generous exposure. There are small sections of class 2 and a short 5th class dihedral (doesn’t require rope) that gives this route its rating.

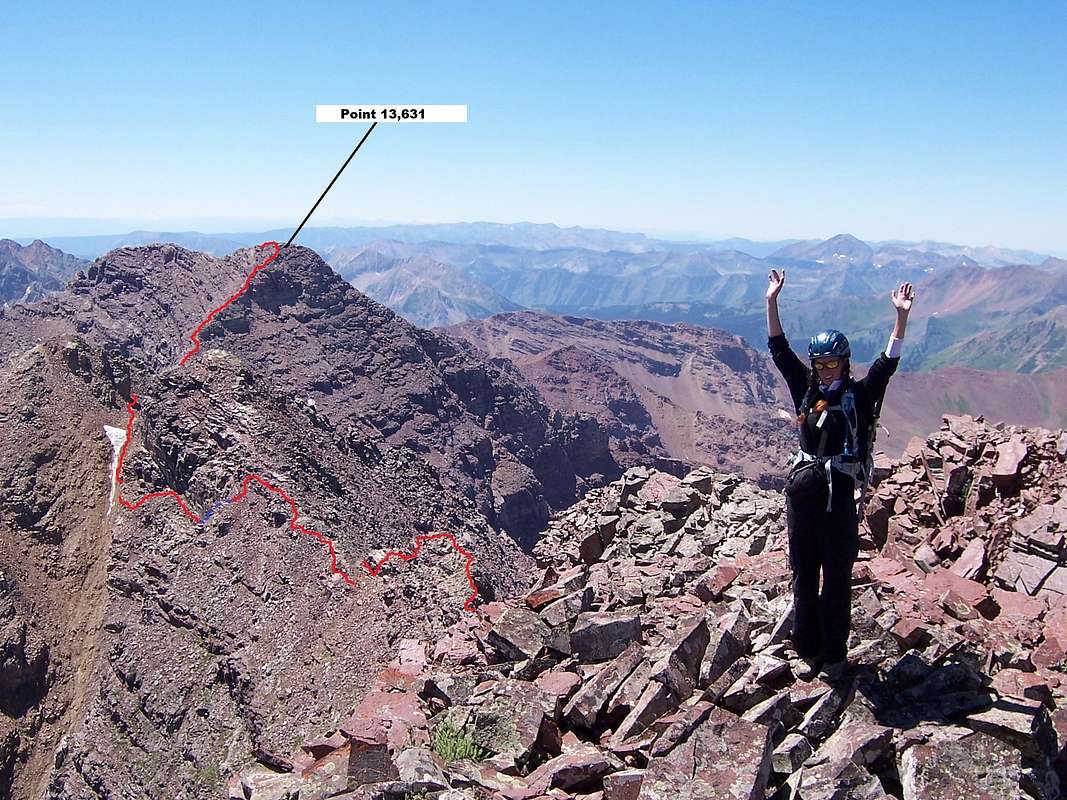
Point 13,631
One of the features that isn’t initially obvious is that there are no cairns. I suppose there could be a sporadic few but in the two times I’ve done it, I placed only one cairn. If there were any before or since, I would guess most have crumbled back into the ledges. So possessing astute route finding abilities are going to be key with this route.
Also, if the weather turns foul, this is a bad place to be. Escape from the ridge is difficult being most of the lower flanks are made of loose and fractured cliffs. The whole ridge is sedimentary rock. You can pick up any piece of ‘dinner plate’ rock and see the ancient mud layering from the old lake bed. It’s actually pretty cool!
This won’t be a popular route either due mostly to the Maroon Bells and Pyramid Peak (Fourteener’s) hoarding all the attention. One end of this ridge is anchored by a Fourteener that most people use as their introduction to class 4 climbing. At the other end lies a nondescript mid-13er. So the only interest in this ridge is going to come purely from an interest standpoint. If solitude is what you’re looking for, the Pyramid Traverse is for you.
Getting There
From the large round-a-bout just west of Aspen, take the Maroon Lake Road spur southwest for 9.4 miles to the Maroon Lake trailhead. Don't mistake this for Castle Creek.The “getting there” section on the Maroon Peak page is pretty good with additional information.
Approach
Leave the Maroon Lake trailhead and strike out west on a great trail for approximately 1.6 miles. Since this is a ridge run, you’ll have two options, starting at Pyramid Peak (north) or at UN 13,631 (south). Leave the West Maroon Creek trail on a climber’s path due south towards Pyramid Peak. Ascend Pyramid Peak via its standard NE Ridge route or by way of its lesser traveled NW Ridge route…your choice. And as Gerry Roach would say, “Consider your future.”If approaching this ridge from the south, truck on past the Pyramid approach and keep following the well-maintained trail to Crater Lake (2.2 miles from the trailhead). Pass Crater Lake and keep hiking for an additional 1.3 miles to where the trail crosses Maroon Creek (can be tricky in the spring). This is where things can get a bit confusing. You will need to pass the ‘bent tree’ that marks the approach for South Maroon Peak. Cross West Maroon Creek. On the other side of the creek, no more then perhaps 40 feet or so, look for a small, shin-high cairn. There will be a partially hidden path coursing through the thick vegetation in an eastern direction towards some apparent cliffs. This will be your avenue up and into Len Shoemaker Basin.
The climber’s path through these cliffs is steep and loose. But it is marked by a few cairns. Once in the upper basin, fill your bottles by way of the stream as this will be your last source of water until the Maroon Creek trailhead is reached again. Trek due south through the grassy and scenic basin towards a very apparent scree slope; trust me, ascending this slope isn’t much fun but there is a broken trail that leads up to the ridge.
Reach the ridge line and scamper south (right). Follow the ridge upon broken ledges and atop the crest to the summit of 13,631. While on the summit, you might as well, ‘consider your future’ again...
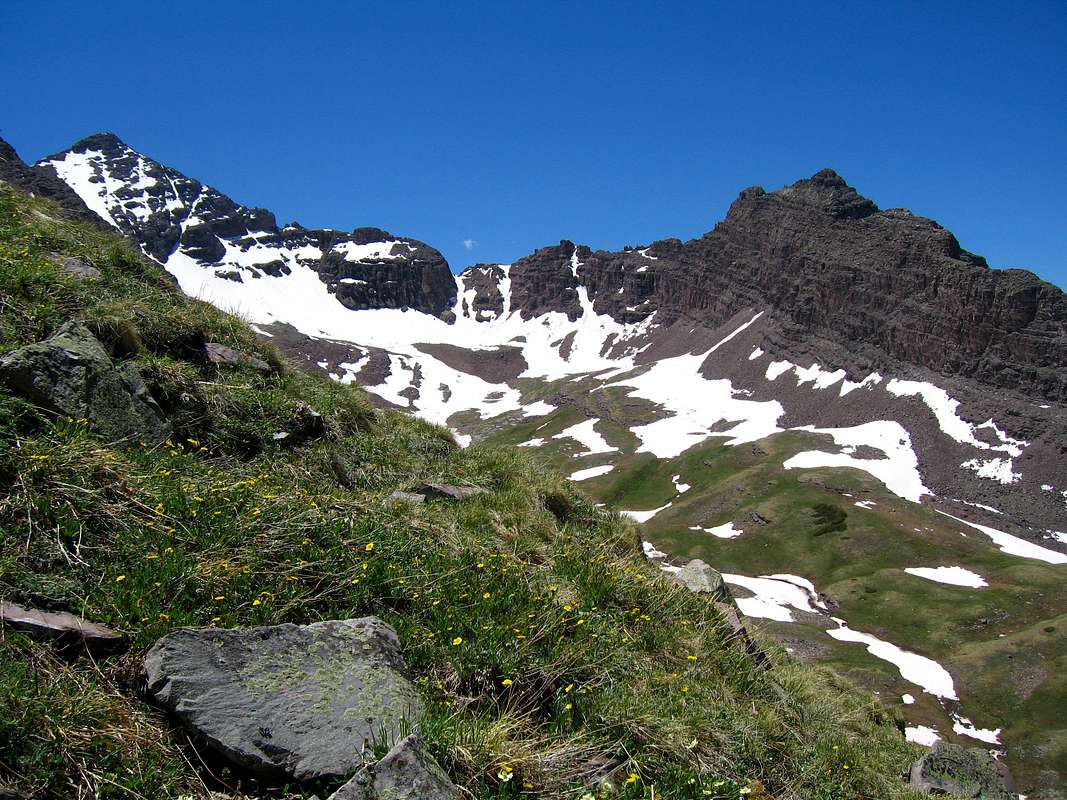
A look down at Len Shoemaker Basin. --Matt Lemke
Route Description
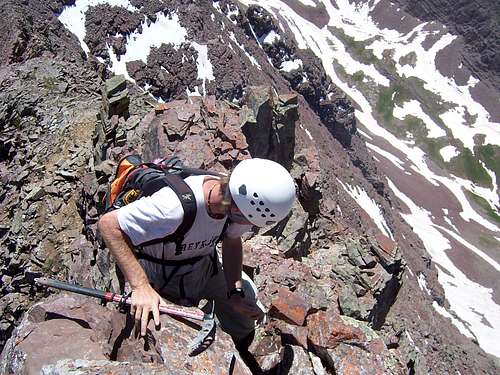
Part of the airy 4th class down-climb between Thunder Pyramid and "Lightning"
(13,631 to “Lightning Pyramid”)
Leave the summit of 13,631 northwards and backtrack to the low point on the ridge where the scree slope melds. This short segment is nothing more than class-3 on ledges, some fractured and loose and by scrambling along the ridge crest. Most of the rock is loose. Exposure is moderate. From here on out, most of your time will be spent on the east side of this ridge or directly on the crest. There are a few sections where you’ll have to cross over to the western side. In terms of exposure and steepness, I really don’t know which side is worse; although the western side did ‘feel’ steeper…less forgiving in the advent of a fall.
Hike/scramble north leaving the saddle. Stay on the crest initially. Most of the climbing to “Lightning Pyramid” will be loose 3rd class with odd sections of 4th. It is possible to follow just below as exposure at this point is mellow. Eventually, the cliffs and rotten rock will force you to the eastern side. I can’t rightly say which path to follow, simply follow that of the least resistance. While on the eastern side, you’ll notice a 60-foot wall, climbers left. Contour your route closer to this wall and hike along it. There will be a dirty & chossy, short 4th class up-climb to regain the ledges closer to the crest immediately after this wall. Climb up and retake the ridge.
“Lightning Pyramid” from here looks impossibly broken and fractured. The nature of the rock really is impressive and multiple times I asked myself, “What in the hell are you doing here?” There are some short, nervous down-climbs punctuated with ledged traverses. But keep to the crest if you can. Your footing will be more secure.

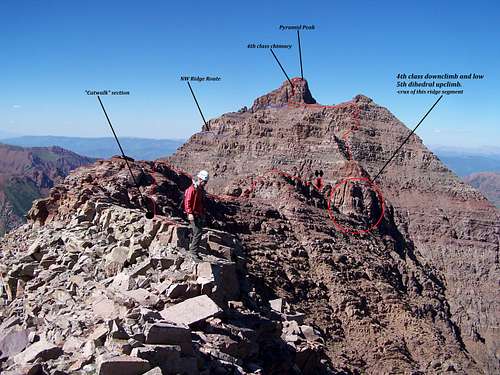
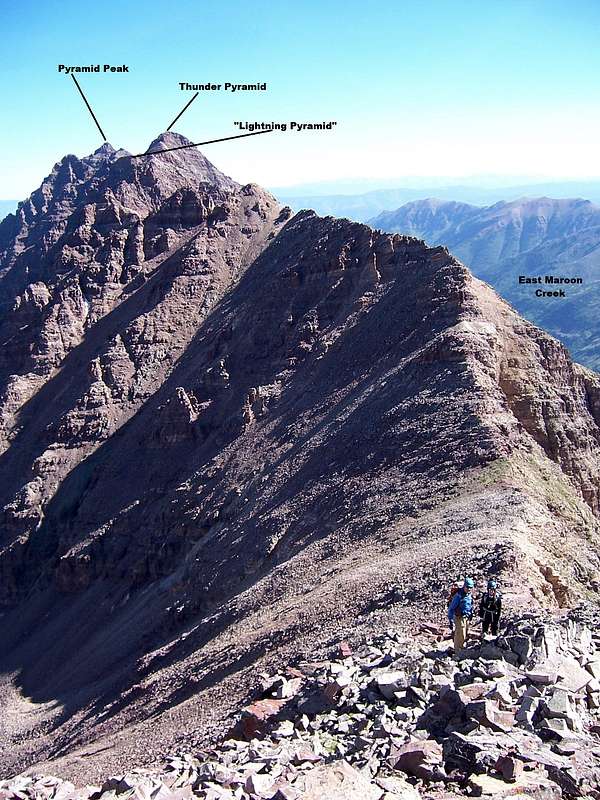
Labeled View of the ridge
The final pitch before attaining the ridge of “Lightning Pyramid” rears up suddenly and appears insanely loose, which it is. Climb straight up the slope on small ledges and holds. Exposure is high but the crest is decent enough. There will be one last move requiring a mantle to reach the summit. Reach the summit of “Lightning Pyramid” and have a good break. The views of Thunder Pyramid from here are sobering.
The climbing will get more difficult and rock will only get worse from here on out. But this section is the one most people don’t do. So congratulations!
“Lightning Pyramid” to Thunder Pyramid
The ridge climbing from “Lightning” to Thunder (or reversed) is mostly 4th class. It’s the segment that gets climbed the most frequently. I’ve done this section in both directions and I feel going south to north is the safest and easiest as this will allow you to up-climb the 4th class cliffs. It is an absolute MUST that one check all holds along this ridge section as exposure is pretty high.
The descent off “Lightning Pyramid” is an easy 3rd class catwalk on [surprisingly] solid rock. This will deposit you back onto loose, dirty sedimentary rock at the col between “Lightning” and Thunder. The couloir that runs west back down into Len Shoemaker Basin from this col is an ascent or descent option if the weather turns bad. It is steep and usually holds snow well into August. I measured it (snow) during a summer descent at 48°….then promptly slipped and fell ten feet later. I slid for perhaps 15 feet before I self-arrested.
Leave the col and climb the small buttress that immediately presents itself. This is an easy short 4th class climb. Stay to the crest along this section when possible because the slopes on both sides actually get steeper and the ledges seem to become more cluttered with scree and choss.
Once atop the small buttress, keep scrambling atop the crest. Aim for a small dirt (apparent lack of rock debris) col. I suppose from this small col, one could climb the small cliff back to the ridge crest but with the bad quality of the rock, I wouldn’t trust anything. Contour east out of the col down the obvious dirt gully. Descend for perhaps 40 feet, give or take and traverse north along the eastern side along small scree ledges. There will be a short 4th class up-climb (looks like a social trail). Take this back to the ridge crest. Keep following the path of least resistance. The ridge will alternate between 3rd and 4th class. There are certainly opportunities for 5th class climbing but nothing I would trust as an anchor or for holds. Some portions of the crest will flatten out into nice break areas. Eventually, the western slope will reach near vertical and the eastern side ledges will scamper down to almost miniscule ledges forcing you to stay on the crest. This is where the exposure is almost extreme and a good hunk of sustained 4th class will be encountered. This section reminded me a little bit of the 4th class ridge in between K2 (Capitol Peak) and the Mt. Daly saddle. Just remember to test everything.
The eastern slope will eventually relent as will the crest start to broaden out again. Contour back to the eastern side and follow the path (up climbing) of least resistance. The difficulty will drop back to 3rd class to the summit. This is also where you might run into a cairn or two as the White Gully (spring snow climb) exits before turning to steep rock on the western side. Enjoy the summit. Thunder Pyramid has without doubt, some of the best views of all the Elk Mountains.
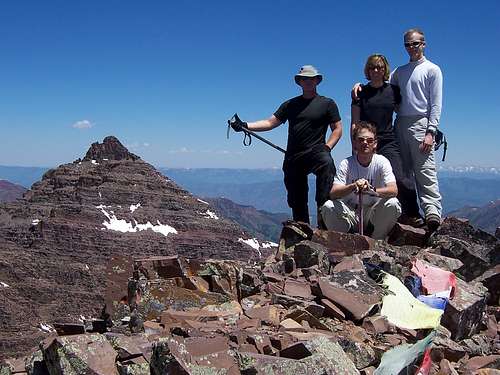 A group picture of our climbing party on the summit of Thunder Pyramid. L to R: Marc, Myself, Jamie Nellis, Jamie Princo | 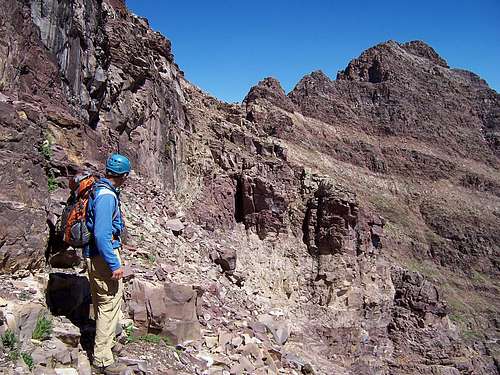 John Broadbooks gazing up at "Lightning" on the traverse from 13,631. This is a view from the lower eastern slopes. | 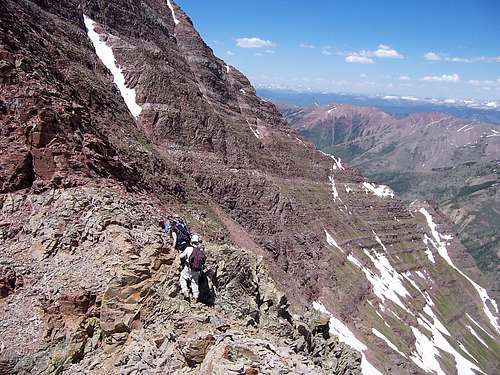 The saddle between Thunder Pyramid and "Lightning Pyramid." Myself & Jamie Nellis. |
Thunder Pyramid to Pyramid Peak
This last segment I believe you can count on two hands the total number of people to have climbed it. Route finding is the toughest along this section but it also contains a generous class-2 ‘catwalk’ immediately preceding the 5th class crux. There is a lot of traversing along this section and major portions spent on the western side.
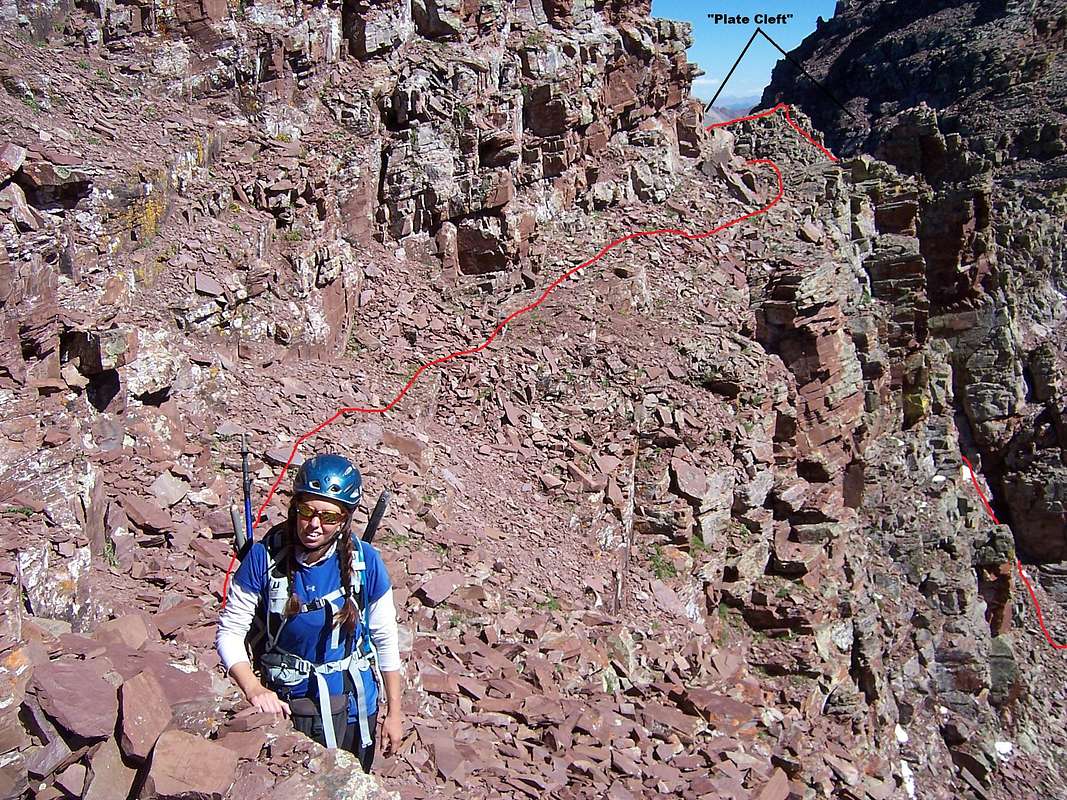
Another labeled view of the ridge leading to Pyramid Peak
The descent off Thunder Pyramid is 4th class. Multiple moves requiring mantling and lowering are necessary. The downclimb is roughly 150’ into a small rubble filled col. If the weather is questionable, it is still possible to traverse back (south) onto Thunder’s western slope and join up with the standard route. Undoubtedly you’ll run into small cairns guiding the way. The fifth unnamed and unranked point (13,812) is immediately encountered. Climbing this upturned ‘munitions shell’ looks flat out dangerous as it is steep on all sides with no good ledges or upon closer inspection, even the holds are fractured. There is a partially hidden ledge system that contours around this on the western side. It is more apparent the closer to 13,812 you scramble. Follow this around staying well below the ridge crest on the western side. There are a few steep gullies that this system will traverse across.
Switchback up towards the ridge after a few hundred meters. You won’t be able to attain the crest (if you do, they’ll be cliffs that will have to be negotiated) but this will grant you easier traversing just below. Most of this section alternates between class-3 and 4th. Keep glancing upwards (climbers right) whenever a break in the crest appears. I marked one of these ‘plate clefts’ with a cairn at the top. Scramble up this loose, dinner-plate filled gully to the crest. Another ledge system will appear again, on the western side. Follow this steadily upwards traversing. The ridge will gradually flatten out and it will become easier to attain the crest. This actually leads to the flat ‘catwalk’ section. Walk across this for a short distance. Pyramid Peak is tantalizingly closer. At the northern end of this class-2 section lays the 5th class crux. There is a modestly-sized cairn at the tail end of the catwalk, CAREFULLY downclimb this edge into a sizeable gap. The climbing is 4th class, steep and insanely loose.
On both instances, we down-climbed this going one at a time. At the gap, it will appear that you can contour back to the eastern side; this side cliffs out. Looking straight up is like looking up the bow of a massive, fractured red Titanic.
Look for a short and shallow recess across the small col. Aim for this short 4th class up climb. This will deposit you at the bottom of the 5.2 dihedral. Climb this for 15 feet or so to a small ledge. The route from here looks irretrievably lost. Follow the ledge climber’s right over to the eastern side. The ledge will peter out into smaller broken ledges before all out ending at a steep dirt gully.
Cross this gully on questionable holds, scampering over a small lip to the massive eastern slope. From here, you’re about a couple hundred feet below the ridge crest. Climb straight up the slope on dirt and scree ledges, mossy and thistle covered patches. The slope pitch will relent. At the top, the difficulty drops to a class-2 hike until the 4th class chimney on the NW Ridge route is encountered. This will lead directly to Pyramid Peak’s summit. Take the standard route down and enjoy the abundance of cairns.
Essential Gear
Leave your rock shoes at home. You’re likely to twist an ankle and cut your feet up on the sharp rock. Also, leave the rope in the truck. There’s nothing stable enough along this ridge to trust as an anchor.Bring plenty of fluids as the last source of water is the small creek in Len Shoemaker Bain then again, back at the Maroon Lake trailhead.
In addition to a helmet (a must), I thought having a smaller length mountain axe to be helpful and in hindsight, gloves wouldn’t be a bad idea either.
 |
 |
 |
 |